Some days are just like these… you have an idea in mind and it just doesn’t get away… it sticks in your head and even though work is busy the idea keeps lingering until satisfied. This is exactly what happened with this giant bundle of leek I had sitting on the kitchen table. I pictured them nicely cooked and golden and set on a dough… but what kind of dough??? A puff pastry would have been good but then that would postpone eating the leeks… a pizza dough would be the same… a regular sable or short crust pastry would be too crispy…
That’s when I remembered about a leftover of brown rice I had. And I love brown rice dough. It gives texture and a delicious flavor. But that still wouldn’t make it soft as a pizza dough. No problem, I added a bit of baking powder, resulting in a new texture for the dough rolled 2mm thin. The rice gave a granular texture as plan, the baking powder a fluffy one as plan too. This totally improvised recipe was a total hit! And we were so curious about trying it that I didn’t even took a good shot of it! 🙁 but I surely will make some again soon, before the leeks are gone for good, because spring is just around the corner. The red plum tree is in full blossom and the other plum trees are in full bud ready to burst at anytime now!
Leek tart (4 servings)
1cup of brown rice, cooked
100g of flour
4tbsp of oil (or butter)
a bit of water
1tsp of baling powder
Salt and pepper
5 large leeks
Attention the brown rice needs to be cooked prior to starting the recipe!!!
Wash and cut in strips the leeks. In a pan grease cook then at low heat until soft and golden. If you want to make the process a bit faster add a bit of water now and then.
While the leeks are cooking, pre-heat your oven to 200deg, and in a bowl mix the flour, oil, brown rice. Add the baking powder and a bit of water. Knead until the down is homogeneous. You can water if you fill it is too stiff. Roll the dough to the shape you want about 2-3mm thick. Top with the golden leaks, and set in the oven for 15-20min. Enjoy!
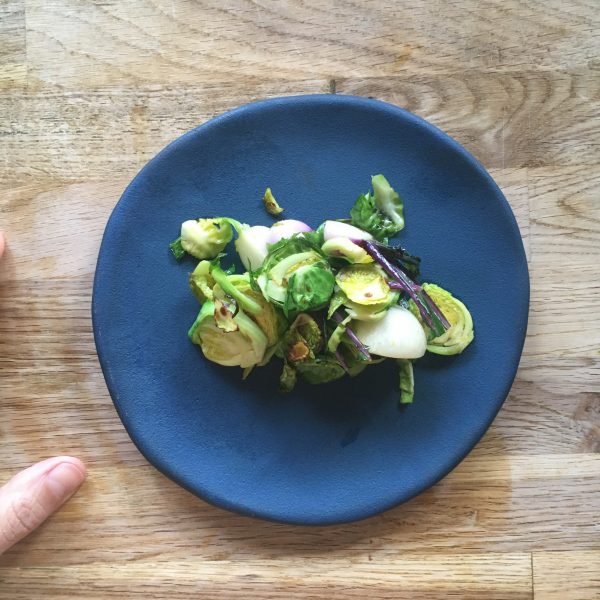
A., and I too, are big fans of Brussels sprouts. Anytime there are some at the farmers market I would bug some even ic sometimes there are sold in tiny portions of 5 or 6! A few years ago we tried growing some in our kitchen garden, hoping for a consistent harvest, but once again the slugs and caterpillars were too quick at first and since then the plants grow leaves every year but never sprouts… I keep them thought, just in case!
Another winter favorite is turnips. The small and firm turnips of all possible shades from white to purple. That we never tried to grow yet… but they are easy to find by rather big bundles.
With these two in my basket I came up with a super delicious recipe, perfect for a side or starter. that can be eaten at room temperature or just warm: a beautiful and colorful plate of Brussels sprouts and tiny pink turnips. I dressed them in olive oil only bug you could easily think about adding a few drops of yuzu juice, or even more Japanese, a white miso and yuzu light sauce. So let me share my recipe.
Turnips and Brussels sprouts salad (2 servings)
6 Brussels sprouts
6 little turnips
1tsp of olive oil
Salt and pepper
Optional: a few drops of yuzu juice or grated yuzu peel, 1 tea spoon of white miso
Wash carefully the vegetables. Slice the Brussels sprouts in 4 or 5. Cut the turnips in 4. If you can’t find tiny turnips then slice them. In a heated pan add the olive oil and the vegetables. Cook while stirring gently for 5 minutes. Add salt and pepper. at this stage you can serve. Add if you want to use them, the yuzu juice and/or the grated yuzu peels. If you use white miso, stir well the yuzu juice with the miso and too the vegetables.
Voila! Really not difficult and soooo scrumptious.
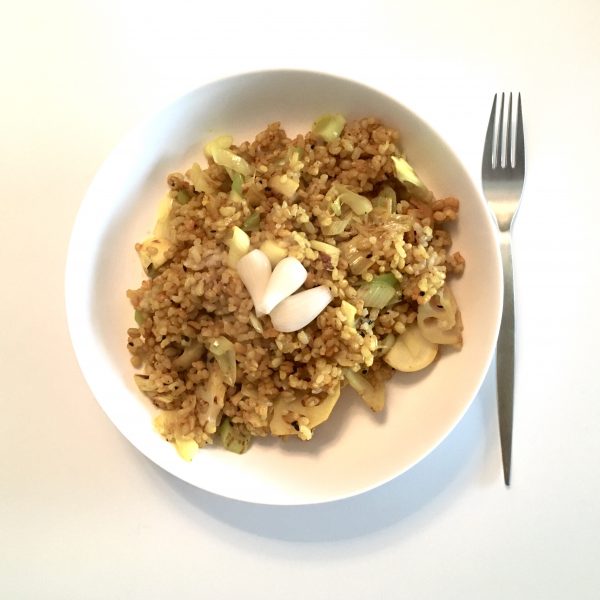
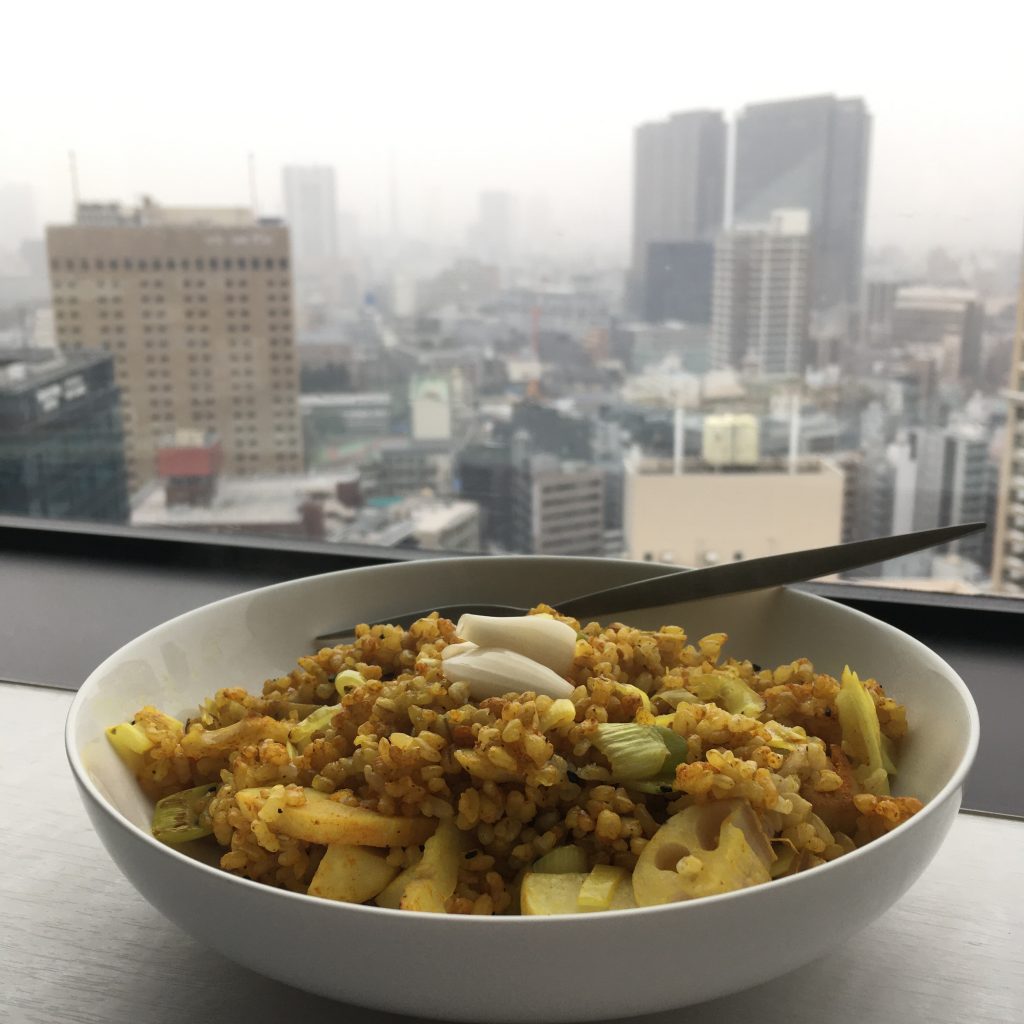
Many of you may be familiar with golden milk, this Indian drink with turmeric and milk, rooted in Ayurveda. Not that I am a fan of it, but borrowing the idea, I prepared myself a warming and bright lunch on a snowy day. Snow doesn’t fall often in Tokyo. Usually once or twice a year in January and March. It is very sudden, it snows a lot for a few hours to cover everything under a beautiful white blanket, and then the next minute is sunny and the blanket melts into a mess of mud and ice. But for a few hours it is magic. The city becomes suddenly quiet.
So before going outside for a walk, what best then having a warm lunch? A what if it is not only warm, it is also bright and full of flavors? That’s how I came up with this golden sautéed rice recipe.
Golden rice (2 servings as main dish)
1 cup of brown rice
1 or 2 leaks
3 little turnips or 1 large
1 little lotus root
1tsp pf curry powder
2tsp of ground turmeric
Ground black pepper
A punch of salt
1tsp of vegetal oil
6 rakkyo (optional)
Cook the rice. Wash and cut the vegetables. In a pan large enough, heat the oil, add the vegetables and cook while steering. Add the rice, the spices and pepper and steer very well. Serve and top with the rakkyo. Eat while watching the cold outside!!
A few weeks ago I started to think about how much I love the French gingerbread called pain d’épices, that I don’t recall seeing any in Japan and that I never made some… It is heavy in the hand, yet light when eaten, with a beautiful golden color and flavors and aromas that sparkle in the mouth, and the texture is a very melting one. One of my favorite pain d’ épices of all time is that of my horse ridding teacher. She has a gift not only for gardening but also for cooking sweets. In summer during intensive training camps, she would bake while we would play around with the horses, and make fruits charlottes with the fruits from the orchard. In the fall or winter she would make pain d’épices. I was so found of it that I remember asking her the recipe, and she told me she just mixes 1kg of flour with 1kg of honey. I was probably 12 when I asked but I still remember this recipe because it didn’t make sense for me at the time, honey and flour, that’s it, really??? and I never tried, too scared of wasting 1kg of honey!
But when I started to look at how to make pain d’épices how surprised was I to see that, this is indeed the recipe for classic pain d’épices from Reims. What I didn’t know then was that the mix, with spices added, should be kept days or weeks to start the fermentation that will guarantee the fluffiness. Last year I would probably have been very skeptical trying such an attempt, as I was not very sure how all this fermentation worked, but since I made my sourdough Lois I feel a lot more confident to do flour base fermentation. Finally, last week I decided to start the experiment and prepared a mix of 600g of flour and 600g of honey together, some said that adding the spices at that stage would increase the development of aromas, so I added them too. I left the preparation in a container under a lid the whole week at home (with the winter temperatures settling in, the house temperature is about 5 to 9 now, so no big risk of seeing things rotting, or mold developing!!!!) And today I just found my mixture, it hasn’t changed much but it is not looking bad at all so I prepared it and baked it. The result???
A perfect pain d’épices! The look, the color, the texture, the smell… Exactly as you would find on in France, a happy A. and a happy me, eaten it with a cup of Christmas tea at tea-time or for breakfast. We even used it for toasts with cheese for me and some pork paté for A. and we were very satisfied. The recipe is very simple and except for the one week wait it is very simple to make. Definitely a must do again one. This recipe is will become a new classic like my pompe a l’huile.
Pain d’ épices (1 big loaf or 2 smaller)
600g of flour
600g of pure honey (liquid is easier but creamy can work too)
1tsp of ground cardamom
1tsp of ground cloves
2tsp of cinnamon
1 ping pong size piece of fresh ginger, pealed, grated or chopped thinly (I use fresh ginger because it is easy to find and I just chopped it roughly but you may use ground ginger, then 1/2tsp should be good enough)
water
additional 1/2tsp of baking soda (if your rise time is short)
About 5days to two weeks before you want to bake your pain d’epices prepare the dough. For that, in a container with a lid mix the honey the flour and the spice. If your honey is really to creamy and hard too work you can melt it in a pan at very low heat to liquify it. Stir to incorporate all ingredients. I used a spatula to do that as the mix is way to sticky to put hands in. One everything is well incorporated put the lid on the container, and let rest for as long as you want, but at least a few days.
After a few days, the spices may have start to color the dough a bit but it may not have changed much otherwise. When you want to bake your pain d’epices, pre-heat your oven to 150deg, just add a little of tepid water to the mix to soften it and knead. The dough is sticky but not terribly sticky. If you think your rise time is rather short (just a few days), you may want to add a little of baking soda now, to ensure perfect fluffiness. Knead and add water to obtain a compact yet smooth dough. Using parchment paper set in a cake dish or split in two and make two, or more. And bake for about 2h if you make a big one (check with a knife or stick if the dough is well cooked inside), for 2 smaller, about 1h should be enough.
I made a very large one and baked about 2h at 150deg, but wasn’t sure it was perfectly baked so I finished with 10 min at 180deg just to be sure. Let cool down before cutting and eating.
Pain d’epices normally keeps well, this is tone he purpose of the original recipe. But in our house, we didn’t had time to see how long it can keep!!! We’ve eaten it in a snap!!!
Look at this beautiful color and perfectly dense but bubbly texture!!!
I always feel excited when the days are becoming short and colder. Spending time outside when the sun is high, and as soon as the sun sets down, it is time to sit for hot spicy tea, a slice of cake or a piece of something comforting. I bake Provencal pompes a l’huile, panettone, or brioches. This is an habit I took when we were in Florence, and I cherish it very much. I also like to go for a walk at night and see the illuminations. Tokyo is really good at creating a festive atmosphere, would it be for the new year, the cherry tree blooming, the summer fireworks… there is always a good reason to decorate and makes us feel like little children.
Christmas decorations at Mitsukoshi Nihonbashi
But when I look at western magazines and IG feeds, it is all about festive food, or so-called, but it is just an accumulation of decadent food, that I must say is a mood killer for me. Rich buche de Noel or Christmas cakes, menus with heavy terrible food such as foie gras, or very creamy things I am just running away from these. I don’t like most of the fancy food: truffles, caviar, oysters, foie gras. and all these pictures instead of appalling to me they only make me crave for simple food, nourishing and warming yet elegant.
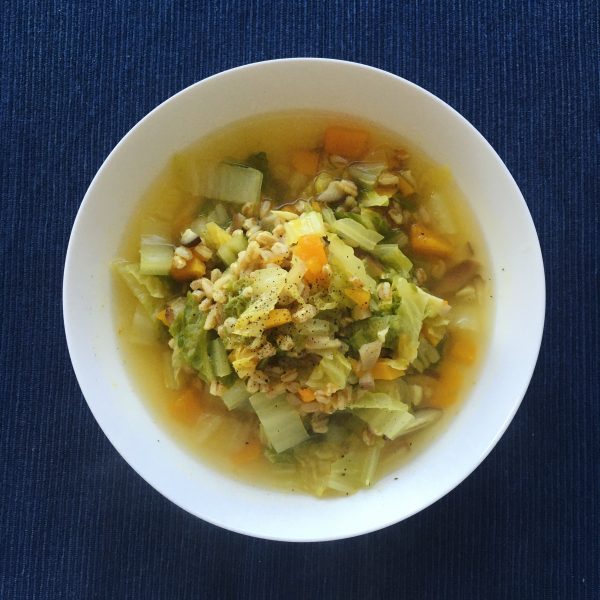
This is when I make more often than ever ochazuke and soups with vegetables and grains. I really love a warm bouillon with some nourishing pasta or rice or chickpeas, lentils, spelt, beans… Today I came up with a super delicious recipe, so I am very happy to share it now!
Farro winter soup
1cup of farro
1/4 of Chinese cabbage
1/4 of butternut squash
8 shiitake
1tsp of turmeric
1/2tsp of ground cumin
1/2tsp of cumin seeds
Wash the cabbage and chop it. Same with the shiitake. Peel and cut the butternut. Put them all in a pan and amply cover with water. Add the farro. Cook at high heat to bring to a boil, then cook for 30min at medium to low heat. Verify that there is still enough liquid, add some if necessary. Add the turmeric, the cumin powder and seeds, a big of salt and pepper. Give a good but gentle stir and serve. Eat hot. No need for an drizzle of olive oil in my opinion but you can add one if you want !
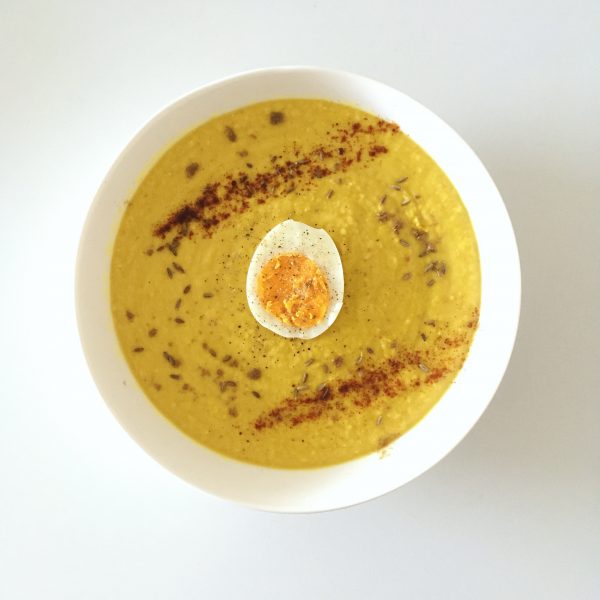
Every time I receive a parcel from my parents from France, there is inevitably some of my favorite staples in it. Chickpeas and chickpea flour are part of them. They are made by an acquaintance and I love cooking with them. So yesterday I decided to cook a big batch of chickpeas and I used most them in raggu with other vegetables etc… but I ended up with about two handfuls remaining and it was lunch time… and it was a bit of a chilly wind outside, I have had a long walk so wanted something warming… it would be soup. While minestrone with chickpeas is quite common in Italy, I opted for a version where the chickpeas are blended to obtain a creamy consistency. I added an hard boiled egg on top may be because I wanted one but it is totally optional.
Want to try my recipe of the chickpeas velouté? Here it is!!!
Chickpeas velouté (1 serving)
Two handful of boiled chickpeas
Water
1tbsp of olive oil
Cumin powdered
Paprika
Turmeric
Black pepper grounded
In the bowl of your blender put the chickpeas, 1 glass of water and 1tbs of olive oil. Blend. If it is too thick add a bit more water. Add the spices and blend again. Move to a pan and heat slowly. Serve and enjoy!
I am sure you could add cream and other things to make the soup richer and silkier, but I like simple things and I prefer olive oil rather than cream… so that’s my way of doing it!
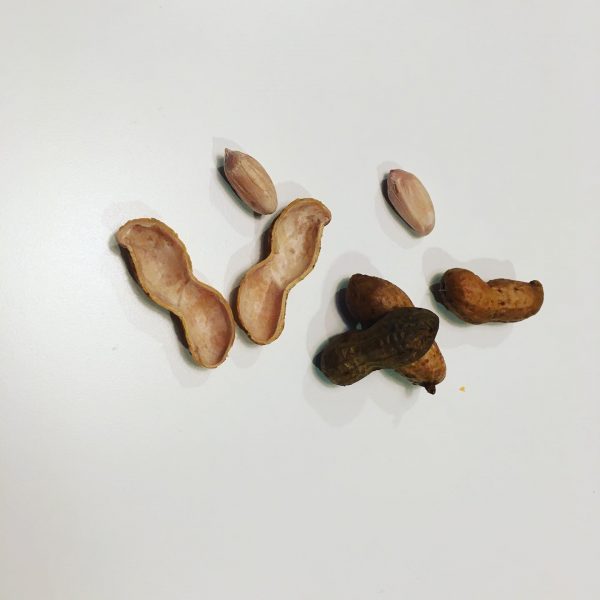
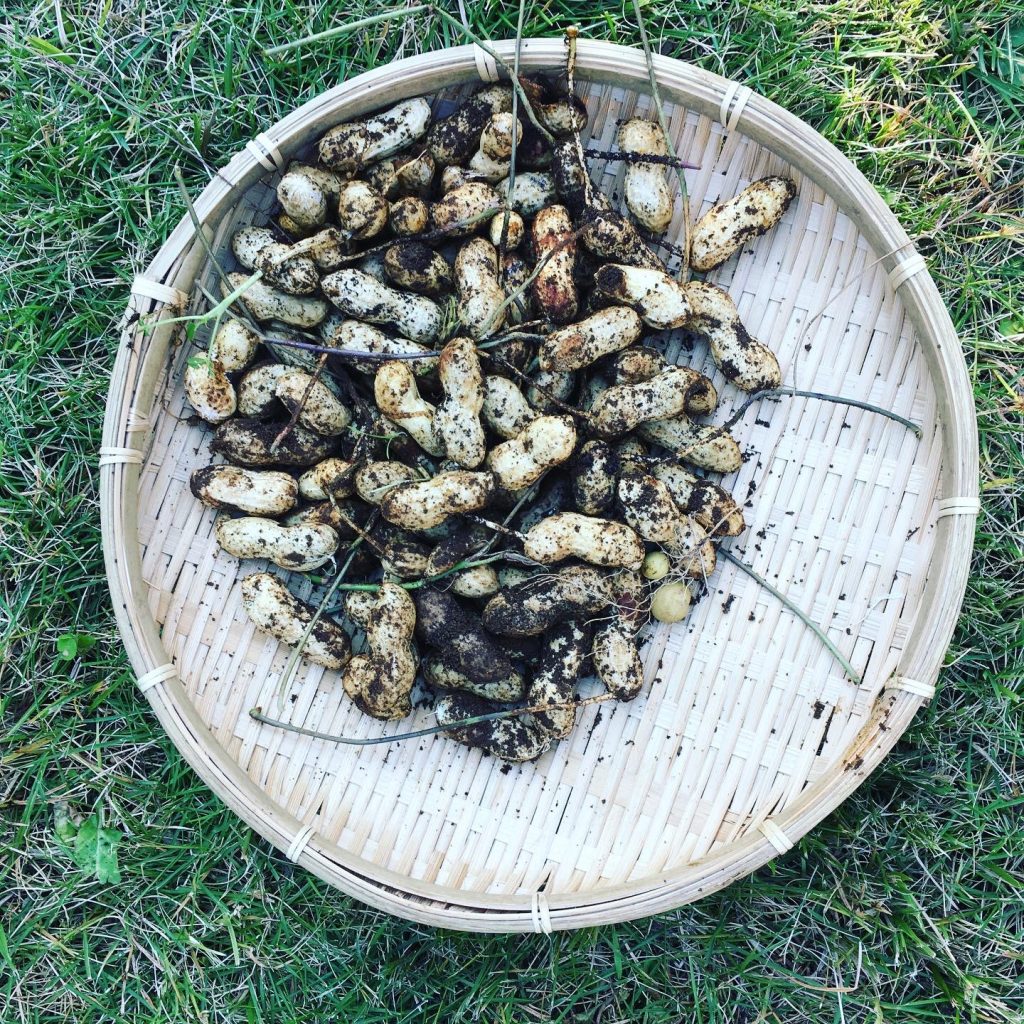
It may seem strange but peanuts grow quite easily in Japan and peanuts from Chiba are among the most famous. Peanuts in Japanese is called rakkasei 落花生, which literally means the falling flower’s life or something of the kind… because peanuts are a very intriguing plant indeed! It looks like a low pea, with nice flowers, which then stem underground, where the peanuts actually grow. My curiosity, the fact that they are local so normally adequate for the weather, and that I am slightly better at growing underground things than overground, peanuts were definitely on my list of things to grow. I did a first attempt in 2019, more or less successful, and tried again this year, more successfully. I harvested a little basket of fresh raw peanuts.
After debating about what to do with them… we usually don’t eat peanuts… I decided I would simply boil them… simple enough and actually really super delicious. So here is my recipe.
Salted boiled peanuts
Fresh raw peanuts
Salt
Water
Remove all the soil and dirt of the peanuts. I gently washed them while shaking them. Then I let them rest overnight in water, and rince again. But if yours are clean enough just go ahead.
In a pan set the peanuts, cover with ample water, add one tea spoon of salt and set to a boil. When it boils cover and let cook for 3-4 hours a low heat, checking once in a while that there is still water. And that it! Let cool and start eating!
I kept them refrigerated, but they were gone in a few days!!!
Not that I have been more busy than usual, nor that I have less inspiration these days… but I’ve been cruising in the kitchen… probably because of the season sudden change and this in between moment when you don’t want to shit to the new seasonal staples too quick, but yet you have explored enough with the past season ones… eggplants, okras and cucumbers are slowly making way to pumpkins, carrots and lotus roots.
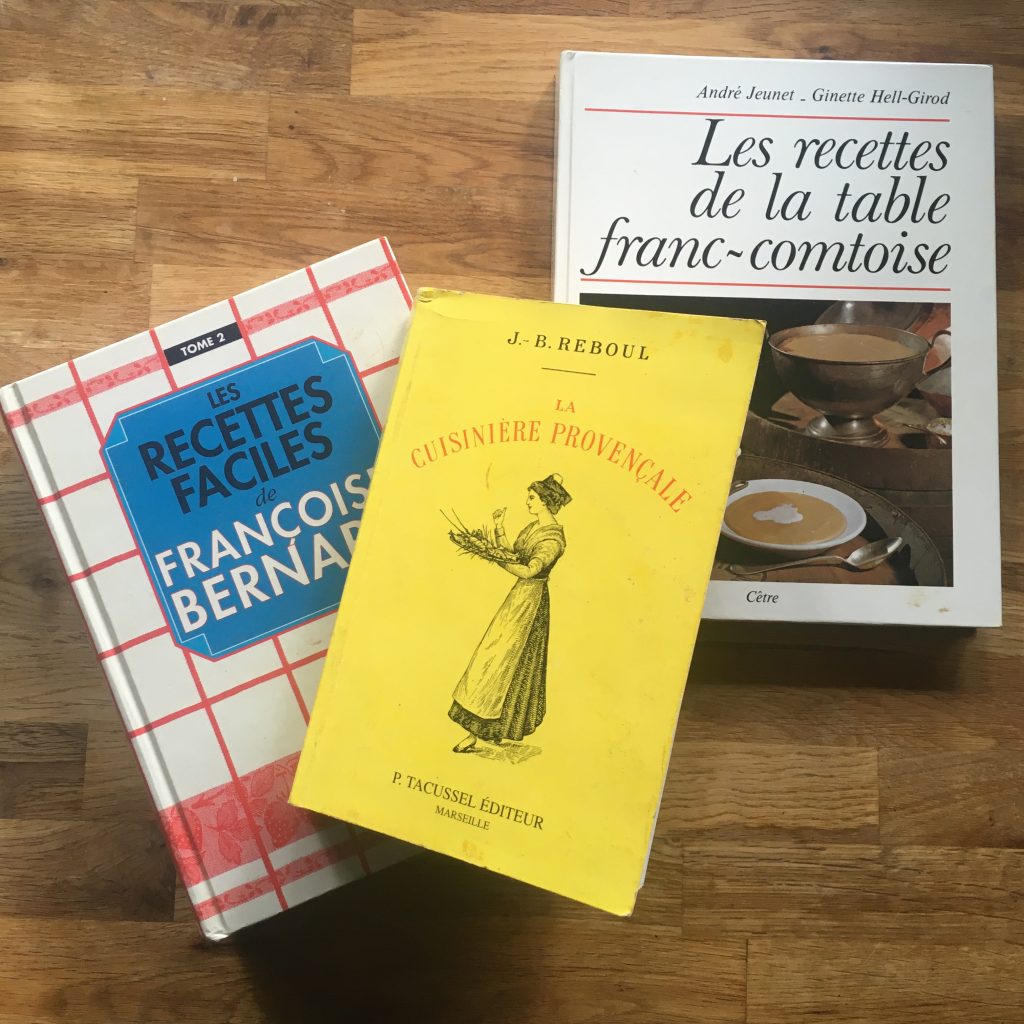
And by cruising I mean Saturday ravioli, Sunday quiche, Monday chocolate cream, Wednesday steam buns etc… etc… hopefully Sunday was rainy, so after a nice bodyboarding session in a rough ocean I spent the afternoon browsing some of my very old cookbooks that were left in Paris 20years ago, and that I just received with our cargo…
The Reboul, a must for Provencal cooking, the first edition dating back to the 19th century, that I have been using to check basic recipes when my grandmother or mother were not available… I read it with a new eye and learned many many things!
Les recettes faciles, also plenty of basic ressources that help a lot for remembering how to make a good roux, or a creamy sauce… it’s nice to go back to the basics again once in a while.
Les recettes de la table franc-comtoise is probably the most alien to me. It was a gift from A. grand mother who was from Franche-Comte, a place in France I have never stepped foot, and where cooking is based on cream… but there are some great recipes and inspirations to gather from there too and the food A. grand mother would prepare for us!
In the meantime, Japanese seasonal cooking has never been more attractive to me and I have been thinking about how to level up… while I don’t feel like going to in-person cooking class yet, I still think about Shojin cuisine…
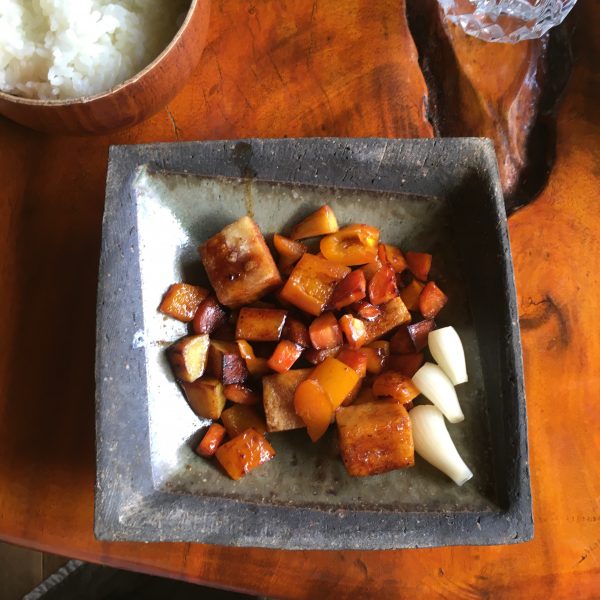
I tested new ways of using Koyadofu, I mean new may not be the right word, but at least without any cookbook nor guidelines and made this soya sauce based stew of vegetables and koyadofu that was just a hit! The recipe yet needs a bit of polishing before I can share it with you.
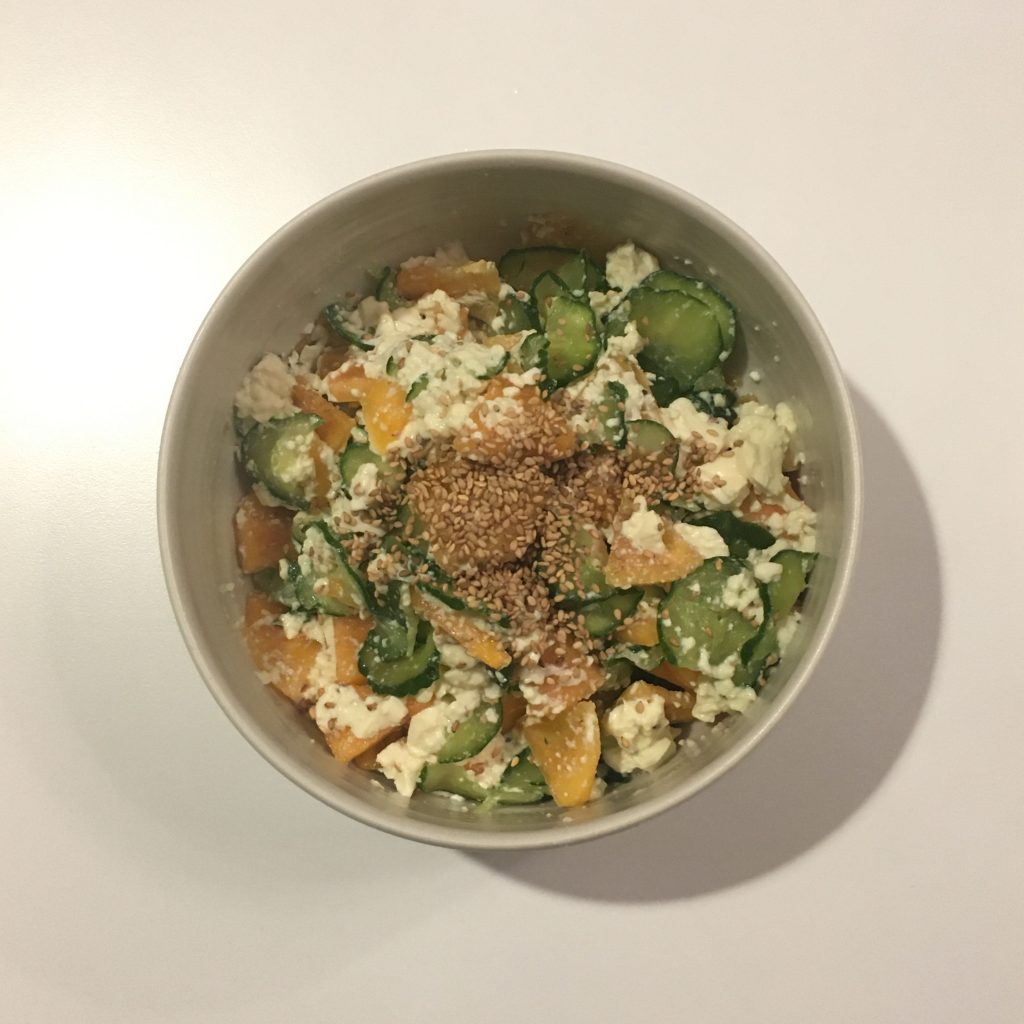
The other big hit this week was my classic persimmon and cucumber tofuae. A. often complains about all these persimmons we have in our garden… and doesn’t seem too happy when I serve one for dessert, but with the less ripe ones when I make this simple dish I learned at my Chakaiseki classes, he surprisingly always asks for more!!!
I’m hopping to be able to share a few new recipes in the coming days/weeks and in the meantime I’ll continue to cruise in the kitchen with all the classic recipes and the new ones that’ll pop in my head!
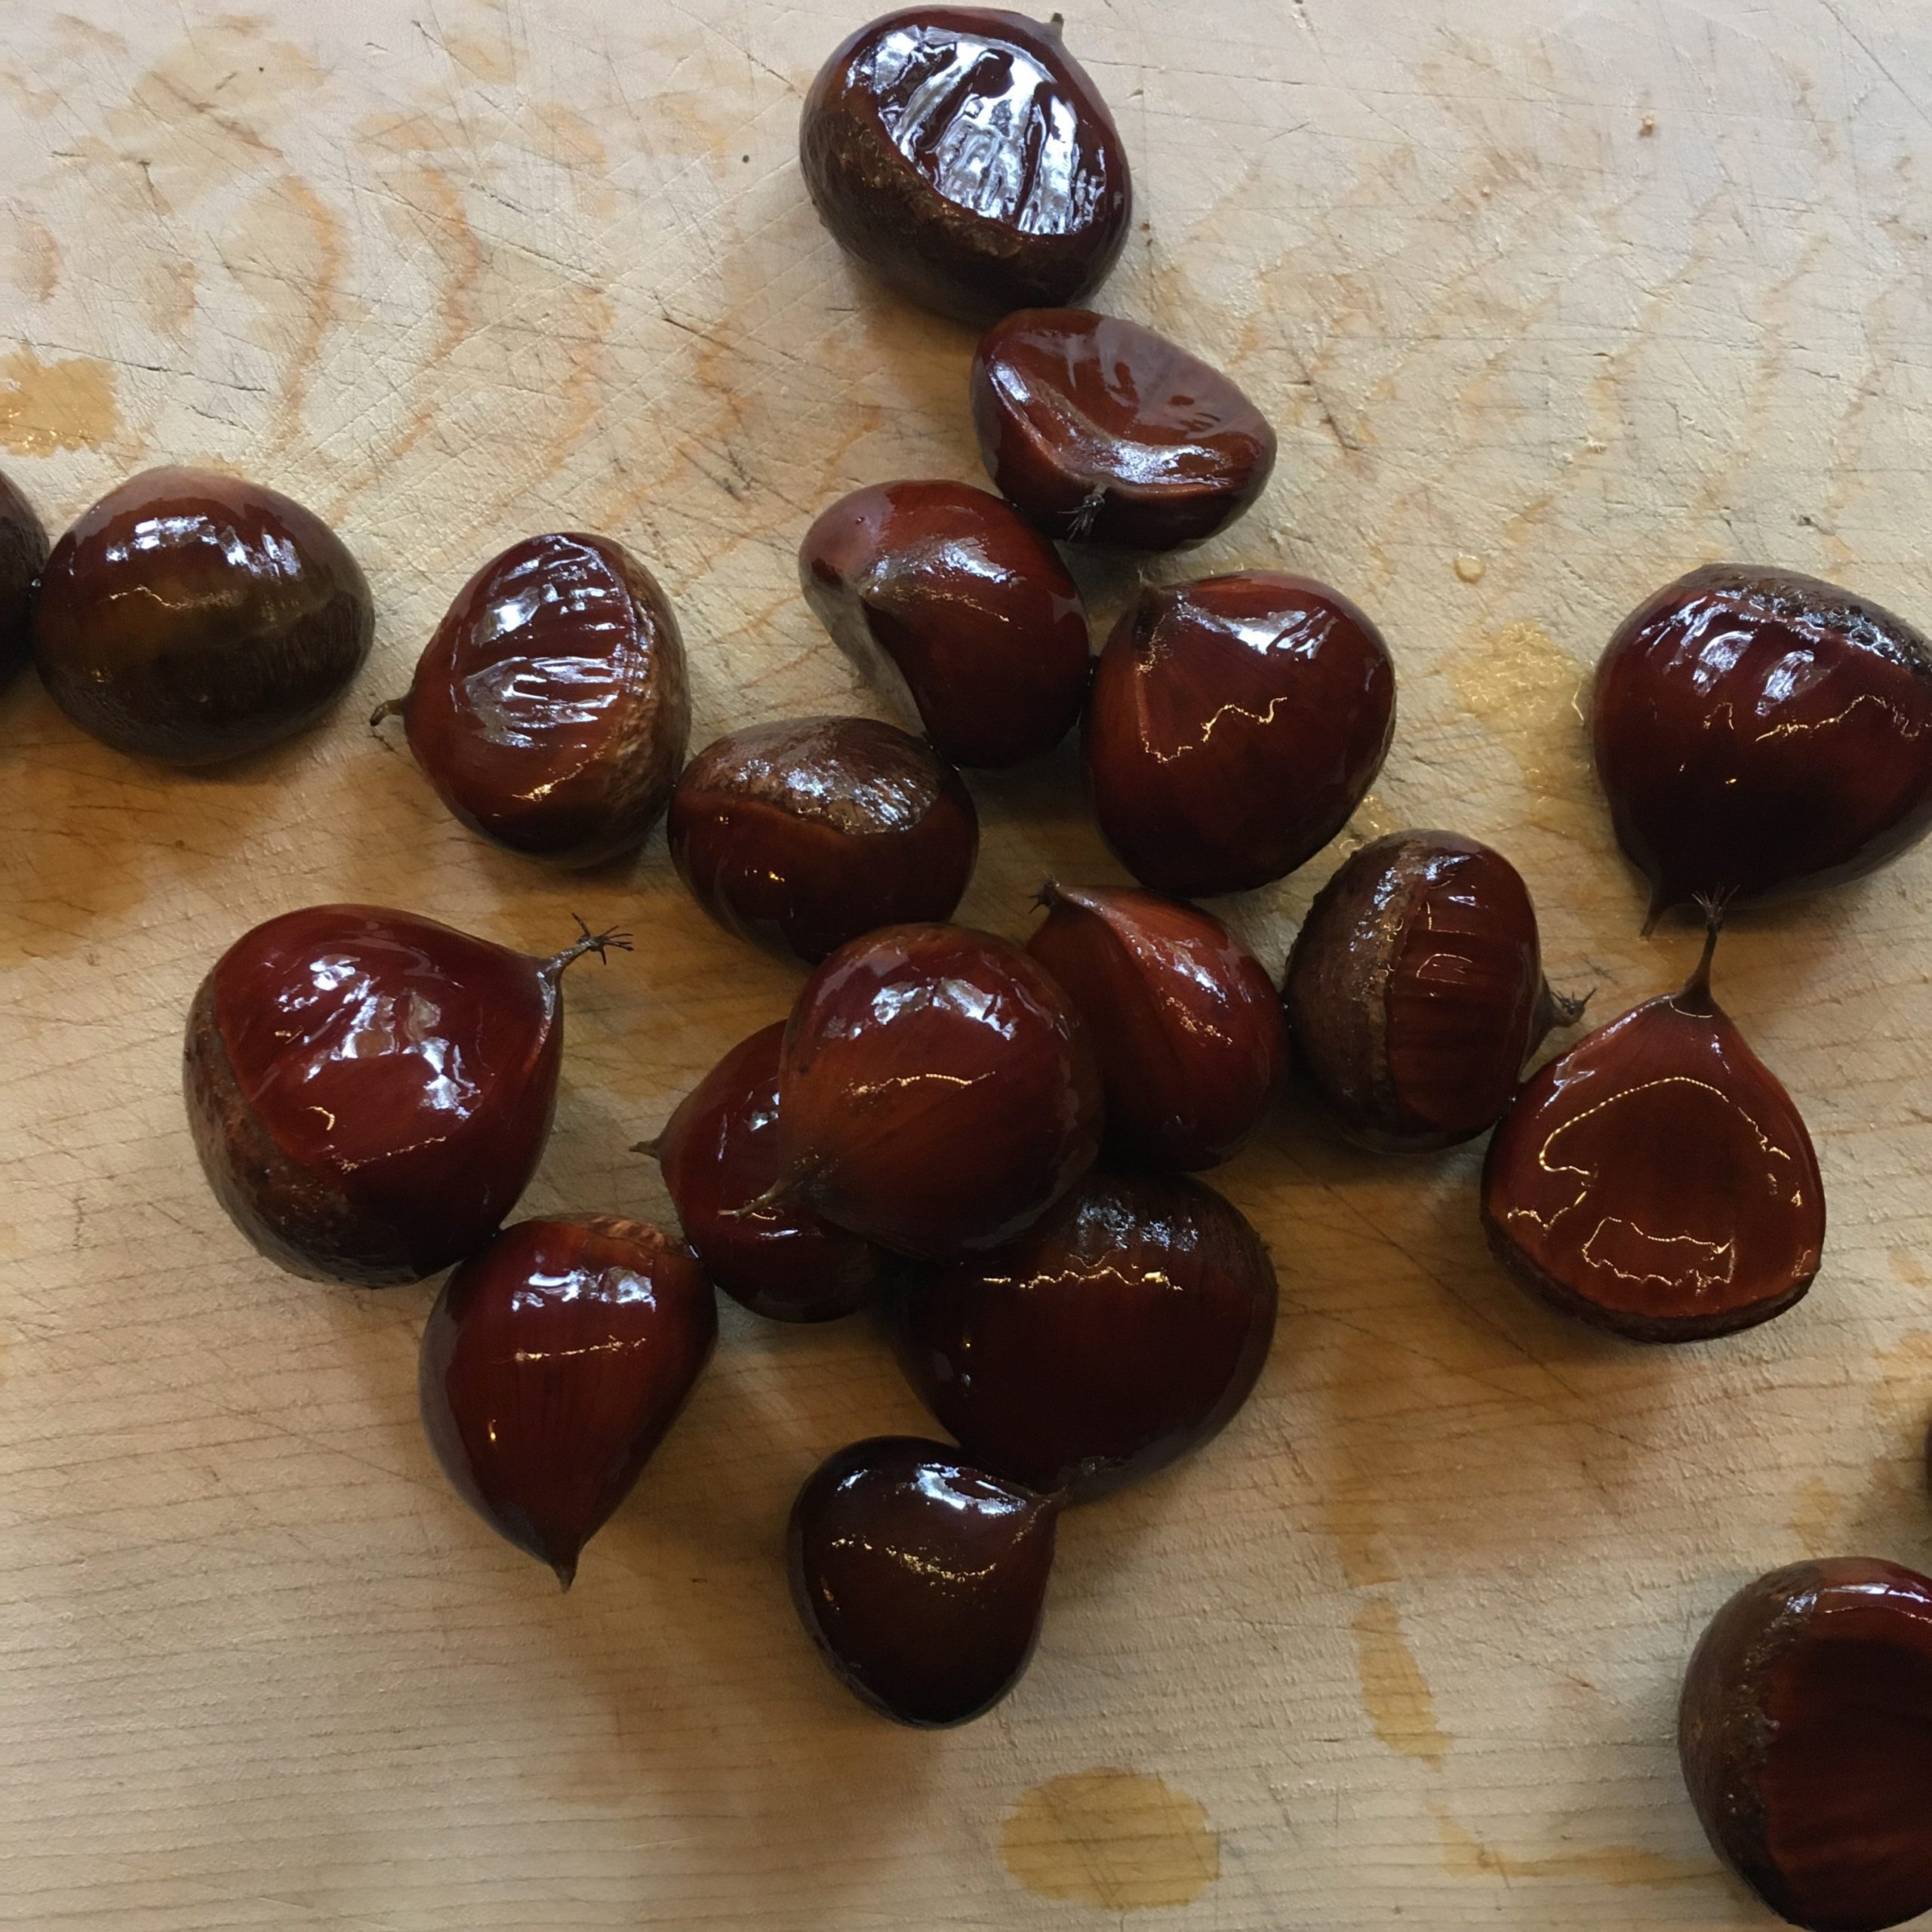
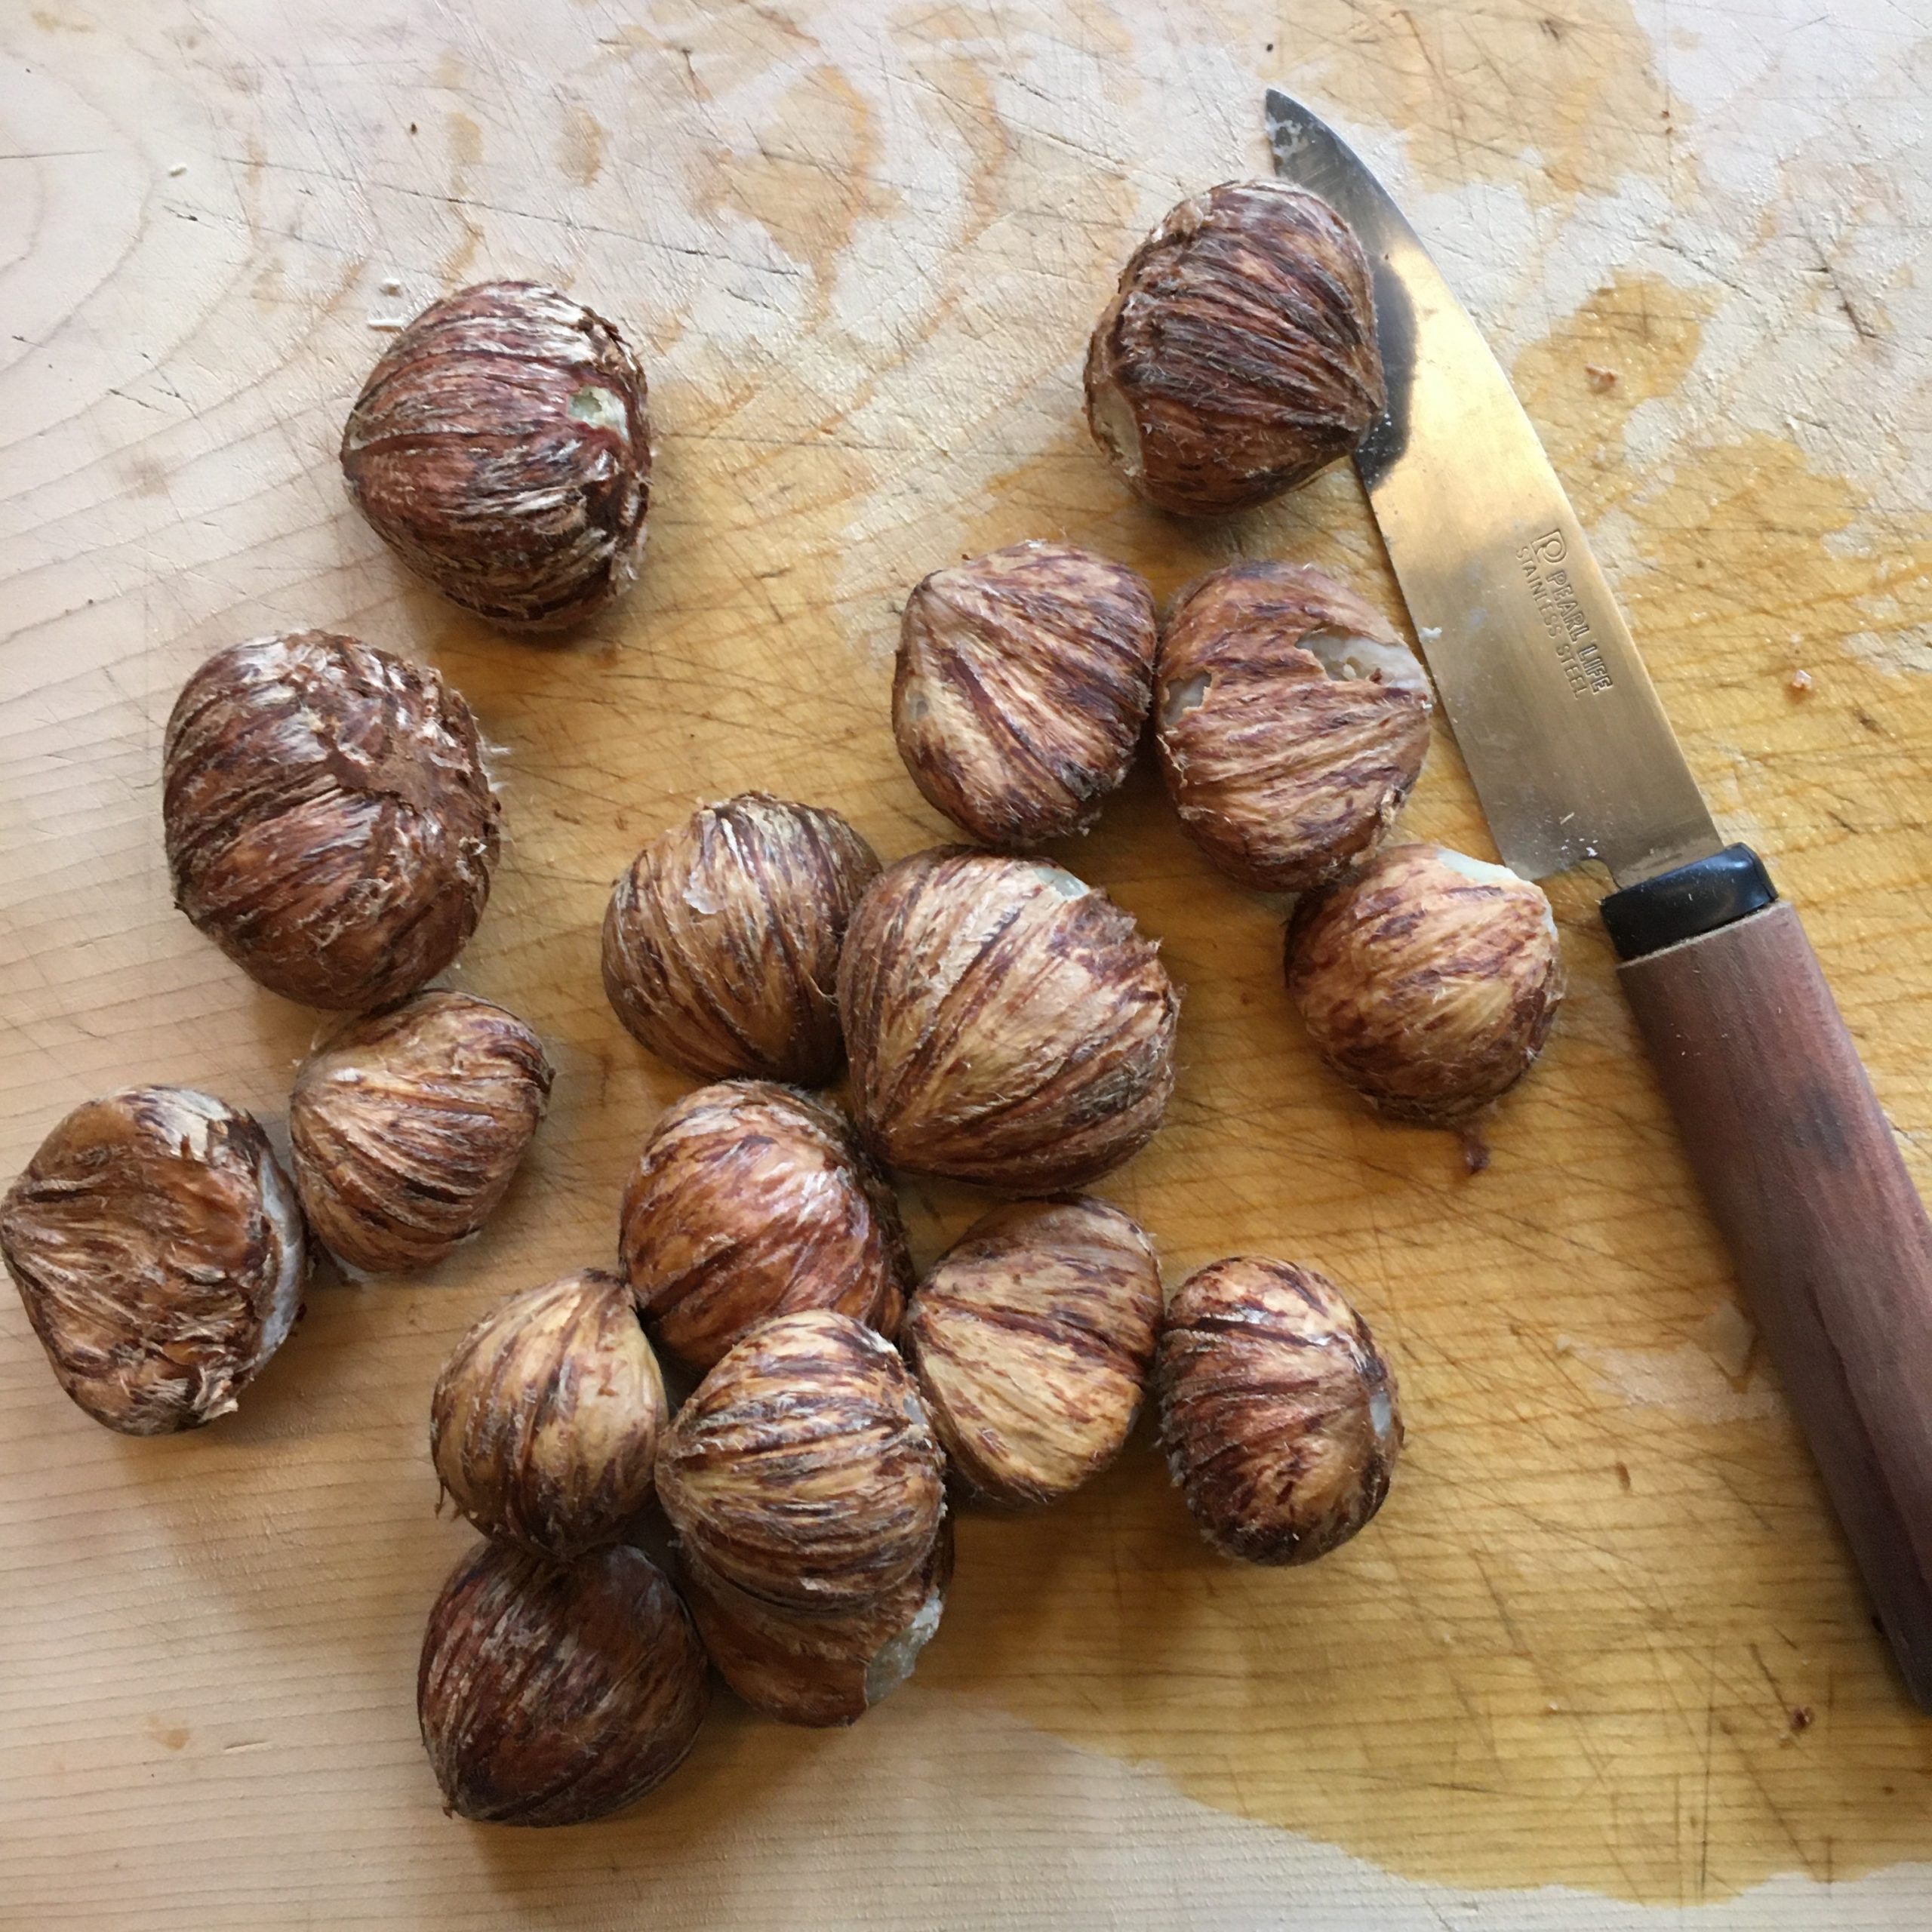
When autumn arrives, sweet chestnuts 甘栗 – amaguri are a must eat. We have a chestnut tree in our garden which usually produces just enough chestnuts for us and the rest of the animals: racoons, kions… A. doesn’t like chestnuts too much so it is usually the right number. Except this year, I wasn’t quick enough in harvesting them, and the other animals didn’t have the slightest pity for us, and left us nothing but empty spiky shells. I had two options: forget about chestnuts this year and be more greedy next year, or wait a bit and buy a bag of local chestnuts whenever I would find one. Bags of chestnut are usually much bigger than what I need, but still eating a few chestnuts, and in particular a bowl of chestnut rice was too tempting. Chestnut rice like many of the traditional Japanese rices, is just too delicious, and the perfect food to enjoy the transition between summer and autumn. This time of the year when days are still hot but shortening quickly, the sky has this special blue color, soft and bright at the same time, and evenings are getting chillier. The cicadas are becoming silent or distant and leave sound space for more delicate voices.
So, it wasn’t long beforeI found local chestnuts and start working with them. Though I had a few ideas of recipes in mind, I opted for the classic chestnut rice 栗ご飯 – kurigohan. It is a bit tedious to make, but not more than anything else with chestnuts, and it is super very delicious, packed with energy. So let me share with you my recipe.
Kurigohan (3-4 servings)
2 cups of rice (I use new rice)
10 raw sweet chestnuts
2tbs of soya sauce
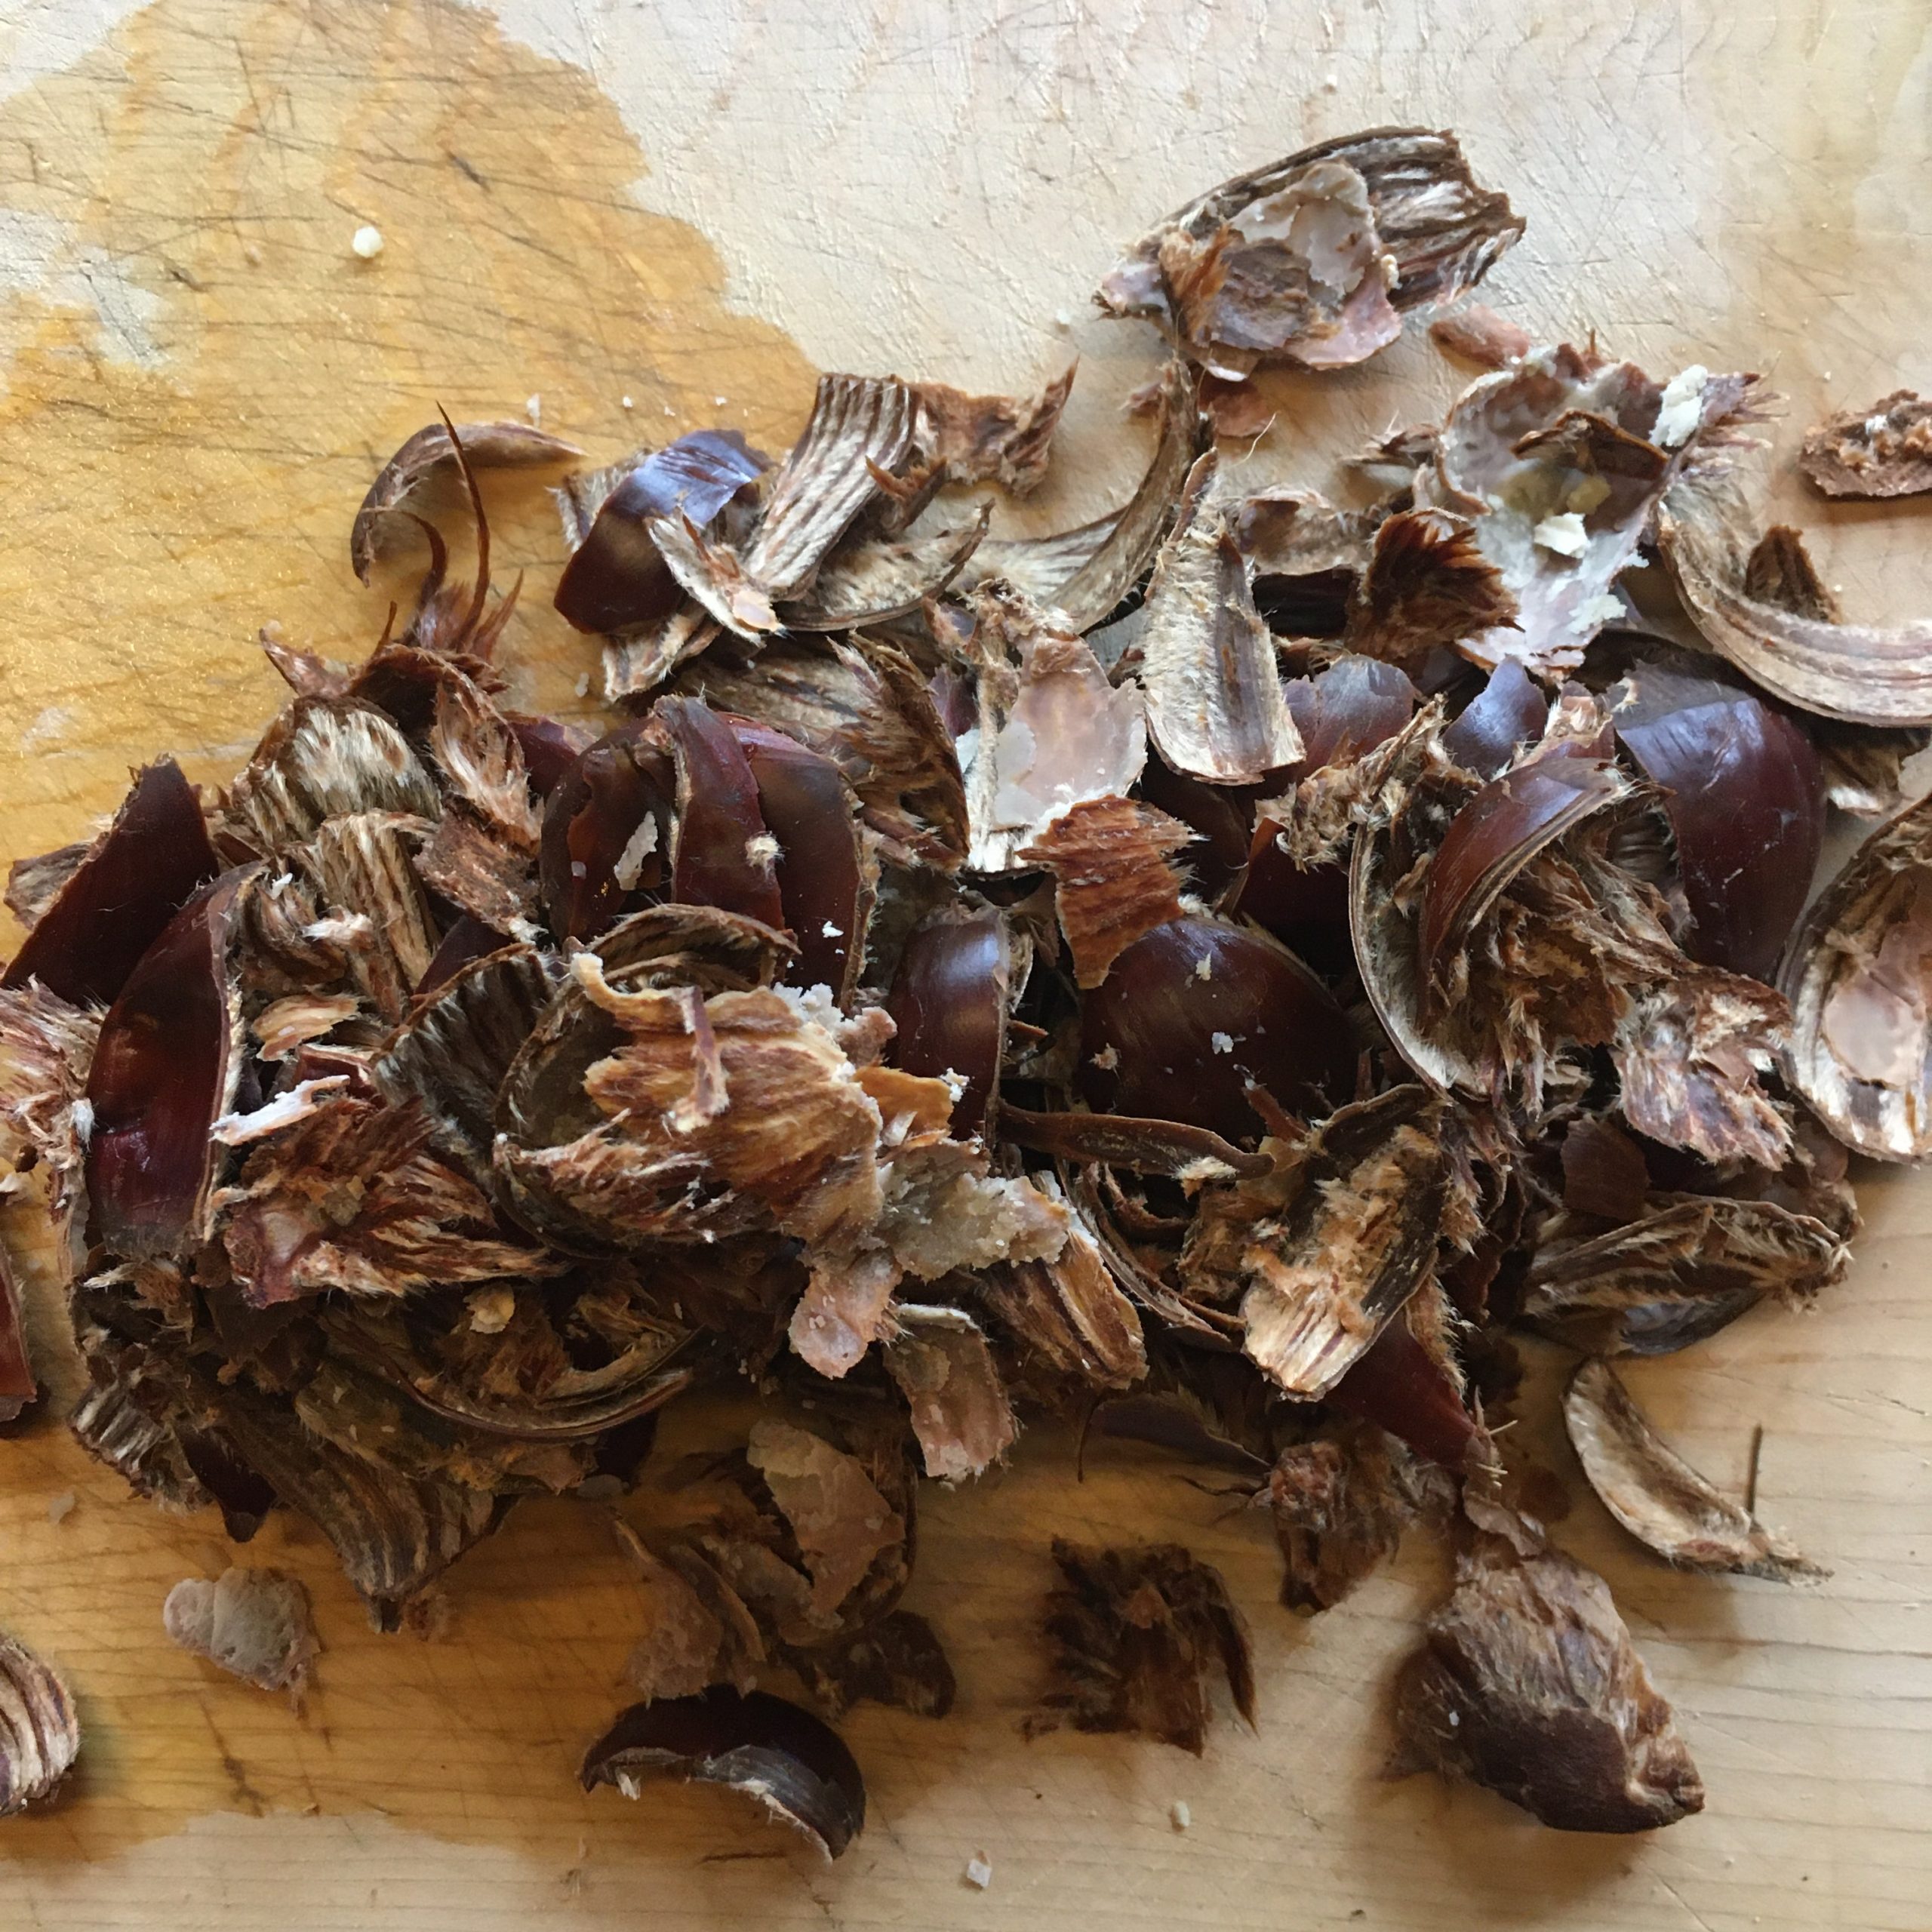
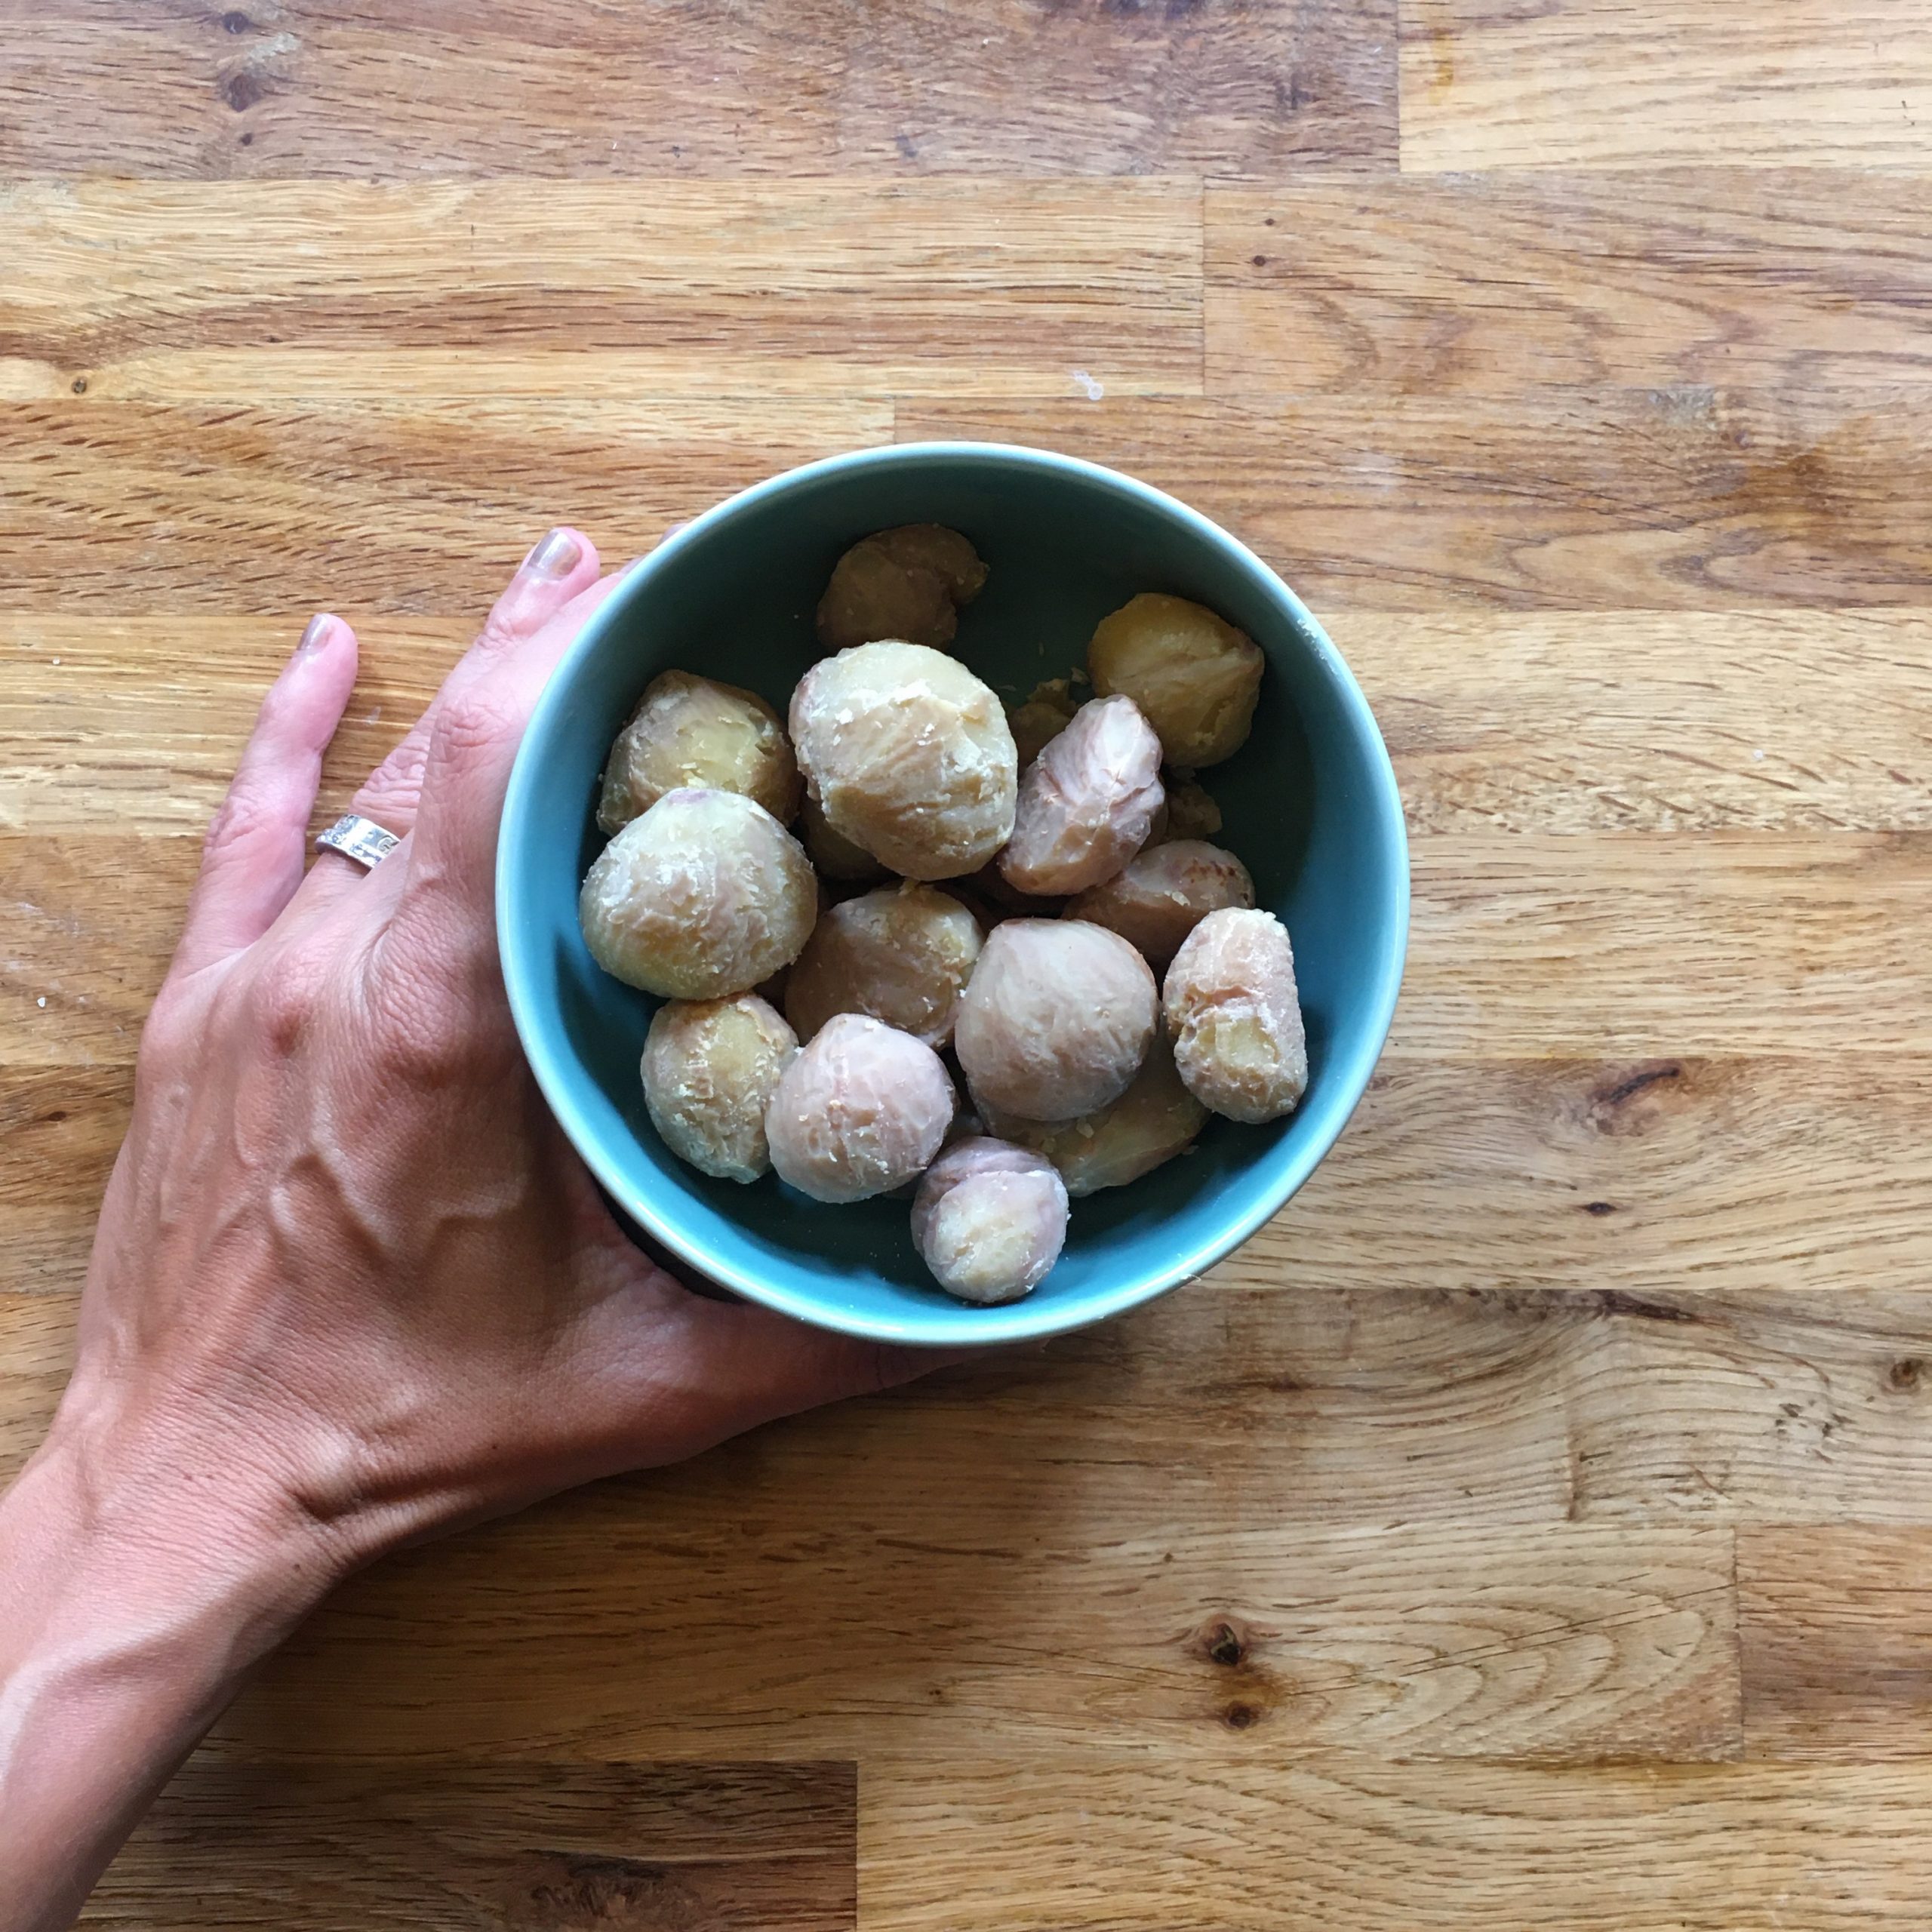
Start by preparing the chestnuts. In a pan put the chestnuts, cover generously with water and bring to a boil. Add a bit of salt if you have some. Bring to a boil and let cook at low heat for 50min. Let cool down. Then peel the chestnuts. You can do this step up to two days before actually.
Once you have peeled the chestnuts, it’s time to prepare the rice, and it’s really simple. Use a rice cooker or a regular pan, or a cast iron cocotte… wash the two cups of rice, set the amount of water you would for cooking it normally. Add the chestnuts, it is good to have some whole and some crumbled. Add the soya sauce, and cook just as usual. Enjoy while hot, and it is even better re-heated the next day!