Pizza!!!

I don’t know why, but quiche and pizza are two things I could eat anytime. Winter, summer, with fresh seasonal vegetables, it’s always happiness in my plate!!!

Recently I haven’t kneaded much… week days are all too busy and weekends none the less but with different activities and more to come as our construction is almost finished and now I will have fun thinking about the new garden. 24h is way too short to do all I want to do!

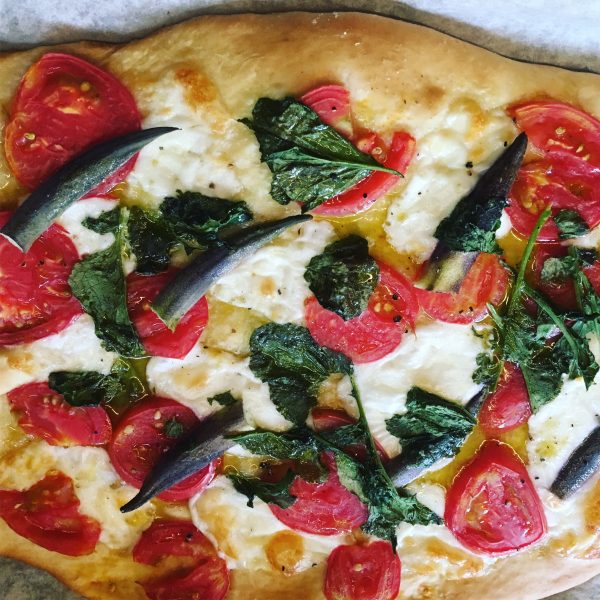
I love to prepare pizza with the local products from Isumi, with all the cheese farms around making mozzarella, the local tomatoes and the variety of fresh vegetables, there is always something to put on your pizza to make it fancy. In the full summer heat now, okra are a nice option and they are particularly good when baked. Adding some fresh radish tops as the rucola season is over and you have a perfect summer pizza.

For the dough I always use the recipe from the Kayser bread book. But now that I know that I can speed up the kneading without affecting too much the result, I cam prepare pizza dough in no time. It’s simple, never fails and with the room temperature at 27-28 now it rises in 45min, so no need to plan too long ahead… so there will be more pizza coming soon I’m pretty sure!

What do you like on your pizza??

Hum…

I’m not the kind of person who complains about the weather. I take it as it is and enjoy each day as it comes… I don’t mind the extreme heat, nor the cold, neither the snow, the wind nor the rain… as long as the weather changes regularly… but I think I have had enough of rainy weekends now… honestly since the beginning of June there as not been a single day without rain at some point, and every single weekend has been rainy if not heavily rainy… And usually on rainy weekends we do stupid things (that we never regret! Don’t get me wrong!). 7 years ago we started browsing internet and ended up buying our country house in a flash… sometimes we spend rainy weekends at an arcade and batting center, and last month we browsed internet again and bought a new car…

Oh yes… a car to go to the beach… well now I just wonder when we will go as a typhoon is coming just for the weekend of course. If I had an outdoor job I wouldn’t mind rainy weekends, but my job gets me stuck indoor 12h/day so I miss the rare sunshine…

What else do I do when it rains?

I cook… sweets… of course… to compensate for the lack of activity!!!

I bake and bake and bake… and this time it was coconut milk and white chocolate scones… which were perfect for both breakfast and tea-time! Simple recipes give often the best results: flour, sugar, baking powder, and then coconut milk, coconut oil, and white chocolate chips… that’s it… all mixed together, and baked…

I wish you a happy weekend, stay dry if you are in Japan…

today glimpse of blue sky and sun on my way to work…

Blueberries and blackberries vegan tart

In the summer… yes yes it is supposed to be the summer, even if you haven’t felt the summer heat nor got this beautiful summer tan… I love to bake simple fruits tart: apricots, peaches, plums, berries… so when I bought these blueberries and this blackberries at the farmers market, I knew what I would use them for!

The difference from the past years? The pie crust. As I was using up all my butter to an other trial of croissants (pathetic result… you can read about it here). I decided to save the butter for the croissants and simply replaced it by almond butter our friend Y. bring us from Portland. I am not used to almond butter so I wasn’t sure how to use it, but in replacement of butter in pastries dough it seems perfect. Of course it changes the texture and taste but I find it very well suited for fruits tarts. However because it is drier then normal butter I found it was necessary to add a bit of water to the dough to obtain a suitable texture. As for the rest, I just put it in a pie dish, top with the fruits and a but of sugar and bake.

In the oven you can see some chocolate chips sablés, and mini white chocolate and blueberries tarts made in financier cups.

Have a good day… I can’t wait for the sun to come but I wonder if that will ever happen… it’s been 20days of non stop rain and grey skies…

Bonito

Not far away from our house is Katsuura 勝浦, a city on the ocean with a fishing harbor, a fish market, a few nice street to browse and a sea front further south where we paddle surf (or least try to!!).

Katsuura is quite famous as a bonito fishing harbor in the area and they indeed have delicious fresh bonito in season, which is basically from spring to mid summer. We’ve eating quite a bit of bonito, and one of my classic way of preparing it is either pan grilled or in a sort of ragù with vegetables. But after a few times eating it that way always, I wanted a new recipe.

Inspired by the pies and other yummy pictures I saw on IG, I decided to try making a bonito pie. The shape of the filet is perfect to fit in a cake dish and with the season of bell peppers starting, I had a perfect combination. The pie cooking is quite interesting as all the juices and flavors are trapped in the pie and reveals when you cut it, guaranteeing a very interesting tasting experience. Though I could have worked a bit more on how to shape and plate it (as usual), the taste was amazing. Definitely a recipe that will go to my favorite recipes of the moment.

Bonito pie (2-3 servings)

For the pie crust

– 200g of flour (I used whole wheat)

– 4tbs of olive oil

– water

– a pinch of salt

For the filling

– 1 bonito filet (for sashimi)

– 2-3 bell peppers red, yellow, orange… you name it

– 2 leaves of laurel

– olive oil, salt and pepper

Prepared the pue crust. In a bowl, mix the flour, salt and olive oil. Add water little by little and knead until you have a smooth dough. Roll it in a rectangular shape to fit your cake dish, yet twice bigger.

Set it in the cake dish. Add the laurel leaves in the bottom of the pie, then add the bonito on top. Wash and slice the bell peppers. Arrange them around and on top of the bonito. Add salt, pepper and a bit of olive oil. Close the pie with the dough. Make a small hole on the top and make a small chimney with baking paper. Bake at 180deg for 40min. Or until golden.

Chocolate focaccia

Yes! You read well… I told you I was back to back to baking… When I was a first year PhD student the first international conference I attended and presented at was a huge conference held in Barcelona. At that time A. had plenty of holidays and surely plenty of time to take them, so we were always traveling together. We spent one week in Barcelona and a couple of days in Sitges. And one culinary thing that stayed for ever in our mind was the dinner, or more the dessert, we had on lovely terrace nearby the museum of contemporary art. The museum was still fairly young and the surroundings all in development. Using the base of the traditional pan con tomate it was a pan con chocolate. You can imagine with bread and chocolate in the same dish we would go for it, and this has surpassed our expectations by its simplicity and its tastiness. It was simply the same as pan con tomate replacing literally the tomatoes by dark chocolate: a toasted slice of bread with melting dark chocolate topped with fragrant olive oil and salt sprinkled. Back home I remember cooking some once in a while and always enjoying it. So this time while I was making the dough for my rosemary focaccia, I decided to keep a bit of the dough to test a chocolate focaccia. And like I though it would be, it was delicious. I’m sure you’ll see some more soon, in particular the picture doesn’t give a fair idea of how delicious it was!!

BD chocolate cake

It is really not something that I cook often… maybe it’s been 5 or 10 years since I last baked a proper chocolate cake… Usually for A.’s birthday I bake a strawberry tart but as I already baked one two weeks ago, I decided to surprise him with very very rich brownies. So for the first time in a while I went through the recipe without actually reducing the amount of sugar or butter. I chose a recipe that was using cocoa powder as it is easier to find organic cocoa powder rather than delicious chocolate to cook here in Japan. The result was a nice piece of brownies, but you know what, I thought they would be even richer (may be the baking powder was too powerful, or it could be my oven that bakes too quick and I slightly overcooked it, or using cocoa powder rather than creamy melted chocolate…)… I topped them with a sugar and cocoa frosting. A. was really happy with the surprise cake, and it was even better the following day.

So the recipe went that way:

Chocolate brownies

– 2 eggs

– 1/2 cup of flour

– 1/2 cup of melted butter

– 1 cup of sugar

– 1/3 cup of cocoa powder

– 1/4 tsp of baking powder

– 1/4 tsp of salt

– vanilla

Melt the butter in a large pan. Off the heat, add the sugar, the eggs, the vanilla. Stir and add the cocoa, the flour, salt and baking powder. Pour in a greased rectangular pie dish or squared pan.

Bake at 170 for 25min.

For the frosting I used cocoa powder, confectioner’s sugar (ice sugar) and a bit of water, to obtain a kind of cream. I spread on the cake while it is still hot, it helps a lot, and let cool down before removing from the pan.

Enjoy!

Lemon curd

When I find beautiful, naturally grown local lemons I want to make many different things with them. The first lemons I harvested in our garden on are newly planted lemon tree were a little small. But when I can find large and juicy, one thing I love is lemon curd, and lemon tarts. Using up all the juice and the zest, lemon curd is quite easy to make. When it comes to British recipes I like to use the BBC website as they always have good recipes for the British basics. I started with this recipe and slightly changed it to adjust to my habit of not using half of an ingredient, in particular an egg, and because I didn’t to make meringues to top the tarts.

So here is my recipe of lemon curd. I love how the lemon flavor is not overly compensated by the sweetness and the perfect creamy texture it has.

Lemon curd (makes about 500g, good for 2 medium size tarts)

– 4 lemons, untreated, nor waxed or whatsoever

– 100g of salted butter

– 3 eggs

– 200g of brown natural cane sugar

Take the zests and juice of the lemon. Put in a pan with the sugar and butter and heat until the butter is melted. Remove from the fire and add the eggs. Stir well and put back on a very low fire and stir regularly. Keep cooking and steering once in a while for 15-20min, until very creamy. That’s it.

You can now use directly in your tarts, in cakes or put in glass jars and use as jam…

If you to make a tart, prepare a sablé dough, bake it and then add the lemon curd. Keep refrigerated.

Lemon curd keeps a few days if not jarred. But in both cases in the fridge.

Braided brioche

When looking at Instagram and at breakfast tables, I was often seeing beautiful braided breads and brioches and was always intrigued by their realization. Not the braid itself, but how to obtain a dough that wouldn’t be too sticky to actually make a braid. I didn’t do much search. My recently acquired cookbook again helped me solving that problem. The Challah Dough from bread in 5 is really a nice alternative between bread and very rich brioche dough and I’ve come to use it often. And that’s how I learned how to make braided breads. It is actually extremely simple, much more than I imagined!

The book recipe can be found on that page but I slightly modified it to fit my pantry and taste. So here is mine:

Braided brioche bread (for one 400g bread)

– 250g of flour + for dusting

– 1 egg

– 1/2 cup of tepid water (add slowly as a little less may be required)

– 5g of yeast

– 5g of salt

– 2tbs of brown sugar

– 25g of melted salted butter

In a bowl, mix all the ingredients. The order has strictly no importance. For some reason (habit for sure) I almost always start with the flour, though the book recommends to finish with the flour… I tried both and the result is basically the same. To mix things altogether I use my hands or Japanese cooking chopsticks if I am on a rush or multitasking and want to keep my hands clean. I then leave the dough to prove and wait until it has almost doubled in volume.

Once the dough has risen, using flour to dust I move it to a sheet of cooking paper. Then flatten it and cut in 3 for long braided bread, or 4 for the round ones. I roll them into 20-40cm sticks to make the strands, and start braiding. The 3 strands, braiding is obvious, and don’t need a picture. The 4 strands in circle, it is a little more tricky but not much actually, it’s just that you have to twist and turn 90deg, go up the first strand and under the second. The braids don’t have to be too tight, as the dough will rise again.

Leave for the second rise about 45-60minutes and then bake at 180deg for 20-25minutes, or until golden. Don’t over bake, it will make the brioche too dry, in particular if, like me, you like to eat it warm, and plan to warm it up in the oven before eating if you don’t eat right after baking. Oh… and I don’t use egg wash and they always come out perfectly golden.

Vegan bagels

I love bagels a lot, but for some obscure reason I almost never make and bake any, hence my last posta about bagels is almost a year old…

So when I saw a recipe in my bread in 5 book, I just wanted to try it. What’s different from the previous one? Basically that it starts like regular bread, in which a little of oil is added to the dough, so it is vegan, the rest is pretty much the same. I kept my way of shaping them rather than the one in the book and same for cooking them. Bread in 5 boiling time was too short for my bagels, I kept with my previous cooking time.

The result was really bluffing. A little less sweet and buttery than with my old recipe, but with the same base I can also make focaccia and fougasse, because I used olive oil. So it makes the preparation very versatile. Of course the boiling and baking of bagels is a little extra effort, but so much worth it… with Isumi smoked ham and the new cheese factory (I’ll talk about this later) cheese I tested this weekend… perfect!

Vegan bagels (makes 6)

– 250g of flour

– 125g of tepid water

– 5g of yeast

– 7g of salt

– 15g of olive oil

Mix all the ingredients, and leave for the first rise for 2-3h at room temperature. When almost double in volume make a ball and cut in 6 pieces. Make 6 balls. Plant your finger in the middle and roll around your finger like a hula hoop until the hole is about 3cm. Leave to rest for another 30-60min. Prepare a pot of boiling water. Roll around your finger before plunging them in the boiling water. Don’t boil more than two or three at the same time. It’s better they don’t touch each other. Cook 90sec on each side and drain. Then roll them in what you want: sesame or any seeds, sugar, spices… bake for 15min at 200deg.

I don’t use egg batter but you can…

Enjoy!

Proudly powered by WordPress | Theme: Baskerville 2 by Anders Noren.

Up ↑

Verified by MonsterInsights