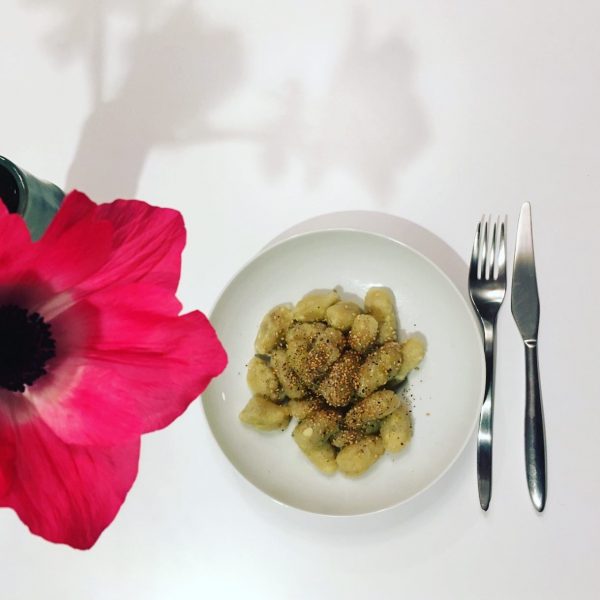
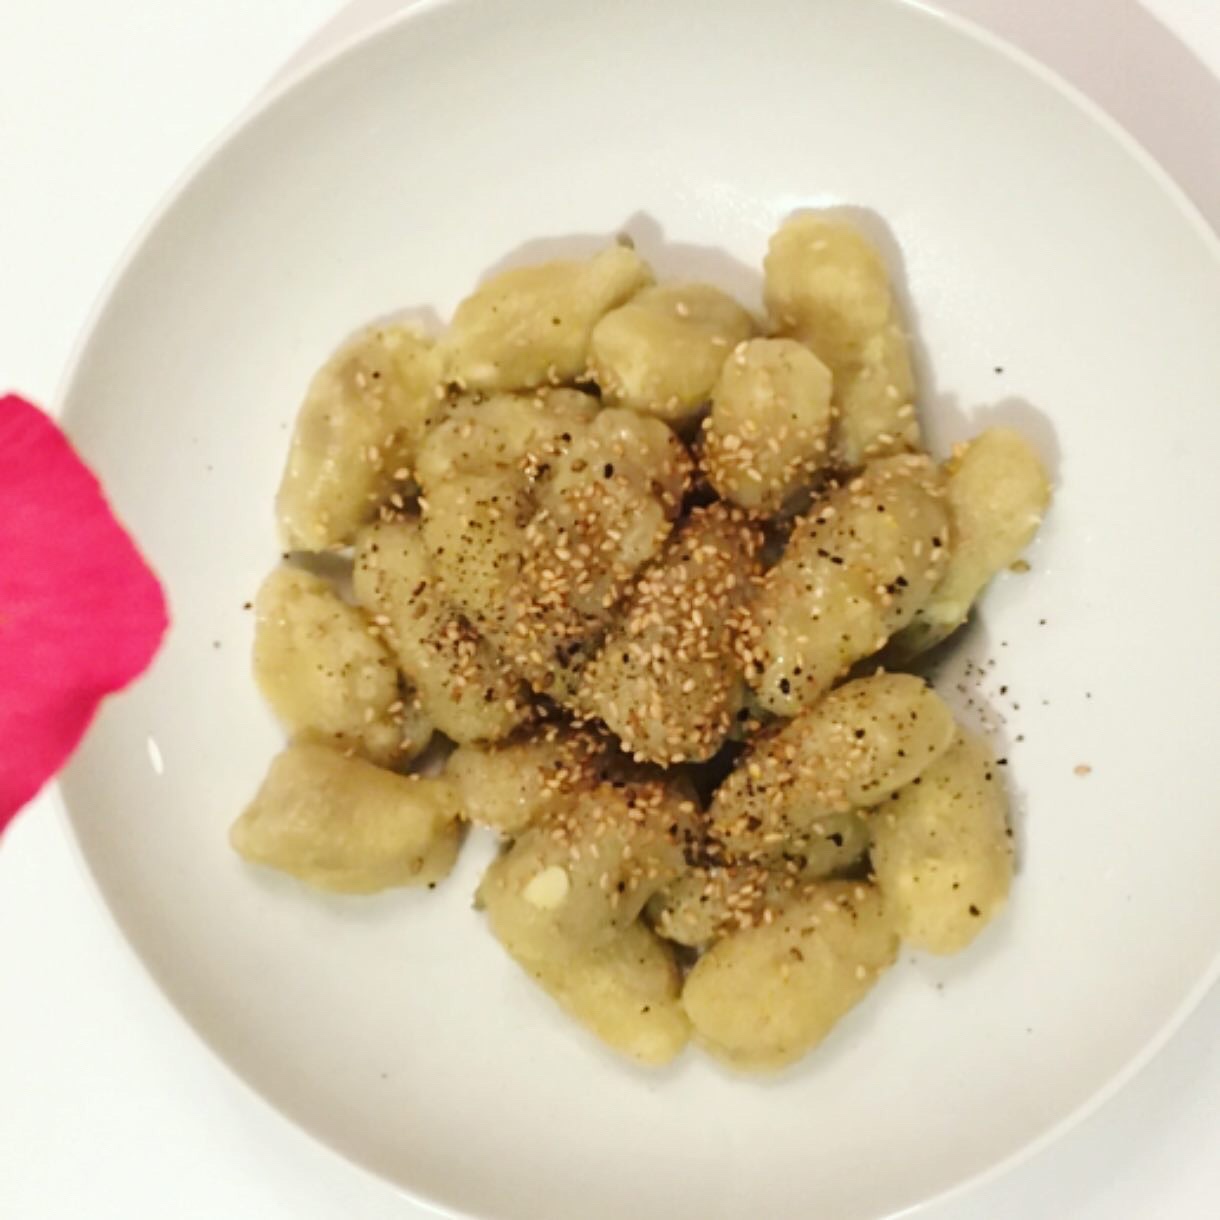
While A. is on business trip while my days at work are super busy, I’m oscillating between experimenting new recipes and easy to prepare but very satisfying food such as cheesy toasts and ochazuke… In my experiments, the sweet potatoes gnocchi with a 100% sesame pairing was definitely a huge hit! It mixes perfectly a traditional Italian recipe with Japanese flavors. A must try if you love sweet potatoes and sesame. Bonus, it is one of the easiest recipe ever… and here it is!!!
Sweet potato gnocchi and sesame (two servings)
1 large sweet potato
Flour
1tbs of sesame seeds
1tbs os sesame oil
Salt and pepper
Steam the sweet potato. When tender let it cool down. Peel it and mash it. Add flour little by little to obtain an almost non sticky dough. Shape the gnocchi. In a pan boil 1-2L of water and poach the gnocchi. Drain and serve in plates, top with a bit of sesame oil and sesame seeds, add salt and pepper. Eat immediately.
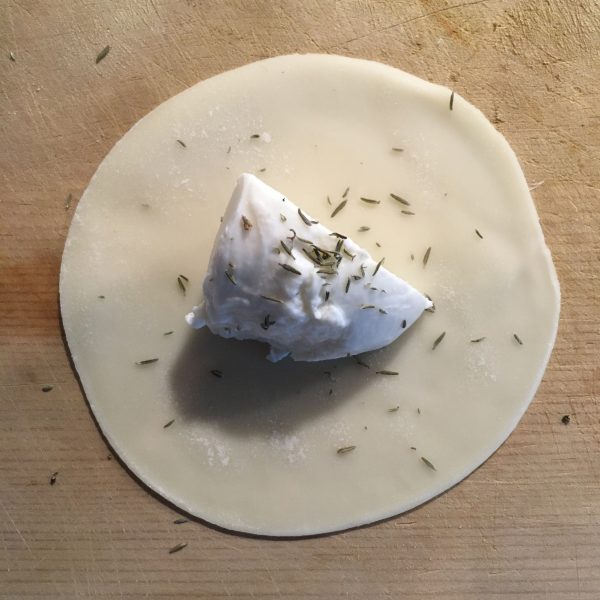
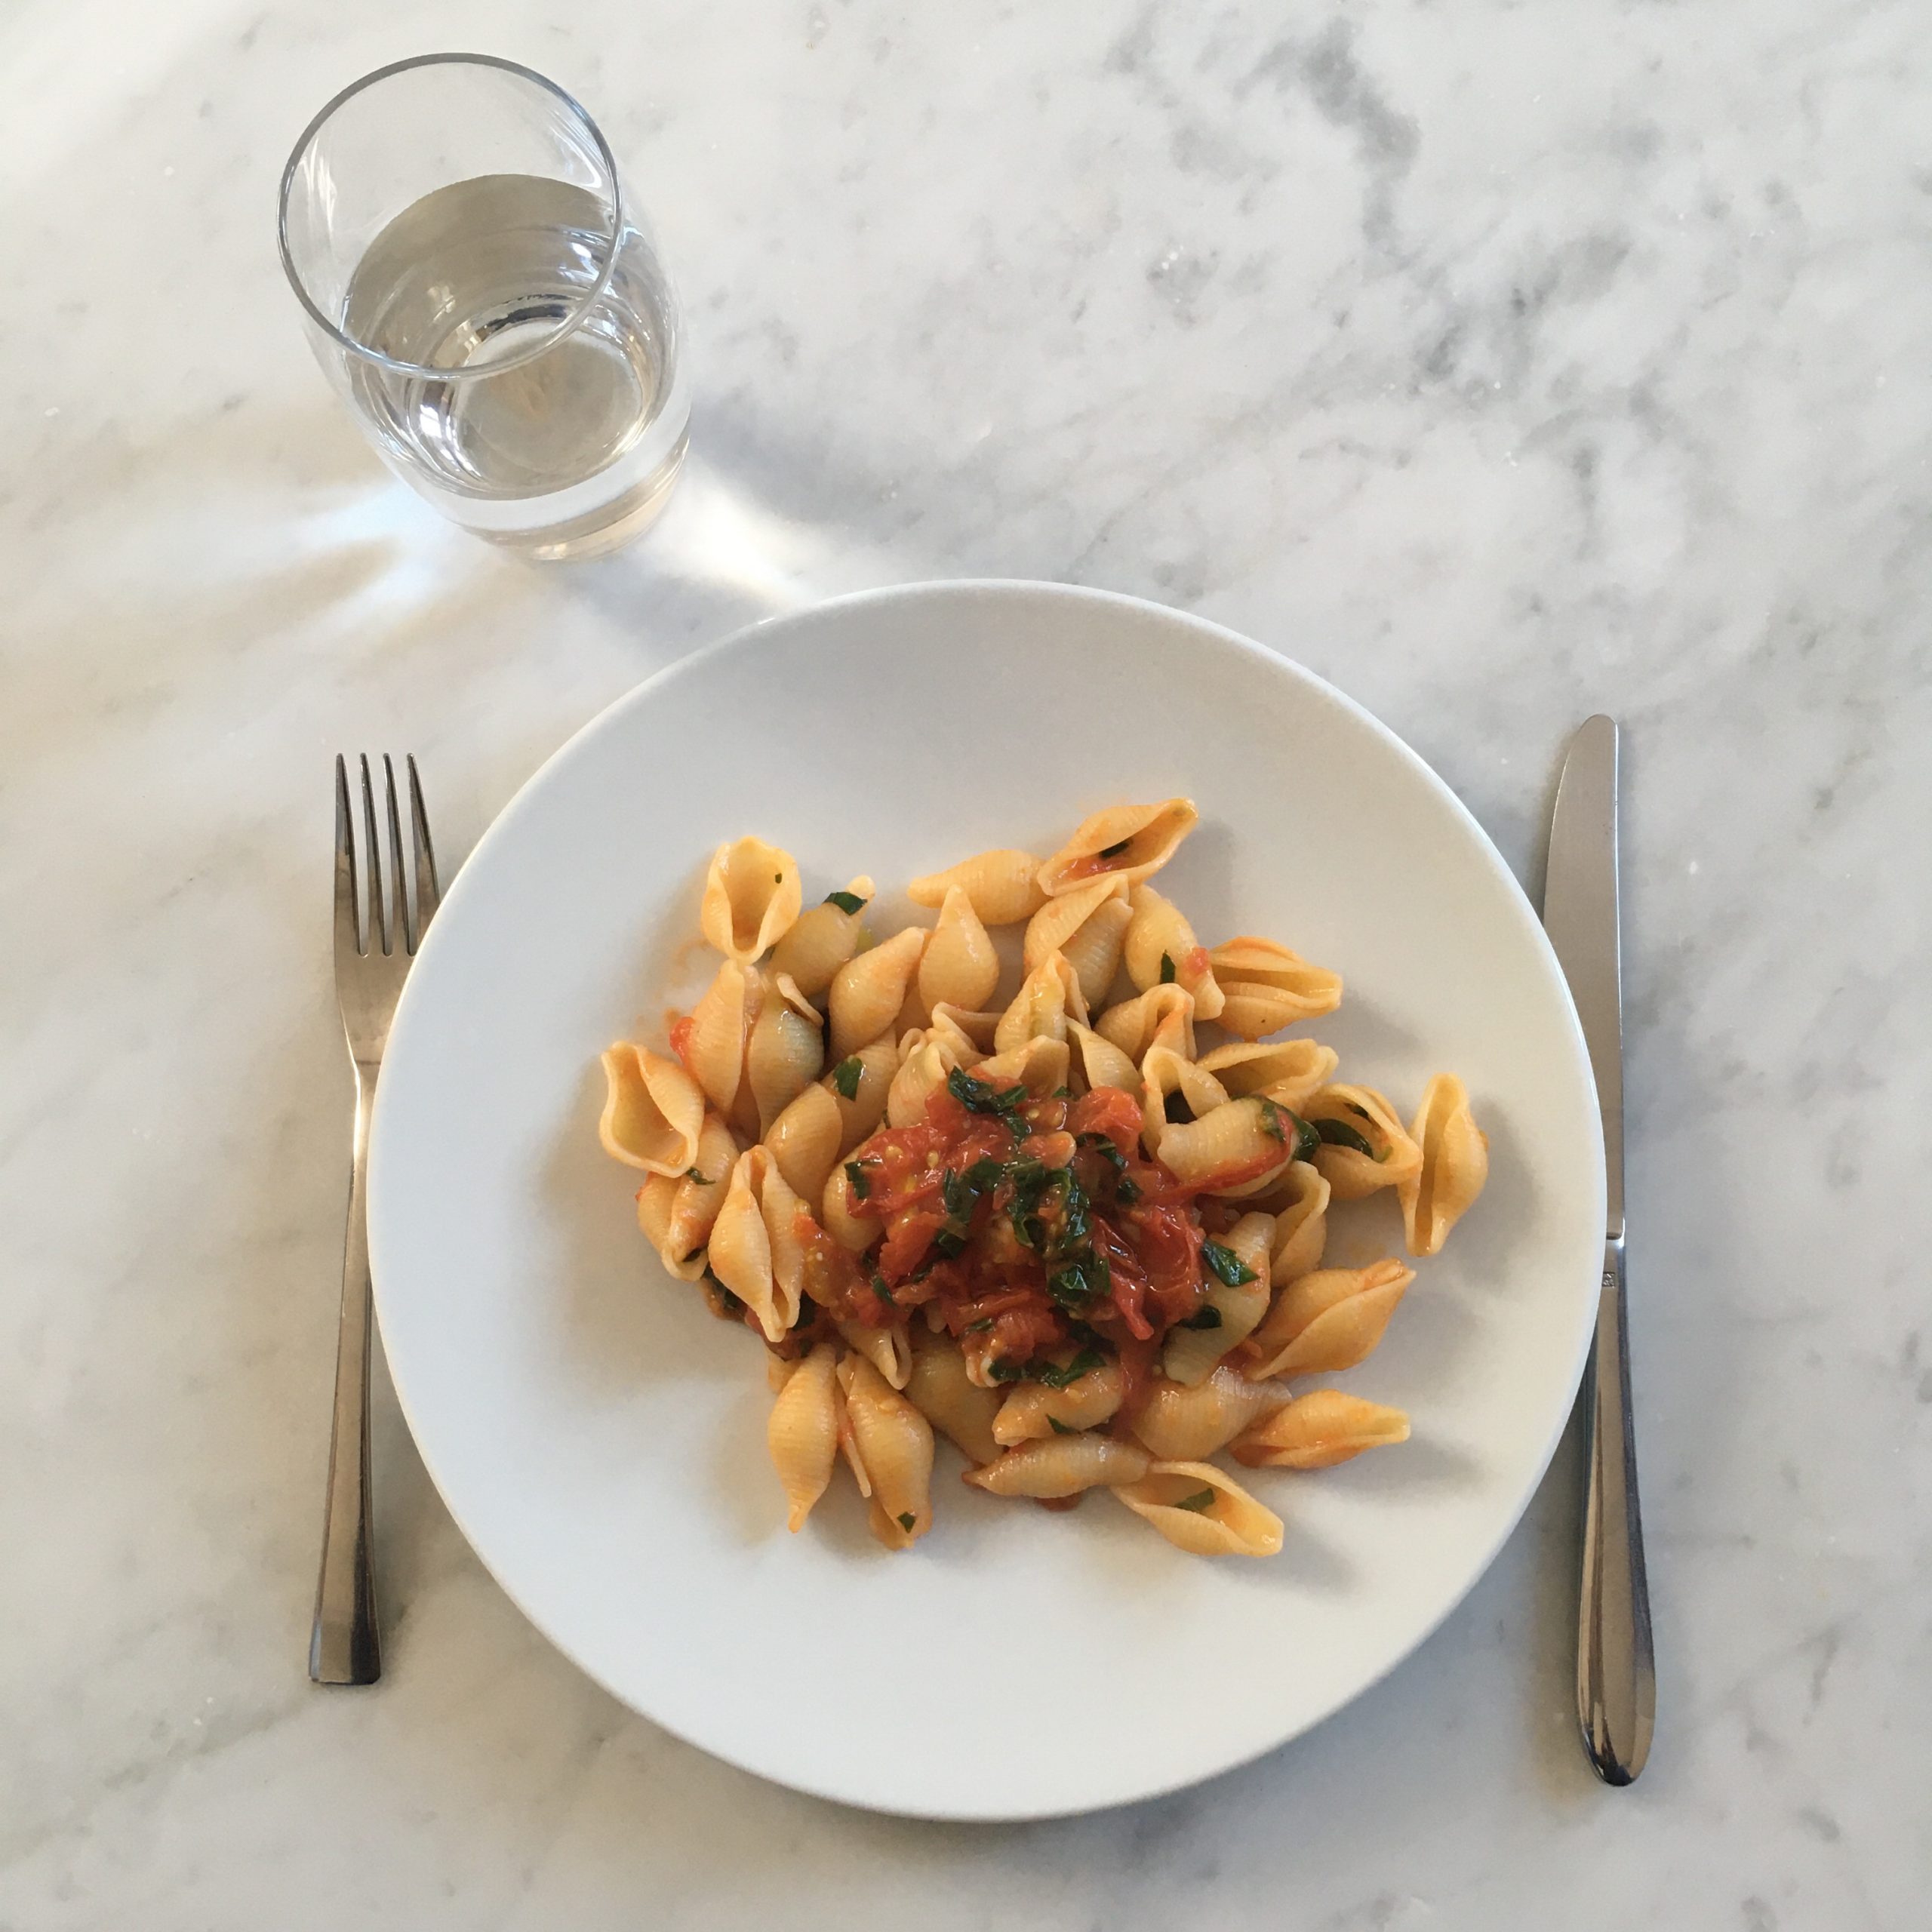
Every morning A. goes to work on site I prepare him a lunch box. I like to cook lunch early because then I know that my portion is also ready and I can eat any time, even when my schedule is super tight, which is more than often the case recently. When it comes to preparing our lunches and it includes pasta, I love to use fresh pasta because they cook very rapidly. The issue is that the brand of fresh pasta I like most has portions that are too big for one and too small for two… so today was one of this day, where I put 2/3 of the portion to A. lunch box, and I ended up with a sort of leftover size of pasta… not enough to feed me until dinner which would be late (again) today. Luckily I had gyoza skin in the fridge (for dinner) so I decided to pick 4 pieces and add these to pasta… but how???
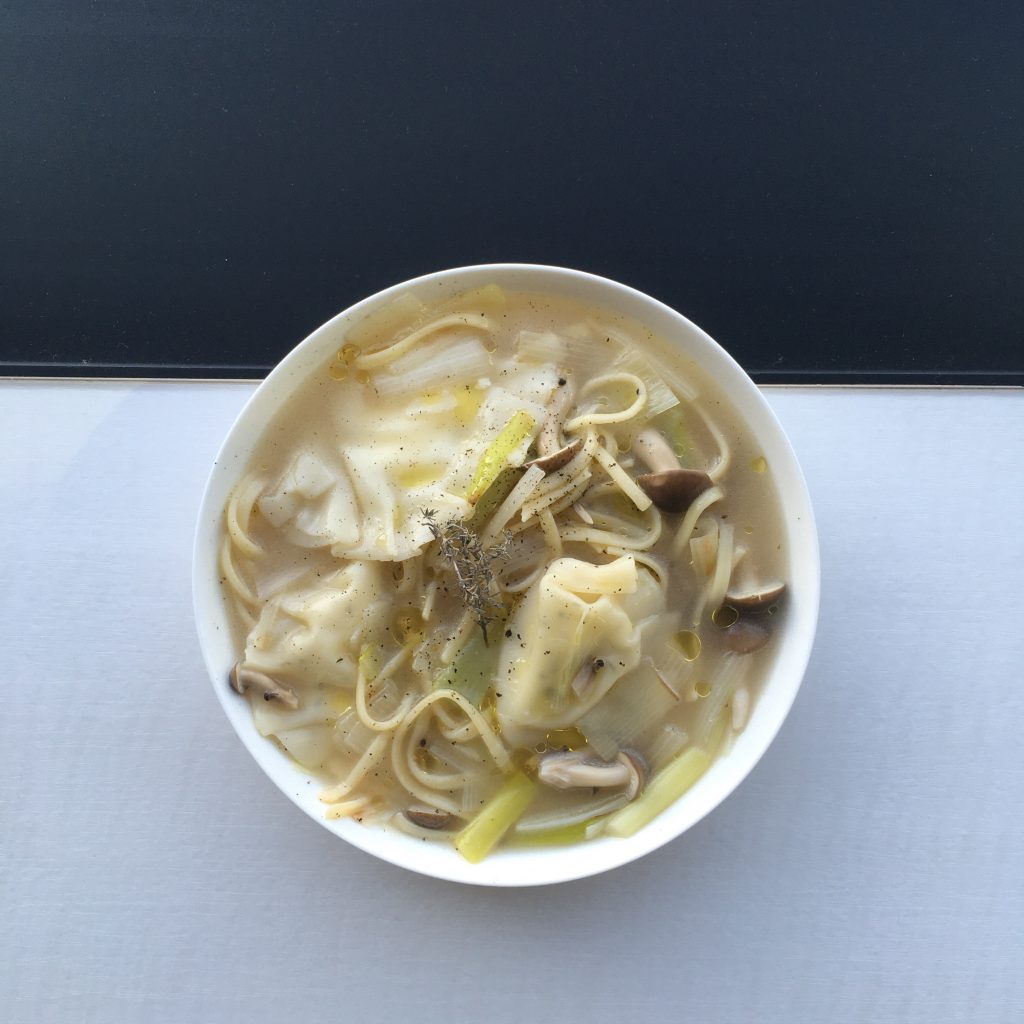
I realized that Asian food often mix dumplings and noodles in soups, so I decided to go for something like that except that it wouldn’t be Asian, but rather Italian like for me, with fresh mozzarella dumplings. And this is how the most delicious thing I have cooked in a bit was born. Too delicious not to share with you my recipe! I used the leftover pasta and the gyoza skin I love most, but you can use fresh pasta and make your own gyoza skin, it is super easy… I was cooking while on a meeting, so I used minimal time.
Dumplings and noodle soup (1 serving)
50g of leftover noodles or the equivalent to cook
4 gyoza skins (you can make your own, it is super easy and rapid too)
1/2 fresh mozzarella
1 leek
a few mushrooms ( I used shimeji)
thyme
salt and pepper
olive oil
Cut the leek in the size/shape you like, same with the mushrooms. Cut the mozzarella in 4. In each gyoza skin, put a piece of mozzarella, a bit of thyme and pepper. Wrap. In a pan add 500ml of water, the leek, the mushrooms and cook for 5minutes after it boils. Add the noodles, the dumplings and cook for another 5minutes. Serve, add thyme and olive oil and eat while it is hot!
OK… after a little time struggling with WordPress I’m back!!!
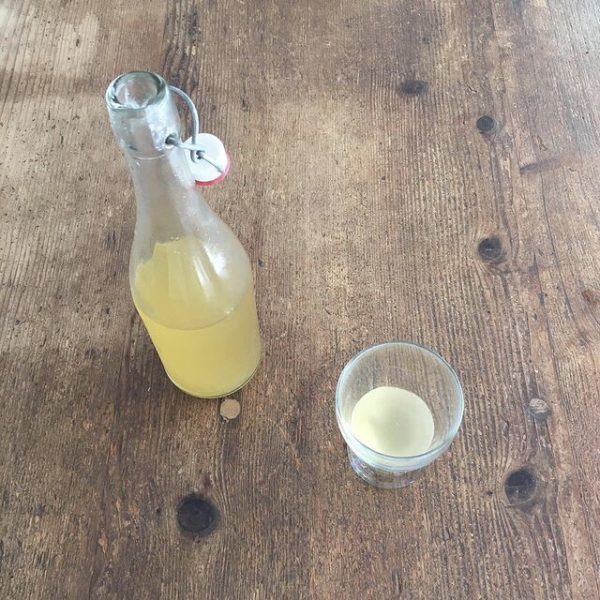
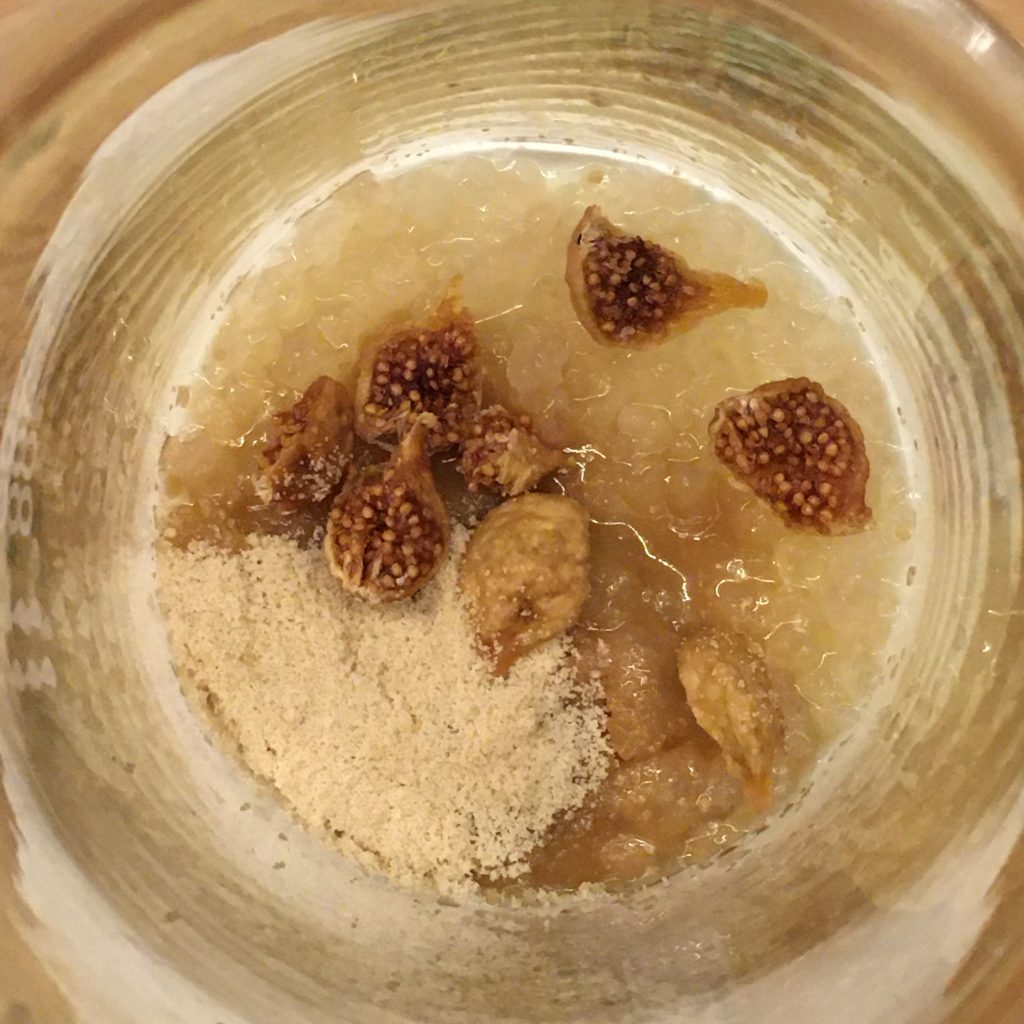
When I was living with my parents, a long long time ago, my mother always had some kind of homemade preparations such as yogurts, that I was very reluctant to try, and I am still for some reasons not to much tempted by. But when we were at my parents’ place last month, I had a chance to try my mother water kefir. At first I was just wondering what this drink may taste like, and when she told me she only put water, lemon and dry figs in it, and has been drinking every morning for the past few years… I was thinking that I may not die from trying and nothing in it could justify I don’t try. And to be honest I really loved it, and even A. did. So instead of packing tones of tasty cheeses from France I packed a bin of water kefir grains that I smuggled in Japan. (Honestly I don’t know if this is a prohibited product or not… information about water kefir grains are just as scarce as mystic…)
And since we came back, I have been making some every two day or so and we’ve been drinking some every day. I follow strictly my mother recipe but the process of making water kefir is still new to me, and I have been having a lot of questions about it that have been mainly unanswered. This is incredible really to see that such an ancient practice is so little documented, and even the scientific research papers on it are just too little.
The first question that popped to my mind when I was making my first batch was what happens if by mistake I release a kefir grain in the drain and it goes to the river that goes to the ocean… would there be at some point (and kefir grows really quickly) a giant kefir blob on the beach? Am I going to create inadvertently an ecological catastrophe like many have been created. Don’t you know about the terrible taxifolia algae in the Mediterranean sea, escaped from the Monaco aquarium? Or some kind of strange animal like ninja turtles… apparently my mother asked herself the same thing… we couldn’t find any answer… but assuming that water kefir exists for a very long time, if that were to happen, wouldn’t it had happened already?
The second question was, what happens if I drink the liquid and the fermentation is not over. Would that be poisonous? And if by mistake I ingest a grain? Same here, I couldn’t find a clear answer.
But one thing that I learned trying to find information about water kefir according to one paper, is that making water kefir drink industrially seems very difficult. So water kefir can only be made on small batches! Isn’t that amazing? And the other thing is that the kefir grain composition varies from one place to another. Not totally surprising but interesting… which means probably, like with sourdough, that each one produces a drink with a signature taste!
Mine is very mild and I like it’s refreshing taste and very slightly sparkling. I do not store it in an hermetic bottle to make it more sparkling, nor add any other flavoring such as fruits during the second phase. We just drink it like it is, after the first phase I just filter it. And I prepare it solely with dry fig and lemon, and a bit of sugar, but not too much either, may be that’s why the sparkling is very subtle.
I’m still learning and searching for solid info on kefir, so if you have good resources…
Making kefir: dry figs, lemon slices, a bit of brown sugar, kefir grains
When on travel, eating out for every meal has always been a problem for me. Too much food, too rich, too many ingredients, too much preparation, too far… not enough simple food, not enough traceability… there are so many reasons why I love homemade food… I have been used now for a long long time to making my own food even with the simplest ustensiles and in the most rudimentary kitchens, but for long stays cooking with a kettle, a plate and a knife used for eating, that would be a little too constraining. So when we decided to travel to Paris I had one strong requirement: our hotel room should have a kitchen. We found a place that checked all the boxes finally: the Majestic hotel. The kitchen wasn’t even tiny, with a great opening on the terrace, but minimally equipped: a frypan and a pan. I bought a kitchen knife, a wooden spoon and a bottle of olive oil, and I was ready to cook for 10 days. I need nothing more than that.
The farmers market down the street on President Wilson Avenue on Wednesdays and Saturdays provided us with all the basic, local and seasonal ingredients we would need. The fish mongers, the cheeses and the organic stalls are really great. For breads there is also a nice stall. You can also find there beautiful flowers, kitchen knives, and a few Italian food stalls, perfect for ravioli and others stuffed pasta. We didn’t test the meat stalls, as I barely cook meat, but there are a few with a nice selection.
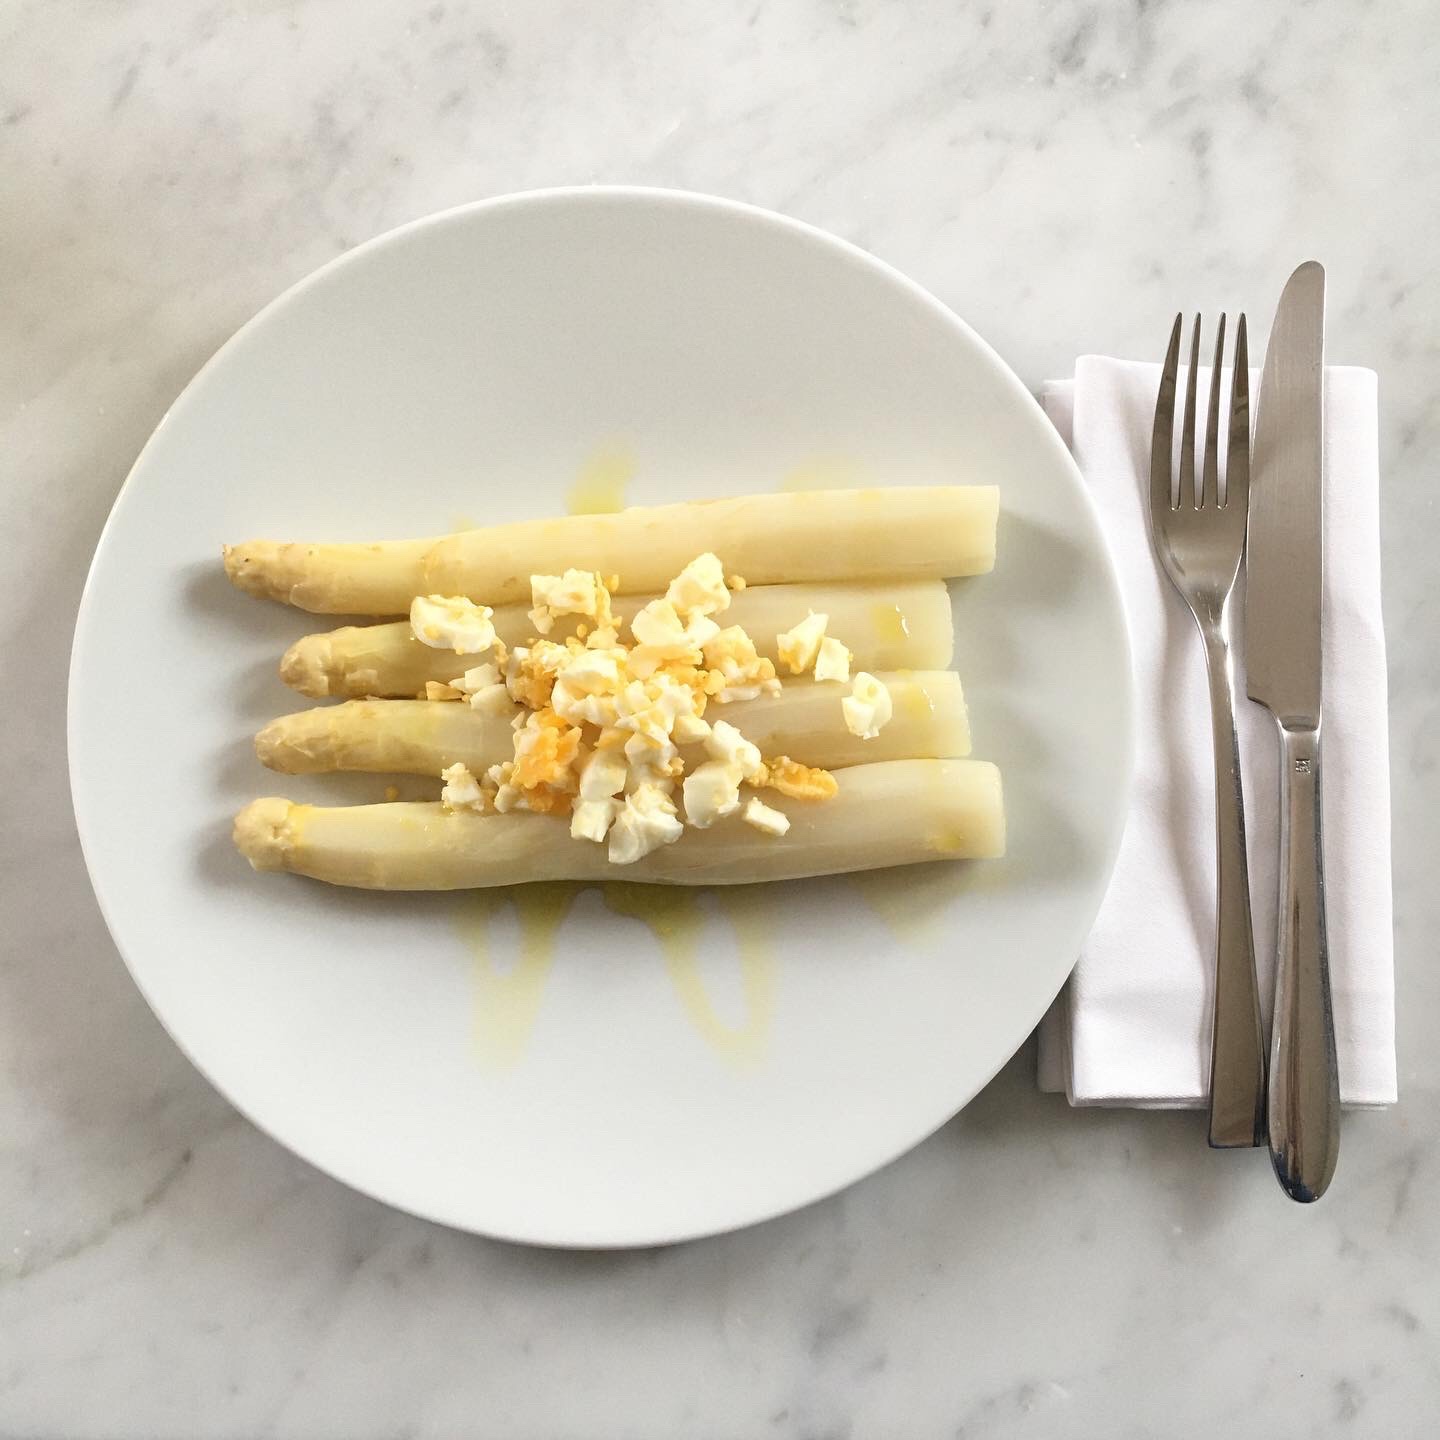
May in France is the season for strawberries, the very first cherries, green peas, asparagus, artichokes, new potatoes, new carrots etc… I focused my shopping on products I would usually not eat in Japan. Artichokes and white asparagus definitely were on the top of my list.
Nearby you can also find one of the trending patissier-boulanger shop: Cyril Lignac, which is the first one to open in the area: 7:00AM. With the jet-lag it’s almost too late, but we could manage to postpone breakfast until then and eat fresh pastries for breakfast. I would particularly recommend their pain aux raisins. Extremely delicious.
As a result, I tested some classic recipes and also created a super simple white asparagus recipe that I’d like to share with you.
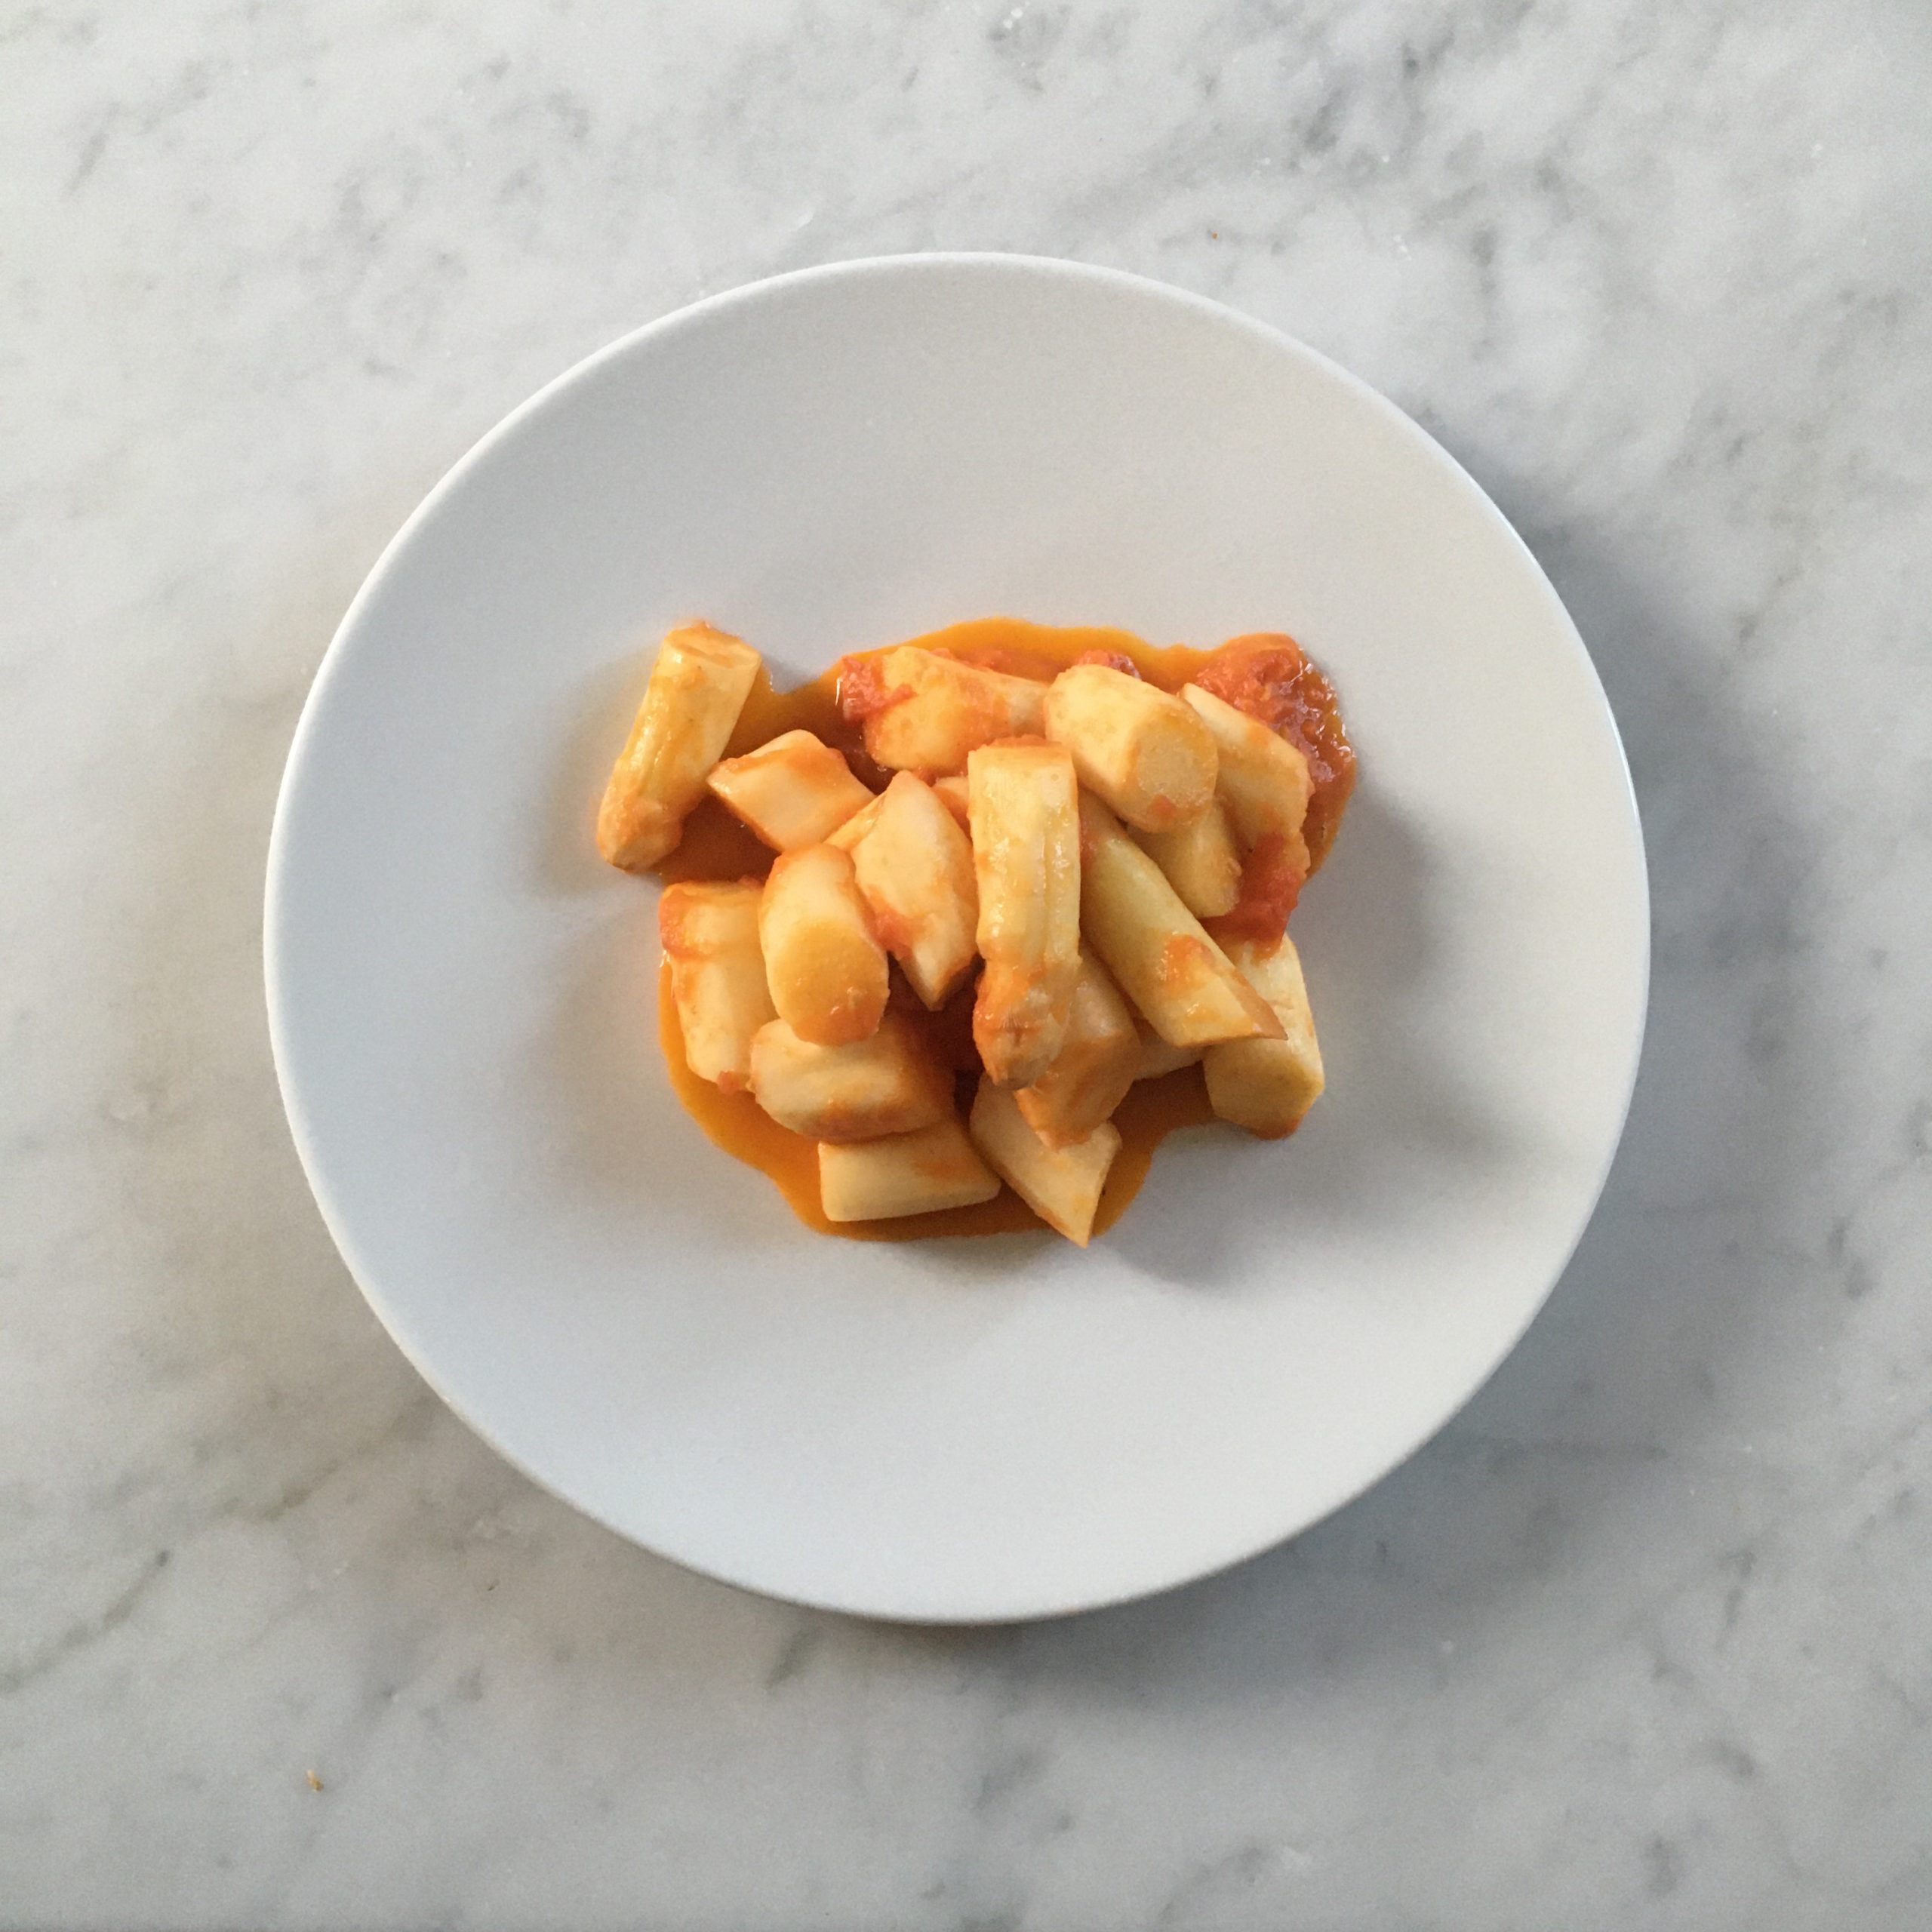
White asparagus in tomato sauce
5 white asparagus/person
2 ripe and large tomatoes/person
1tbs of olive oil
A pinch of salt and pepper
Wash and peel the asparagus. Cut in 3cm long chunks. Blanche them. Drain, let cool down and pat dry. In a pan add the olive oil and the diced tomatoes. Cook until it has reduced enough and it becomes a thick tomato sauce. add the cooked asparagus. Stir well and serve. That’s it!!!
Three Swiss chard and new onion new ideas of recipe
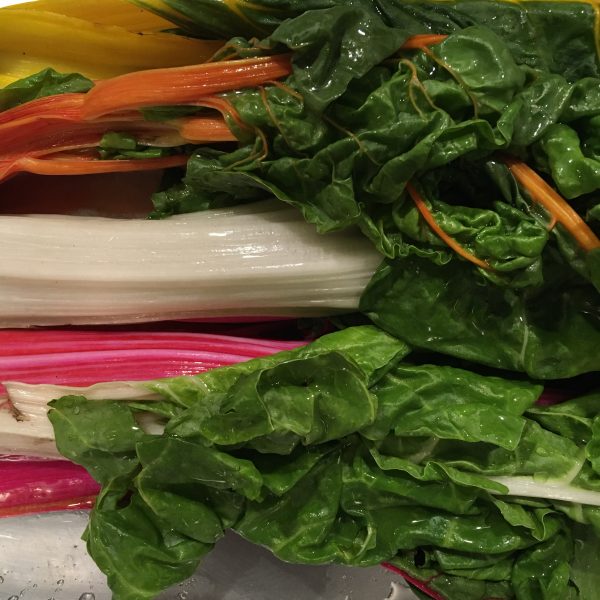
In France we have chards and they are green, with beautiful leafy greens and rather stiff whites. Both are delicious and I have always liked when my mother was making some. Compared to spinach they have a distinctive earthy flavor that I love. It took me a long long time to find chards in Japan. I only found some once we started to shop at local farmers’ markets in Isumi or once in a while at Mitsukoshi Nihonbashi. I think not because of the location but because they are just becoming more popular now and are not originally a green from Asia (we have so many already there…).
What surprised me the most was that instead of being the classic white and green vegetables I knew, they came in various bright and beautiful colors. Vibrant pinks, bright yellows… and the colors stay rather well even after cooking. The other funny fact is that the fibery white part (now colorful part) is a lot less fibery and stiff.
Actually growing some is also not too difficult so we had a try at it last year, and we enjoyed the very young ones not even cooked, just row and they make beautiful salads!
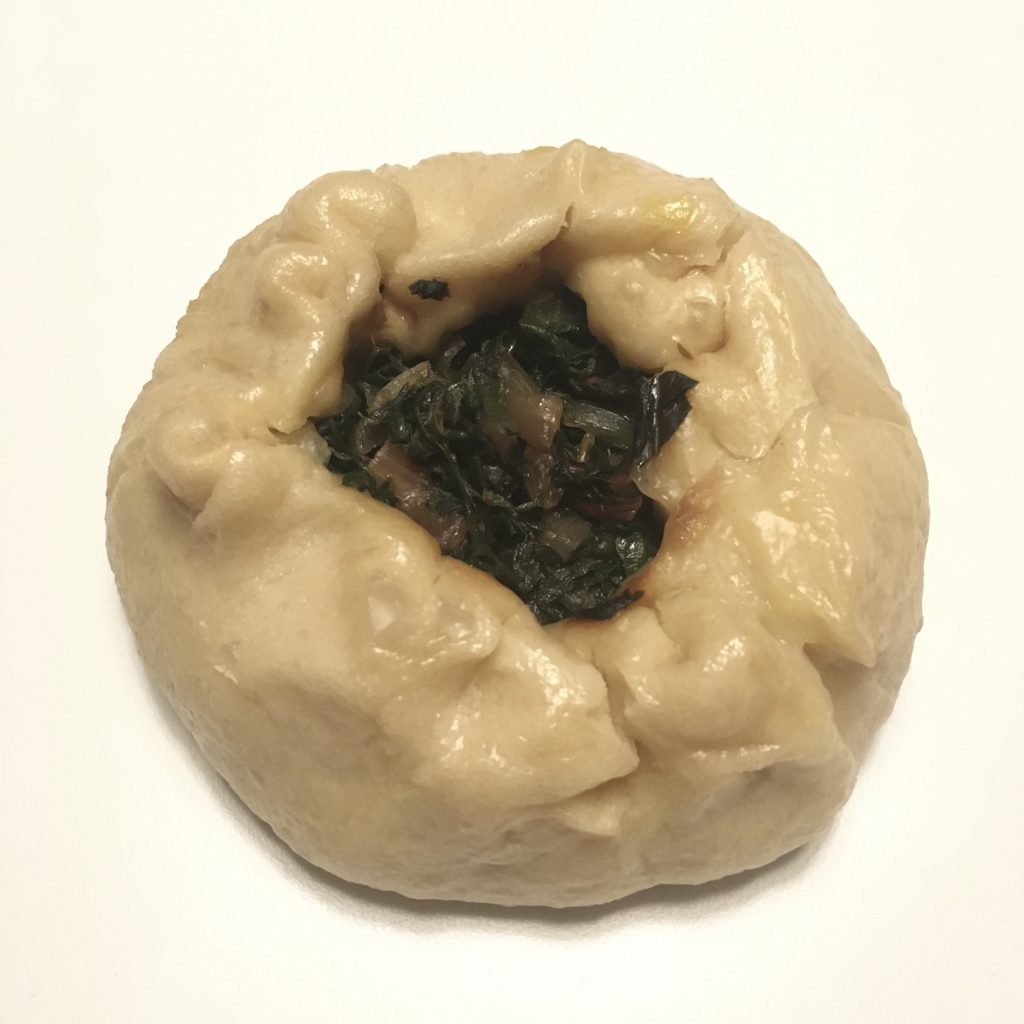
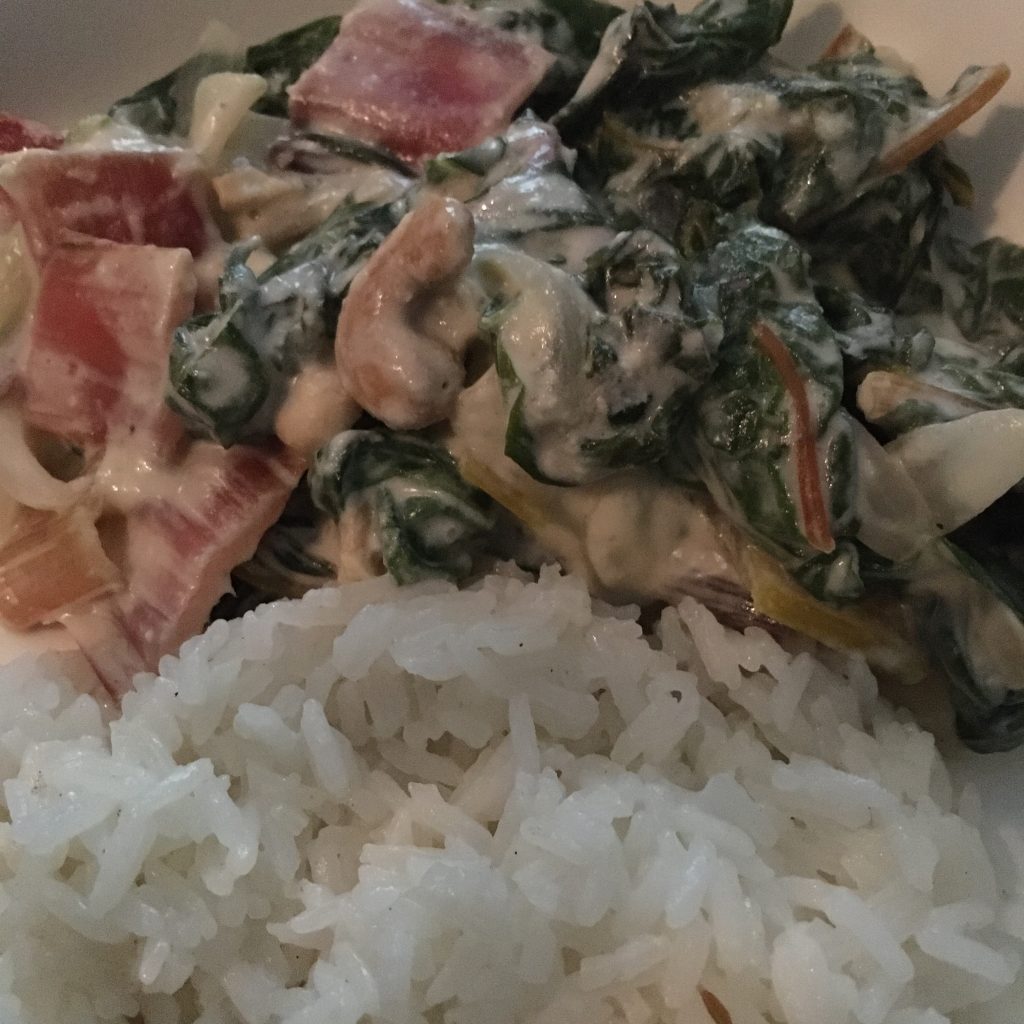
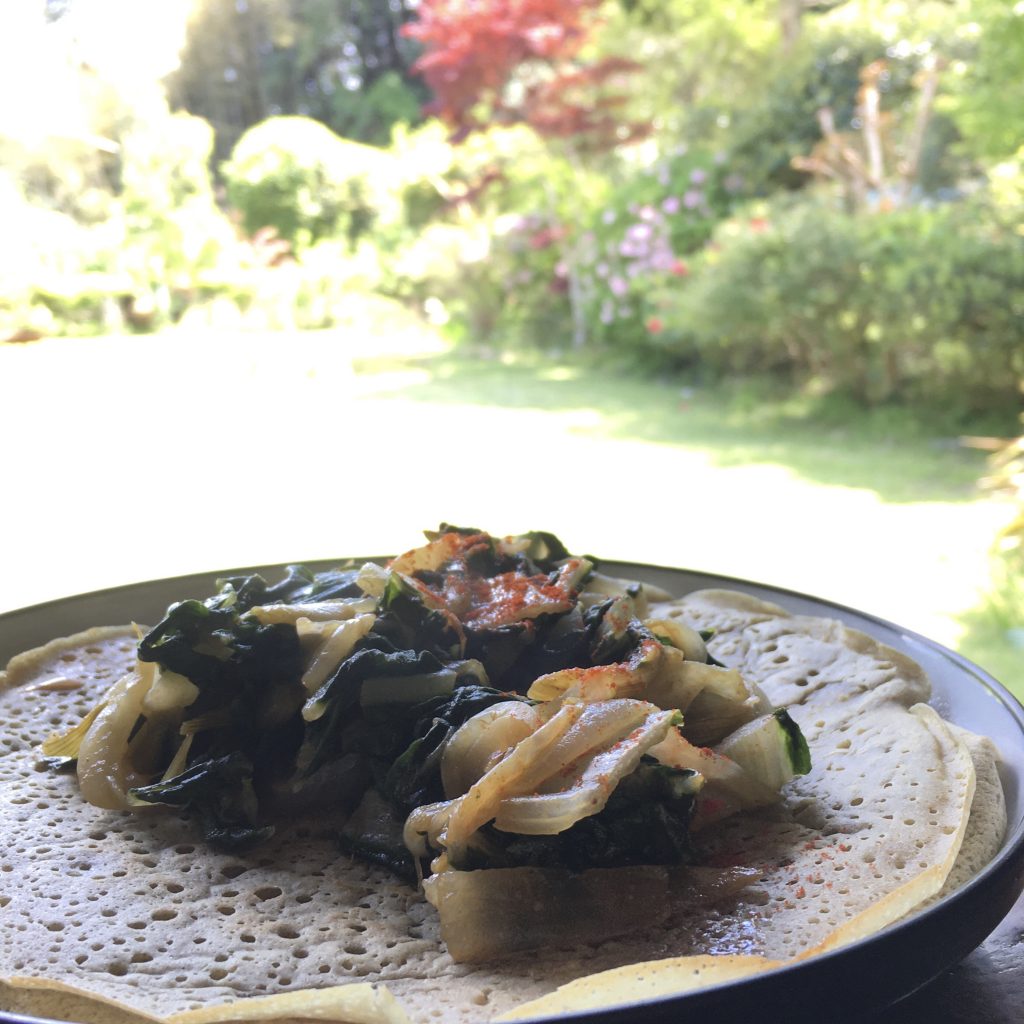
Last weekend on our way to visit some plots of land, we stopped at a local farmer that was selling some. And he gave us a real lot of colorful Swiss chards, and some new onions too. So Swiss chards and new onions have been on our plates pretty much every day. First with some simple pasta and olive oil, then I started to think about other possible recipes. My top 3 of the things I cooked with New onions and Swiss chards is as follow: 1. Steamed buns 2. With coconut milk and cashew nuts, served with spicy Basmati rice 3. With paprika and served with buckwheat pancakes
So here are my recipes. They are all vegan and super easy to make. I hope you’ll enjoy them!
Steamed buns with Swiss chards and new onions (makes 4 large ones)
a bundle of Swiss chard
2 new onions
a pinch of cumin
salt and pepper
1tbs of olive sesame oil
200g of flour
1tsp of baking soda
a pinch of salt
water
In a bowl mix the flour, baking soda and salt, add water little by little and knead until the dough is soft and smooth. (If you have time, replace the baking soda by sourdough and wait 12h after kneading).
Wash and chop the chards, peal and chop the onion. In a frypan, put the sesame oil, and the chopped vegetables and cook at medium-low heat until they are soft. Add the cumin and salt and pepper and stir well.
Cut the dough in 4, make balls, and roll them into an 18cm disc. Split the filling into 4 portions and put in each disc. Form the buns and steam for 20min. Enjoy with a bit of soya sauce or without!
Swiss chards in coconut milk with super fragrant rice (2 servings)
a bundle of Swiss chard
2 new onions
200ml of coconut cream or coconut
1 handful of cashew nuts (shelled)
salt and pepper
100g of Basmati rice
a pinch of cinnamon, of cardamom and coriander, 2 star anises
A bit of butter if you don’t mind
First, steam the rice with the spices, and the butter if you use some. Then, while it is cooking, wash and cut in chunks the onions and chards. In a pan put the vegetables, the coconut milk and the cashew nuts roughly broken. Cook for 10minutes at medium heat, while stirring once in a while. Then serve with the warm rice and enjoy.
Buckwheat pancakes and Swiss chards and new onion stew (2 servings)
a bundle of Swiss chard
2 new onions
1tsp of olive oil
1tsp of paprika
a pinch of turmeric
salt and paper
120g of buckwheat flour
1tsp of baking powder
water
a bit of oil for cooking the pancakes
In a bowl, mix the buckwheat flour, the baking soda a pinch of salt and add water until the dough is creamy, but not liquid.
Wash and chop the vegetables and cook them in a pan with olive oil while stirring once in a while. Add the turmeric and paprika, salt and pepper and stir again.
In a greased pan cook the pancakes (size is up to you) on both sides. Serve with the vegetables and enjoy.
Et voila, three really easy and delicious recipes with Swiss chard and new onions!
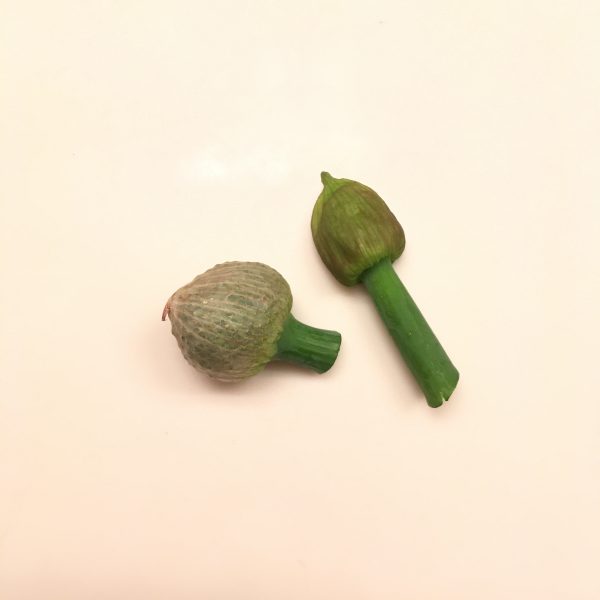
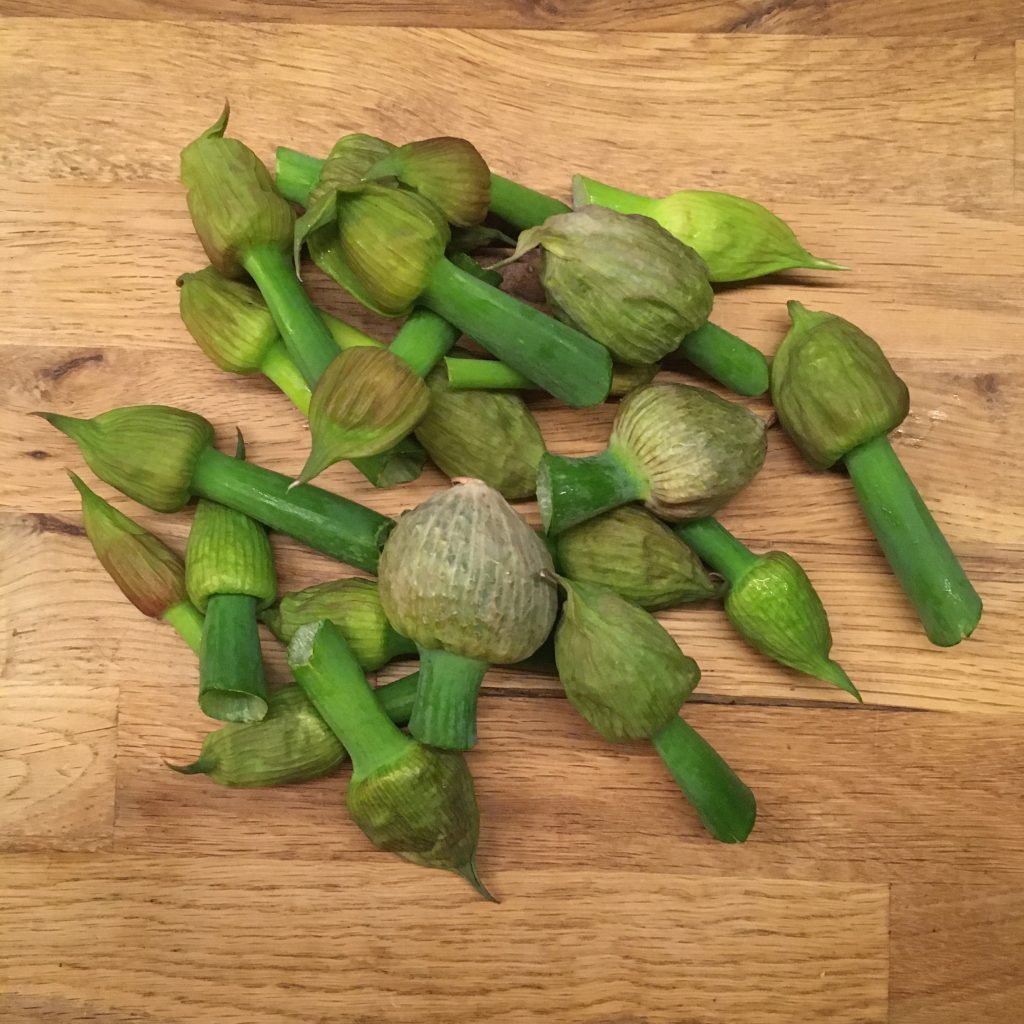
There is no need to go far to discover new things and in particular when it comes to food, there is always something new and curious to discover at the farmers market. You just need to look around and you’ll surely find something you haven’t seen before. This time I found negibosu 葱坊主 leek’s flower buds. You can often spot the beautiful flowers in kitchen gardens in the spring, they are amazing ornaments. But I never guessed that would be edible, and that even you would be able to buy them in the bud version at the farmers market. But it is!
So here I am with my negibosu… I thoughts immediately that tempura would be an appropriate recipe. For some reasons, tempura always work well with any green, even with strong flavors: fukinoto is a good example. But what else… and would actually negibosu be strong in flavors? So I browsed a bit the net. Nothing came out neither in French nor in English but for the fully blossomed leek flowers. It was of no help, so I turned to Japanese and bingo! Negibosu have a significant number of entries in cookpad, more than half of them being…
Tempura of course… hum… not helping much either… digging a bit more I finally found the other classic Japanese recipe to accommodate greens: miso ae. Miso ae, in my opinion, works better with creamy miso, the one I have, that I make, is more granular and won’t work as good… one recipe in the end attracted my attention: a goma ae one. So I decided to go for this one, well, my way though. (and the tempura… just in case!!)
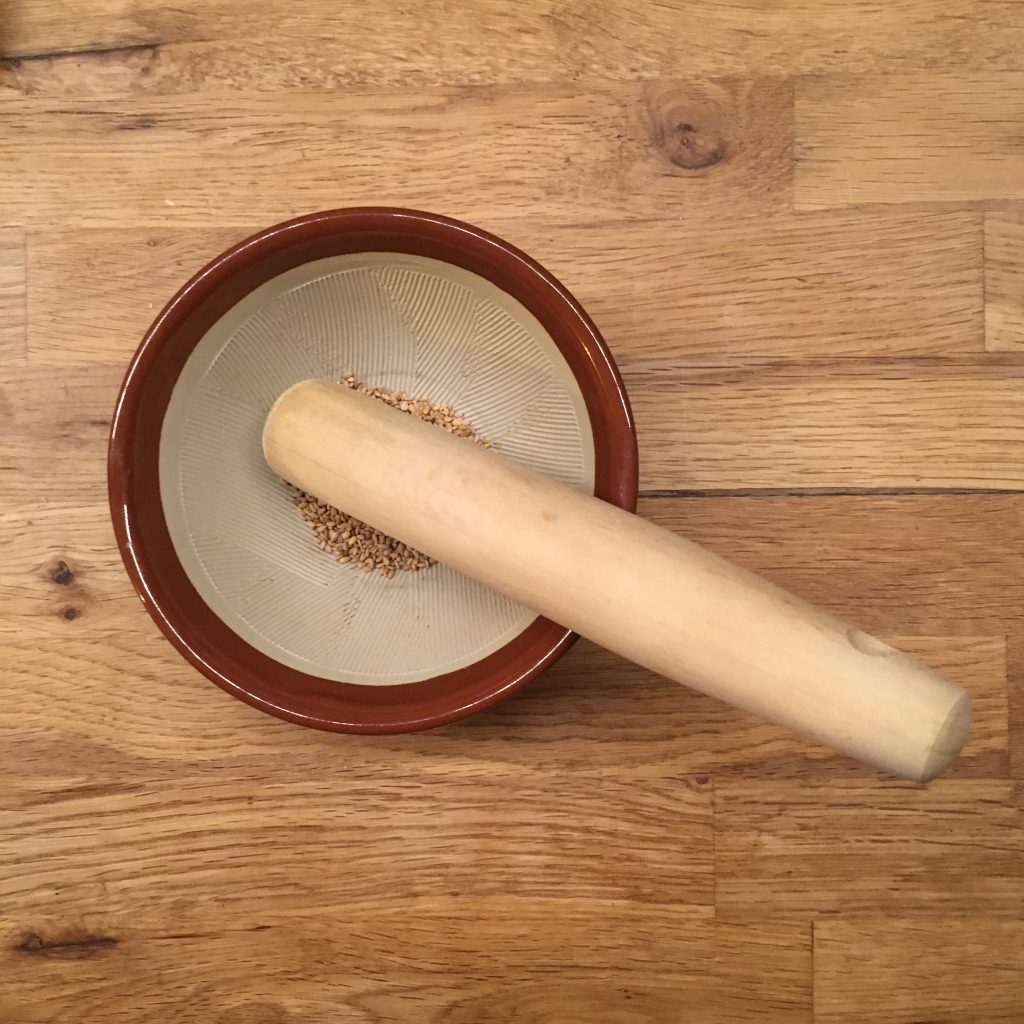
So here’s my recipe of goma ae. Suri goma すり胡麻 is ground sesame powder. It’s very easy to make from the sesame seeds, or to buy already powdered.
Making ground sesame: suri goma
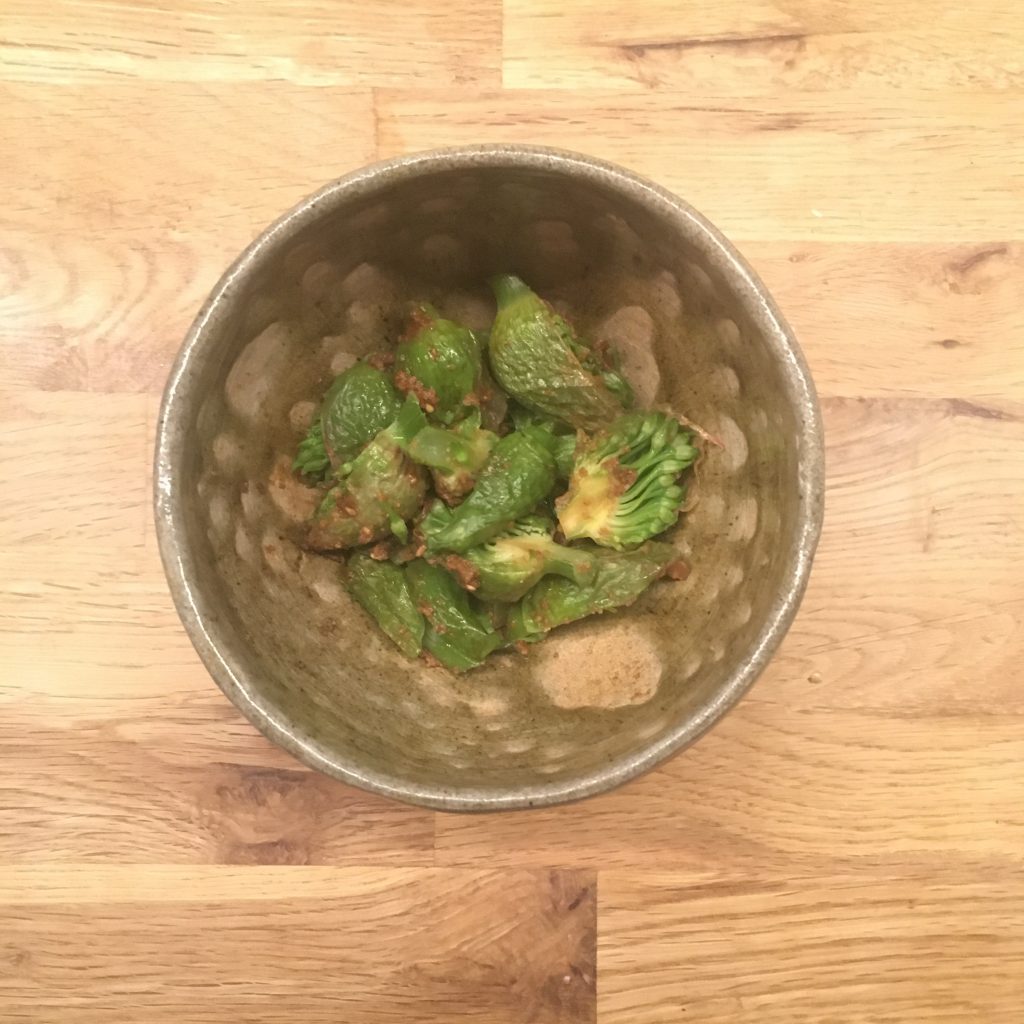
Negibosu goma ae (2 servings)
A dozen of leek flower buds
1tbs of sesame seeds
1tbs of soya sauce
1tsp of brown sugar
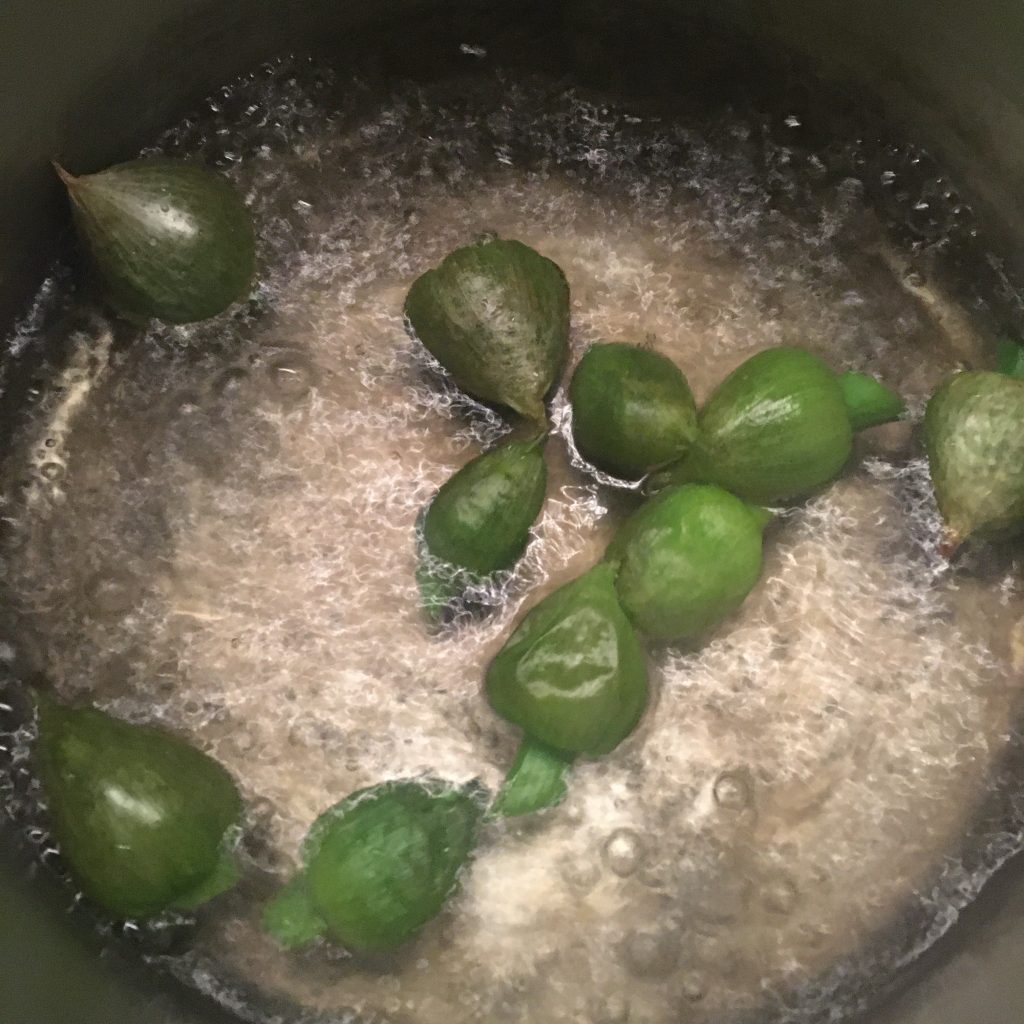
Wash the negibosu, remove the hard part if any, and blanche for a few minutes. Drain and pat dry.
Blanching negibosu
Once cool enough, cut in tiny bite size.
In a mortar, crush the sesame seeds with a pillar to obtain a paste. Add the sugar and soya sauce and stir. Add to the negibosu, stir and that’s ready!! Yes, it’s that simple and you’ll see it’s delicious!!!! Enjoy!
A few weeks ago I started to think about how much I love the French gingerbread called pain d’épices, that I don’t recall seeing any in Japan and that I never made some… It is heavy in the hand, yet light when eaten, with a beautiful golden color and flavors and aromas that sparkle in the mouth, and the texture is a very melting one. One of my favorite pain d’ épices of all time is that of my horse ridding teacher. She has a gift not only for gardening but also for cooking sweets. In summer during intensive training camps, she would bake while we would play around with the horses, and make fruits charlottes with the fruits from the orchard. In the fall or winter she would make pain d’épices. I was so found of it that I remember asking her the recipe, and she told me she just mixes 1kg of flour with 1kg of honey. I was probably 12 when I asked but I still remember this recipe because it didn’t make sense for me at the time, honey and flour, that’s it, really??? and I never tried, too scared of wasting 1kg of honey!
But when I started to look at how to make pain d’épices how surprised was I to see that, this is indeed the recipe for classic pain d’épices from Reims. What I didn’t know then was that the mix, with spices added, should be kept days or weeks to start the fermentation that will guarantee the fluffiness. Last year I would probably have been very skeptical trying such an attempt, as I was not very sure how all this fermentation worked, but since I made my sourdough Lois I feel a lot more confident to do flour base fermentation. Finally, last week I decided to start the experiment and prepared a mix of 600g of flour and 600g of honey together, some said that adding the spices at that stage would increase the development of aromas, so I added them too. I left the preparation in a container under a lid the whole week at home (with the winter temperatures settling in, the house temperature is about 5 to 9 now, so no big risk of seeing things rotting, or mold developing!!!!) And today I just found my mixture, it hasn’t changed much but it is not looking bad at all so I prepared it and baked it. The result???
A perfect pain d’épices! The look, the color, the texture, the smell… Exactly as you would find on in France, a happy A. and a happy me, eaten it with a cup of Christmas tea at tea-time or for breakfast. We even used it for toasts with cheese for me and some pork paté for A. and we were very satisfied. The recipe is very simple and except for the one week wait it is very simple to make. Definitely a must do again one. This recipe is will become a new classic like my pompe a l’huile.
Pain d’ épices (1 big loaf or 2 smaller)
600g of flour
600g of pure honey (liquid is easier but creamy can work too)
1tsp of ground cardamom
1tsp of ground cloves
2tsp of cinnamon
1 ping pong size piece of fresh ginger, pealed, grated or chopped thinly (I use fresh ginger because it is easy to find and I just chopped it roughly but you may use ground ginger, then 1/2tsp should be good enough)
water
additional 1/2tsp of baking soda (if your rise time is short)
About 5days to two weeks before you want to bake your pain d’epices prepare the dough. For that, in a container with a lid mix the honey the flour and the spice. If your honey is really to creamy and hard too work you can melt it in a pan at very low heat to liquify it. Stir to incorporate all ingredients. I used a spatula to do that as the mix is way to sticky to put hands in. One everything is well incorporated put the lid on the container, and let rest for as long as you want, but at least a few days.
After a few days, the spices may have start to color the dough a bit but it may not have changed much otherwise. When you want to bake your pain d’epices, pre-heat your oven to 150deg, just add a little of tepid water to the mix to soften it and knead. The dough is sticky but not terribly sticky. If you think your rise time is rather short (just a few days), you may want to add a little of baking soda now, to ensure perfect fluffiness. Knead and add water to obtain a compact yet smooth dough. Using parchment paper set in a cake dish or split in two and make two, or more. And bake for about 2h if you make a big one (check with a knife or stick if the dough is well cooked inside), for 2 smaller, about 1h should be enough.
I made a very large one and baked about 2h at 150deg, but wasn’t sure it was perfectly baked so I finished with 10 min at 180deg just to be sure. Let cool down before cutting and eating.
Pain d’epices normally keeps well, this is tone he purpose of the original recipe. But in our house, we didn’t had time to see how long it can keep!!! We’ve eaten it in a snap!!!
Look at this beautiful color and perfectly dense but bubbly texture!!!
I always feel excited when the days are becoming short and colder. Spending time outside when the sun is high, and as soon as the sun sets down, it is time to sit for hot spicy tea, a slice of cake or a piece of something comforting. I bake Provencal pompes a l’huile, panettone, or brioches. This is an habit I took when we were in Florence, and I cherish it very much. I also like to go for a walk at night and see the illuminations. Tokyo is really good at creating a festive atmosphere, would it be for the new year, the cherry tree blooming, the summer fireworks… there is always a good reason to decorate and makes us feel like little children.
Christmas decorations at Mitsukoshi Nihonbashi
But when I look at western magazines and IG feeds, it is all about festive food, or so-called, but it is just an accumulation of decadent food, that I must say is a mood killer for me. Rich buche de Noel or Christmas cakes, menus with heavy terrible food such as foie gras, or very creamy things I am just running away from these. I don’t like most of the fancy food: truffles, caviar, oysters, foie gras. and all these pictures instead of appalling to me they only make me crave for simple food, nourishing and warming yet elegant.
This is when I make more often than ever ochazuke and soups with vegetables and grains. I really love a warm bouillon with some nourishing pasta or rice or chickpeas, lentils, spelt, beans… Today I came up with a super delicious recipe, so I am very happy to share it now!
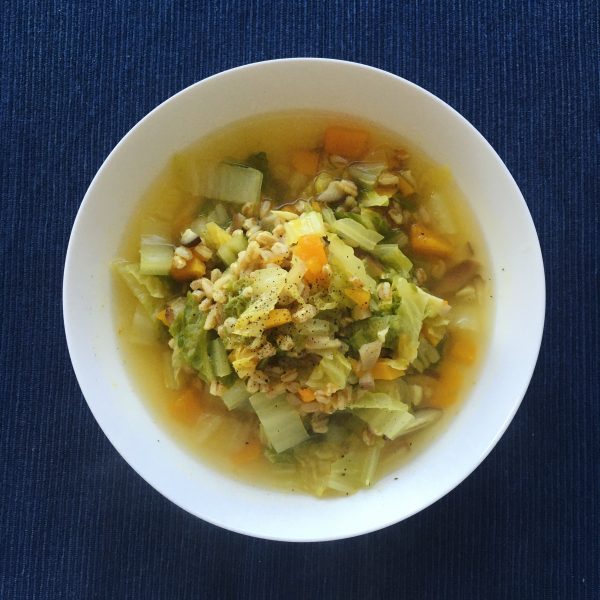
Farro winter soup
1cup of farro
1/4 of Chinese cabbage
1/4 of butternut squash
8 shiitake
1tsp of turmeric
1/2tsp of ground cumin
1/2tsp of cumin seeds
Wash the cabbage and chop it. Same with the shiitake. Peel and cut the butternut. Put them all in a pan and amply cover with water. Add the farro. Cook at high heat to bring to a boil, then cook for 30min at medium to low heat. Verify that there is still enough liquid, add some if necessary. Add the turmeric, the cumin powder and seeds, a big of salt and pepper. Give a good but gentle stir and serve. Eat hot. No need for an drizzle of olive oil in my opinion but you can add one if you want !
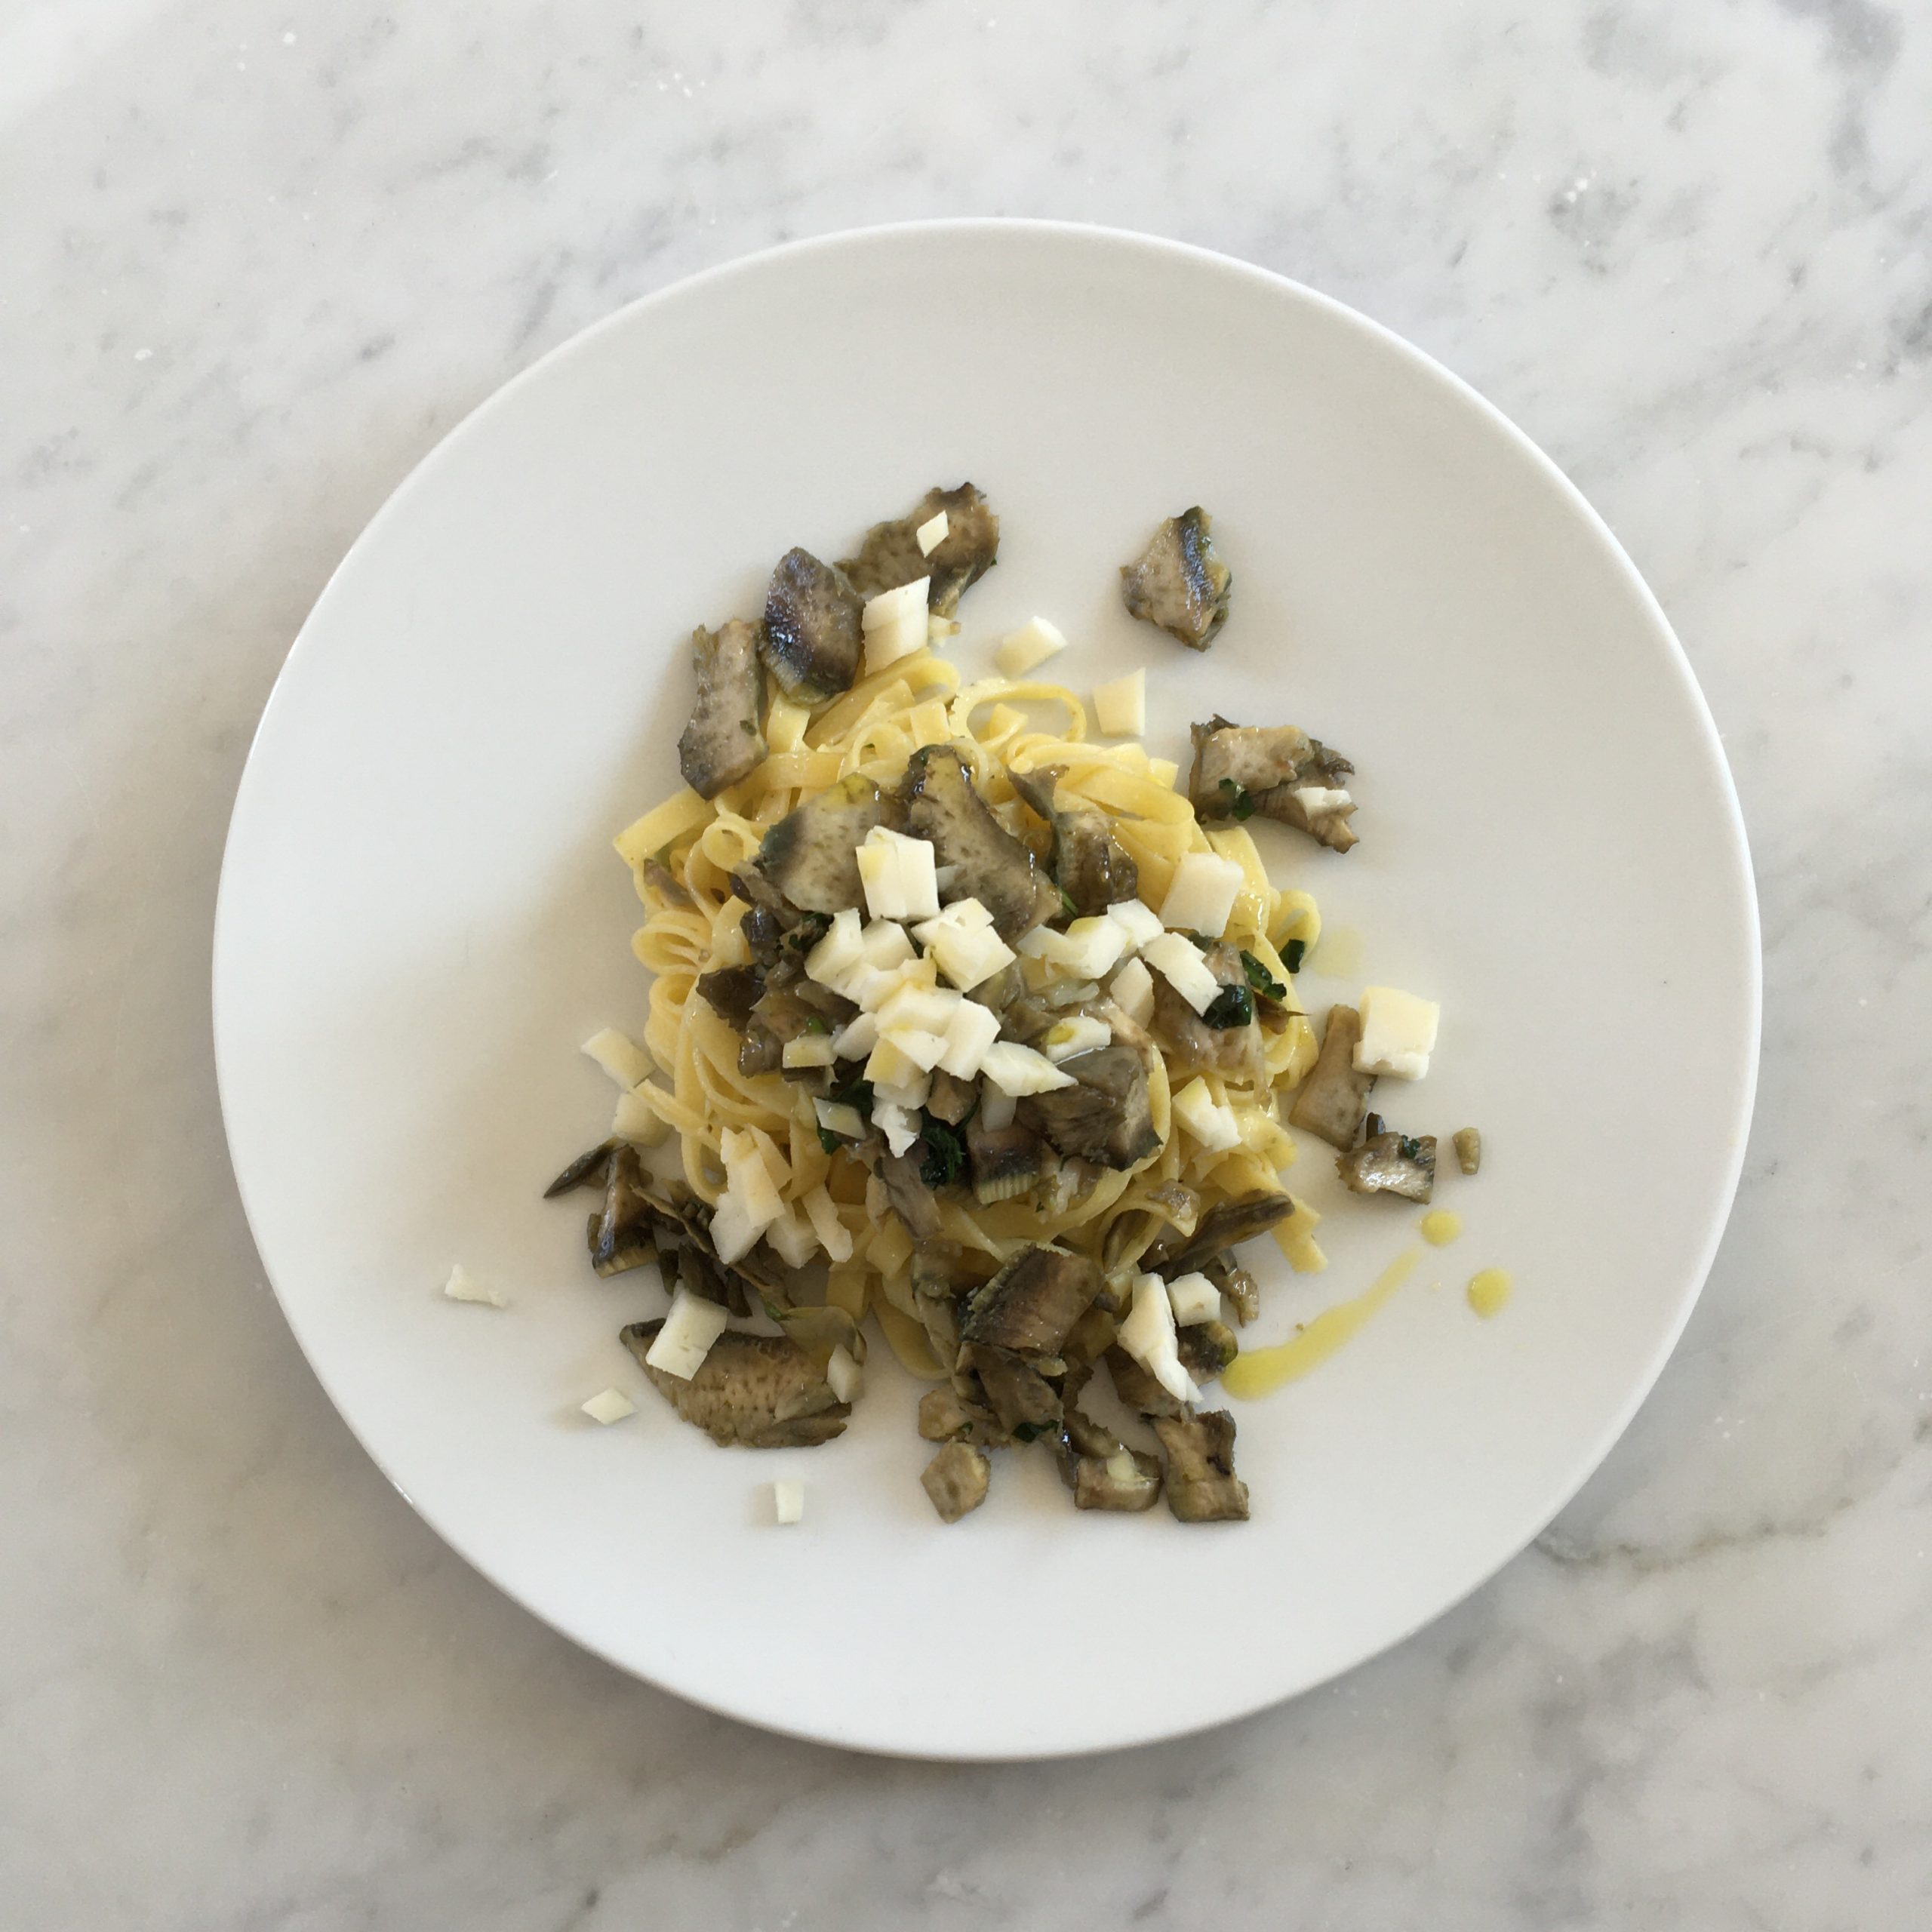
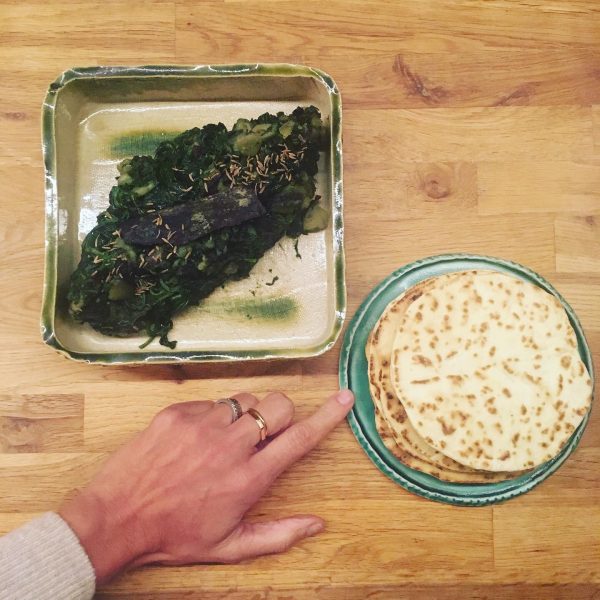
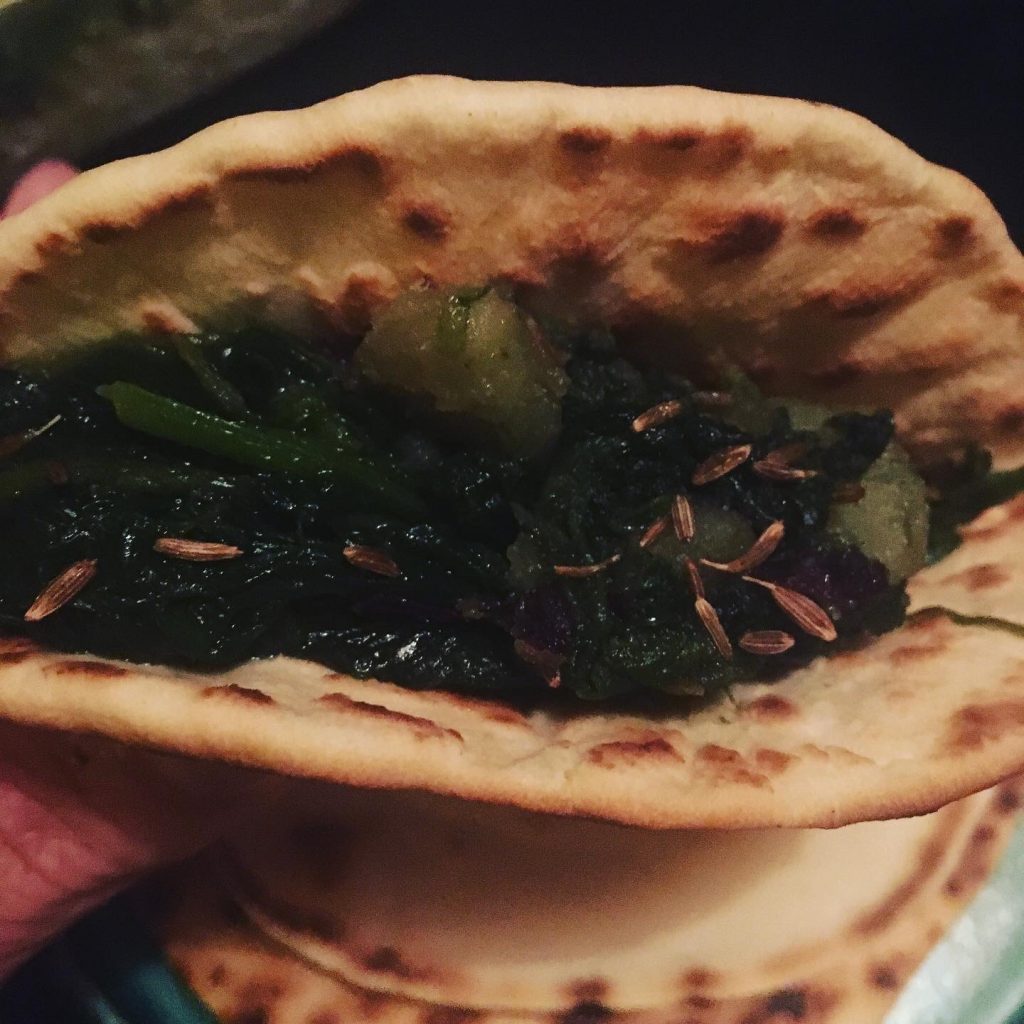
There are things I love I don’t make often enough. Among them are cha-kaiseki cuisine, ravioli, steamed buns and flat breads. Even though they are easy enough to make I just get distracted, or don’t have the right ingredients, or prepare something else. So last night when time to prepare dinner came I had my mind set on flat breads and couldn’t change it. But with what??? It took me a bit of time to come up with something that would be a good match, but suddenly spinach and sweet potatoes ragoût appeared as the only option. A bit pf spice and I knew it would be a hit! And damned it was!!! As simple as it you can improvise your own recipe, just in case, I share mine.
Flat breads (8 15cn pieces)
150g of flour
A pinch of salt
A pinch of baking soda
Water
Mix the flour, salt and baking soda together. Add water little by little while kneading until you have a smooth dough. Leave aside.
After you have prepared the veggies (see below) cut the dough in 8 pieces. Roll each to a 15cm and cook them in a pan on both side until golden.
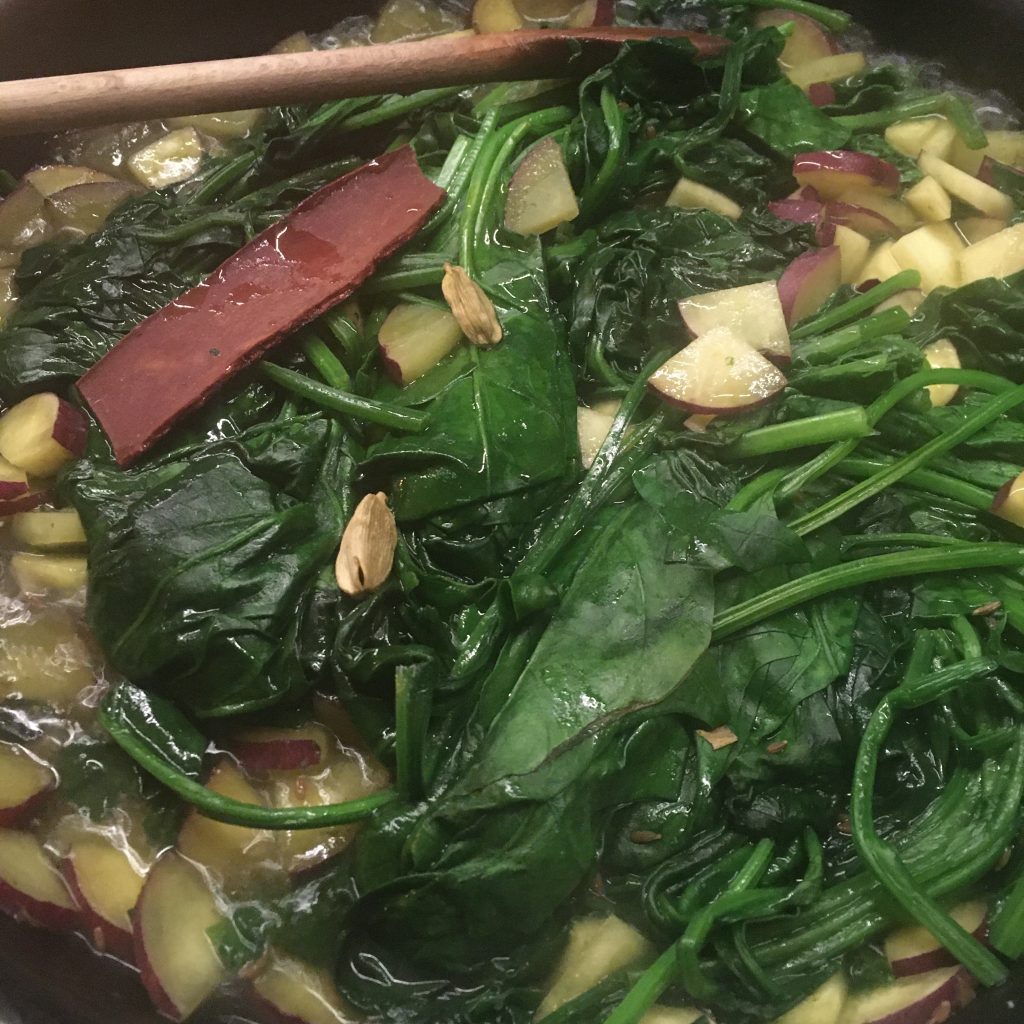
Spinach ragoût (2 serving)
2 large bundles of fresh spinach
2 sweet potatoes
1 cinnamon stick
2 cardamom pods
1tbs of carvi seeds
3tbs of olive oil
Salt and pepper
Wash the vegetables. Cut the sweet potato in bite size. In a large pan heat the olive oil. Add the vegetables, and cover with water. Cook slowly. Add the spices. Let cook at low heat until all the liquid is gone. Stir sometimes.