Auto pilot in the kitchen…

There are times in the year like the one now: busy at work that leaves shorter times to cook, busy in the garden that leaves little time to cook too, end of the season and timid transition to a new one that force to use the same ingredients over and over and inventing new recipes or testing new recipes is not really on the agenda. I have exhausted my resources or almost. When time comes I put myself in autopilot for the cooking: I use as less resources as possible, working on the basic, classic versions of my registry. Spinach, shiitake, broccoli, carrots and bok choy are cooked in minimum time for the simplest recipes ever.

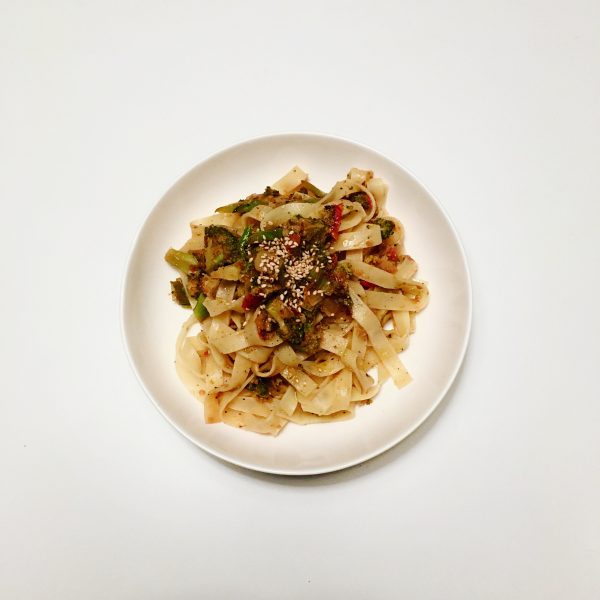
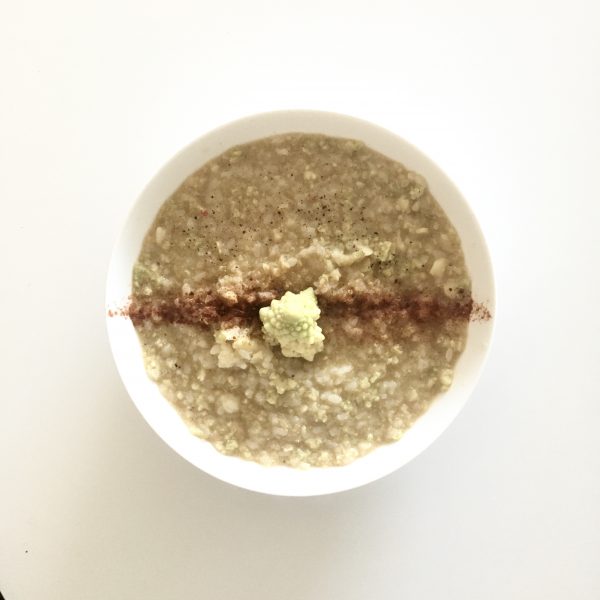
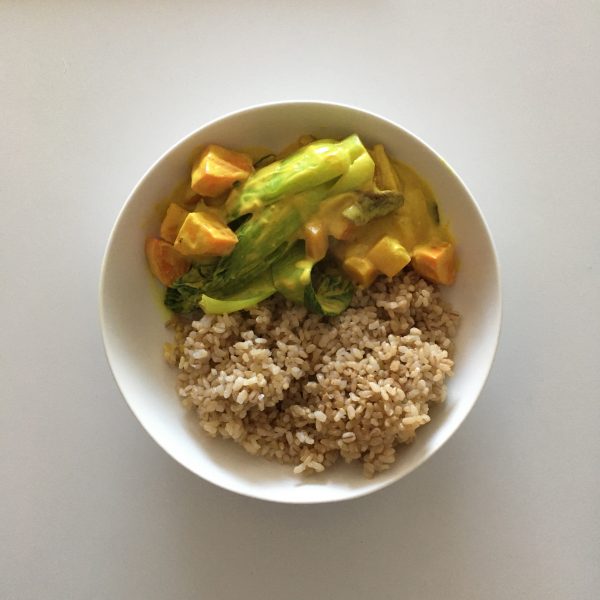
I have a few new recipes I’ve been loving to make in the past year. One is coconut milk curry, and it is one of my favorite super quick lunch fix. It is sooooo very simple and hands free that you can cook and work or cook and go for a walk while the pot is on the stove. And the result is always so colorful and tasteful that it’s a hit! I serve it with brown rice preferably but white rice would work too. Here is the recipe for today’s version, of course you can adjust the spiciness and the vegetables to the season, the location and your taste. I would usually use a combination of three vegetables: one crunchy, one creamy and one green…

Coconut cream curry (serves 2)

  • 1 large carrot
  • 1 bok choy
  • 5 shiitake
  • 100g of coconut cream or milk
  • 1tbs of turmeric
  • 1/2tbs of curry powder
  • 1 tiny pinch of red pepper
  • 1 pinch of salt
  • 1 pinch of black pepper

Wash and cut the vegetables to the shape and size you like. In a pan slightly greased, put the carrot and the shiitake and start cooking at medium heat, then add the coconut cream or milk and stir well. Cook at low heat under cover. It your vegetables pieces are rather large add 1/2 cup of water. Add the spices. Let on the stove for 15min still at low heat. Add the bok choy and cook for 3 minutes until leaves are still bright green. And that’s it… serve with rice.

If that isn’t super simple tell me what simple means for you!!!

More Wafu pasta

I have a principle that I apply for pretty much anything and even more when I cook or think about cooking, it’s to be always flexible and opened to opportunities, or see change in plans as one. Nothing is definite. A recipe evolves and comes to life as ingredients are mixed together, taking the mood and the time into consideration… This is exactly how this wafu pasta recipe was created. It all started with a bicycle ride to go diy shopping. On the way back, if we take this road, I like to stop at the little stall that sells local fresh vegetables grown right on the spot. Sometimes the shelves are empty, and sometimes they have little treasures. They just had many little treasures this day. In particular a big bundle of tiny sweet leeks appealed me. I just picked it, slid a 100yen coin in the box and off we went.

But what to do with them… I had no plan… until a few days later when time for dinner came and it was decided we would eat pasta. Tagliatelle. A bit of sesame oil was remaining in the pan from some little rice crackers I made, so I decided to use it. Chopped the little sweet leeks, coated them in sesame oil, added a very ripe large tomato (that can easily be replaced by a good tomato sauce or preserved tomatoes), and cooked at low heat until I obtained a creamy tomato sauce with the delicious flavor of the fragrant sesame oil, slightly confit. Added the boiled pasta, stirred well and added a bit of sesame seeds before serving. A new version of the wafu pasta…

How do eat your pasta Japanese-style? Have you ever tried???

Warming up!

Sunny but cold days follow each others this week, so a warming and rich soup is always good, isn’t it? I had rice ready for lunch and a romanesco in the fridge, and I wasn’t sure about how to eat them together, when the idea of combining them in a soup came to my mind. I was a bit worried about how it would turn, but with a few well chosen spices it was really a great idea! Not very photogenic though… so let me share the recipe here with you. I hope you’ll like it and test it!

Rice and cauliflower soup

  • 1/2 cauliflower or romanesco
  • 1 cup of rice (cooked)
  • 1 pinch of nutmeg
  • 2 pinches of paprika
  • salt and pepper
  • 1 little pinch of red pepper (optional)

If your rice is not cooked yet, cook it, you can use leftover rice too.

Wash the cauliflower or romanesco and steam it. Then mash it roughly adding a bit of the cooking water, to obtain a rather liquid but not too though, mixture (blender works too). In a pan heat gently, add the rice, salt and pepper, the nutmeg, the paprika and if you like it a little spicier the red pepper. Stir and serve hot.

Chandeleur VS Setsubun

In France, on February 2nd, it’s Chandeleur. A quick search on the internet told me that it’s Candlemas, a Christian celebration, 40 days after Christmas, the presentation of Jesus to the temple (thanks Wikipedia for enlightening my ignorance), but for me Chandeleur was just the day we ate crepes. A most awaited time as for some obscure reason my mum wouldn’t flip crepes often and we would for sure have some on February 2nd!!! One of my mother traditional savory filling was béchamel and ham, while I did like it then, I now barely prepare béchamel. A. doesn’t like it and I find it a bit heavy unless it is to eat with leeks or mushrooms only. My crepes filling is usually very simple: spinach, mushrooms, ham or prosciutto, eggs, cheese. Usually no more than two at the time, we are eating crepes not a kind of “put it all”… and it’s s good excuse to have a few crepes with different filling combinations!!!

To be honest, I care a lot less now of Chandeleur, because, as you may know if you follow me on Instagram, I flip crepes more often then I don’t! Crepes are my quick fix for a snack treat and A. loves them. And once in a while we also have savory crepes, or more precisely galettes, because I cannot help but love buckwheat crepes. I like them simple, with some vegetables and eggs, or ham and melted cheese. So over time I realize I have been skipping Chandeleur quite often, but who cares? As soon as you have a good crepe basic recipe you can make them anytime and realize how easy it is! You can easily change the wheat flour by 2/3 of buckwheat in my recipe to make galettes, you can even increase more the percentage of buckwheat, but don’t forget that with wheat comes gluten and with gluten comes consistency and firmness, so going gluten free means more cooking time before flipping and extreme carefulness in handling.

I don’t have a shallow crepes pan so I simply flip them in a large non sticky frypan slightly greased with butter, and it works perfectly well, no need to clutter the kitchen with this kind of goodies!

Have a good crepes flipping if you are planning to make some! I made some last week so I’ll pass today! Oh! And this year Setsubun 節分 is on February 2nd (it usually is on 3rd or 4th)… a celebration to welcome the new season (spring) that I love very much. I prefer by far traditions that are linked to seasons cycles or natural events rather than religions, so let’s throw beans to chase the evil out and hope for a quiet and peaceful home and year for everyone.

One year of ochazuke…

Last winter you could see that I discovered having a thing for ochazuke. This thing suddenly arrived when I was stuck at home with a pneumonia and I thought it may be temporary until I fully recovered, but it continued on… so I thought then when winter would be over, but not even… it has lasted a whole year and ochazuke has been on my table many many times and not only on chilly days!

The generous bowl with rice (brown or white are equally delicious) topped with a few vegetables, a pickled plum, sesame… and finished by pouring dashi or something of the like on top has revealed to be a very handy lunch fix for busy days. Indeed since telework is our new way of working, it is more than often that lunch breaks are short or that mine and A.’s do not coincide well. Fixing my lunch in a snap is then paramount and ochazuke are great for this. Rice cooked in advance or by itself in the rice cooker, dashi gently boiling on the stove for a few minutes, a handful of seasonal vegetables, that all needed. Sometimes when I am even more busy than usual it’s simply one of our homemade umeboshi that serves for everything.

For the dashi I mainly use a mix of katsuobushi and konbu, sometimes dry shiitake, less often only konbu, or a bouillon with pork filet cooking juice. For the vegetables, whatever is in season is good!!!

Such simple lunches are really great because they are light and nutritious and allow me to work very efficiently in the afternoon!!! Below is a selection of my favorite! What’s yours???

All time classic: shiitake & spinach
Komatsuna, radish and a bit of pork fillet
Komatsuna and umeboshi
Grilled sweet potato and mizuna
Grilled lotus root and umeboshi
Lotus root and korinki
Late summer version with kabocha and black sesame

Quick! Quick! A little pie!

This is the time of the year when work gets busy with graduation thesis to read, budget to close, new contracts to search for, and plans for the new term to make. Every year it comes inevitably, together with the excitement of new things in preparation and the sadness of seeing students wrapping up their research before leaving the lab. It also coincides with the short season in Japan when seasonal food variety is at its lowest level (while we can’t complain much because even at its lowest it’s plenty!!): chinese cabbage, leeks, sweet potatoes, burdock, turnips and spinach are the main staple and it has been such for quite a bit now… of course there has been occasionally mizuna, shiitake and a few others but they are scarce and it is a few more weeks before we start having some spring greens. Hopefully on the fruit side, citrus fruits of all kinds, yuzu, lemon… come to light up savory recipes, and hassaku 八朔 from our tree make our breakfasts and desserts bright! Strawberries are also slowly getting towards their pick season.

After having prepared all kind of recipes with spinaches, I was wondering if dinner would be another quiche, another ravioli, when I was reminding myself my last travel, that is now more than a year old… travel Malta, the country of the delicious pastizzi tal pizzeli. Green peas are far from being in season but why not trying something with spinach and a bit of pork meat??? The idea was immediately approved by A. and I started cooking. Time was shirt and puff pastry is not a recipe I master well, so I opted for a rough puff. The overall preparation was quick, cooking not too long and the result was delicious tasty savory pies. I am so pleased with recipe that I can’t help sharing it!!!

Savory spinach pies (6 individual pies)

For the rough puff pastry

  • 120g of flour
  • 100g of butter
  • A bit of water

For the filling

  • 5 bundles of spinach
  • 1 large onion
  • 1tsp of ground cinnamon
  • 1 pinch of ground cloves
  • Salt and pepper
  • 100g of ground pork meat (optional)

Start with the preparation of the filling. Peel and cut the onion, wash and cut the spinach. In a slightly greased pan cook them at low heat. If you use the meat add it also. Cook while stirring once in a while until the vegetables are soft but not golden. Add salt, pepper and the cinnamon and clove. Stir well.

Then make the pastry. Cut the butter in small blocks. Knead very roughly the butter and the flower without incorporating the flour in the butter. The butter should stay in small blocks. Fold and turn 4 times like for puff pastry, but without waiting. Roll to a 2mm layer.

Cut 12 squares in the dough of aout 12cm -15cm. In 6 of them put 1/6 of the filling each. Cut or not the remaining 6 pieces of pastry. And cover the 6 filled parts, seal with a bit of water. Bake at 200deg until golden. Eat right out of the oven!!!

Surimi – すり身

What the heck?! you may think…

When you hear the word “surimi” you probably think about this disgusting white or orange industrial thing they sell in supermarket, I would definitely at first. I have never eaten any so I don’t know how it tastes like or feels like but my surimi looks quite different… it is made of ultra fresh fish flesh and based on cha-kaiseki classic recipe.

Indeed! That’s what surimi was before it turns into a super processed food: a classic Japanese recipe, made of local products and seasonal: cooked seasonal white fish flesh, without bones, egg white, and tororo (grated yam). It is used in cha-kaiseki cuisine to make fish cakes, fish balls, kamaboko 蒲鉾, satsuma age さつま揚げ, chikuwa 竹輪… I remember making surimi at my first cha-kaiseki class, with my mother. That’s shen I realized the meaning of “surimi” when seeing written in Japanese for the first time: すり身, which is literally squeezed body. Just like the sesame powder: surigoma すりごま, or the mortar used to make surigoma and surimi: a suribachi 擂鉢. The preparation is ultra simple and the result quite versatile. So here is one adaptation of the classic recipe to make some fish balls.

Surimi (2 servings)

  • 100g of white fish (I used flounder)
  • 1 egg white
  • 2tbs of grated yam (optional)
  • 1/4 leek

Cooked the fish as you like: poached, grilled… everything is fine. Remove bones, skin… In a mortar, squeeze the fish, add the egg white and continue stirring and squeezing to obtain a paste. Add the tororo (grated yam) if you use some and continue until the paste is homogeneous. That’s the raw surimi!

Wash and cut the leek in small pieces. Add to the mix. Make balls and cook them in a greased pan, I put them on skewers but it’s not mandatory. That’s it!!! Anc have a good

More of the little red beans!

I hesitated in doing an adzuki week but thought I would come dry of ideas quickly except from the many sweets… but we don’t eat so many. But discovering more and more recipes, maybe I should have had… another time!

So to change a bit from sweets I wanted a savory recipe to test and when browsing a Japanese cooking website I discovered recently I was immediately convinced that it was a perfect recipe for me: brown rice, sweet potato and adzuki! The simplicity of the ingredients, the seasonality of sweet potatoes 🍠 and the timeliness of me buying and cooking adzuki for the first time. (Really!! Can you imagine it took me 16 years to buy dry adzuki and cook with them!!!!)

The most common and popular recipe of savory adzuki is probably sekihan 赤飯 or literally red rice. The rice used for this preparation is usually mochi rice (sticky rice). It is served topped with black sesame and salt. It is often served for special occasions, but I think the most often I have had it was in bento bought in Tokyo or Ueno station… so for me it’s associated with train travel! 😉 That could still count as special occasions, more now that we haven’t traveled for a year, neither plane nor train… As I don’t buy normally mochi rice (but that too may change soon…) this option of recipe was excluded. Of course using regular Japanese rice would work too by slightly steaming longer… but the idea of adding sweet potatoes was just too tempting, I love sweet potatoes so much!!! So here is the recipe, easy as can be and each ingredient perfectly balanced and the flavors harmoniously enhanced. You can replace the brown rice with white rice, but it will change the texture balance of the overall. Taste will still be ok of course!

Sweet potato and adzuki rice (2 servings)

  • 1go (150g) of brown rice
  • 10-15g of dry adzuki
  • 1 sweet potato (not a big one!)
  • a pinch of salt
  • a pinch of sesame seeds

Rince the adzuki, set in a pan (that can be used for cooking the rice as well, so non sticky is nice), and cover with 1.5cm of water, bring to a boil and boil at medium heat for 5min. Wash and dice the sweet potato. Add the brown rice and the sweet potato and the salt to the adzuki pan, stir a bit and cover with water to obtain enough liquid to cook the brown rice (that will depend on your pan, your cooking range and the lid you are using. I usually add water to double the height in the pan, plus a bit for brown rice, but I do every thing about). Cook under a lid at low heat until the liquid is all absorbed and the rice is soft. Serve and top with a bit of sesame seeds.

Kintsuba

Sorry for the delay! I was hoping to publish it much earlier but then I got busy with work and I am struggling with wordpress and jetpack… technical issues that are getting more and more annoying.

So to continue with adzuki, there are a few more recipes I would like to share, and as promised on IG, kintsuba was one of them. It’s a slightly more elaborated recipe of wagashi than those with just anko and mochi or shiratama. I like it very much for the variations that exist, it can be with sweet potatoes, including walnuts etc… so many options… I like it also for its very graphic visual. It’s a little square “cake”. Kintsuba consists of a soft and melting jelly and a thin cooked skin. Making kintsuba is simple but takes a bit of rest time as it uses agar agar and it takes 2h for it to solidify. Then there is a frypan cooking step to finalize them. But they are really delicious and worth trying.

Kintsuba also uses an ingredient that is often used in Japanese sweets: shiratamako. It’sa kind of rice flour but made from cooked mochi rice.

Kintsuba (4 pieces)

For the beans jelly

  • 100g of tsubuan or anko
  • 25ml of water
  • 1g of agar agar

For the skin

  • 25g of wheat flour
  • 5g of shiratamako
  • 60ml of water
  • A bit of cooking oil to grease the pan

First of all the jelly. It’s quick to make but as I said it takes about 2h for the agar agar to stiffen so better do this step ahead. Once you have the rest is rather quick.

In a pan heat the water and the agar agar, stir well, when it comes to a boil lower the heat and continue stirring for 2min. Add the anko or tsubuan prepared before hand as in the recipe here. Continue stirring for 5min at low heat. Then move the paste into a dish that is square ideally. I use a Japanese tofu and jelly stainless steel dish for that specific use (see below picture). The jelly should be 1-2cm thick in the dish. Let cool down and refrigerate for 2h. That’s it for the jelly. You can eat it once it has stiffen as a jelly.

Once the jelly is stiff, take it out of the fridge, cut it into 4 pieces of 4x4cm approximately. In a bowl mix the ingredients for the skin. If you use shirotamako, you will need to crush it to powder it. It’s very easy. Stir well. Heat a fry pan and grease it. Now dip one face of a square in the skin dough and put this face down in the pan. Cook until that side is dry and no longer sticky. Repeat for each side. If you think your skin is too thin, apply a second layer. You can eat right away or keep a few days in the fridge.

Proudly powered by WordPress | Theme: Baskerville 2 by Anders Noren.

Up ↑

Verified by MonsterInsights