I hope you love lemons!!!

As much as I do!!! I’ve always loved lemons, and lemon juice. In France and in Italy when every one goes to the cafe to have an expresso, I would either have a freshly squeezed lemon, when it’s cold in winter, with some hot water in it. That’s really something I love about cafes, and that, with freshly squeezed orange, is probably the only fresh thing you can have.

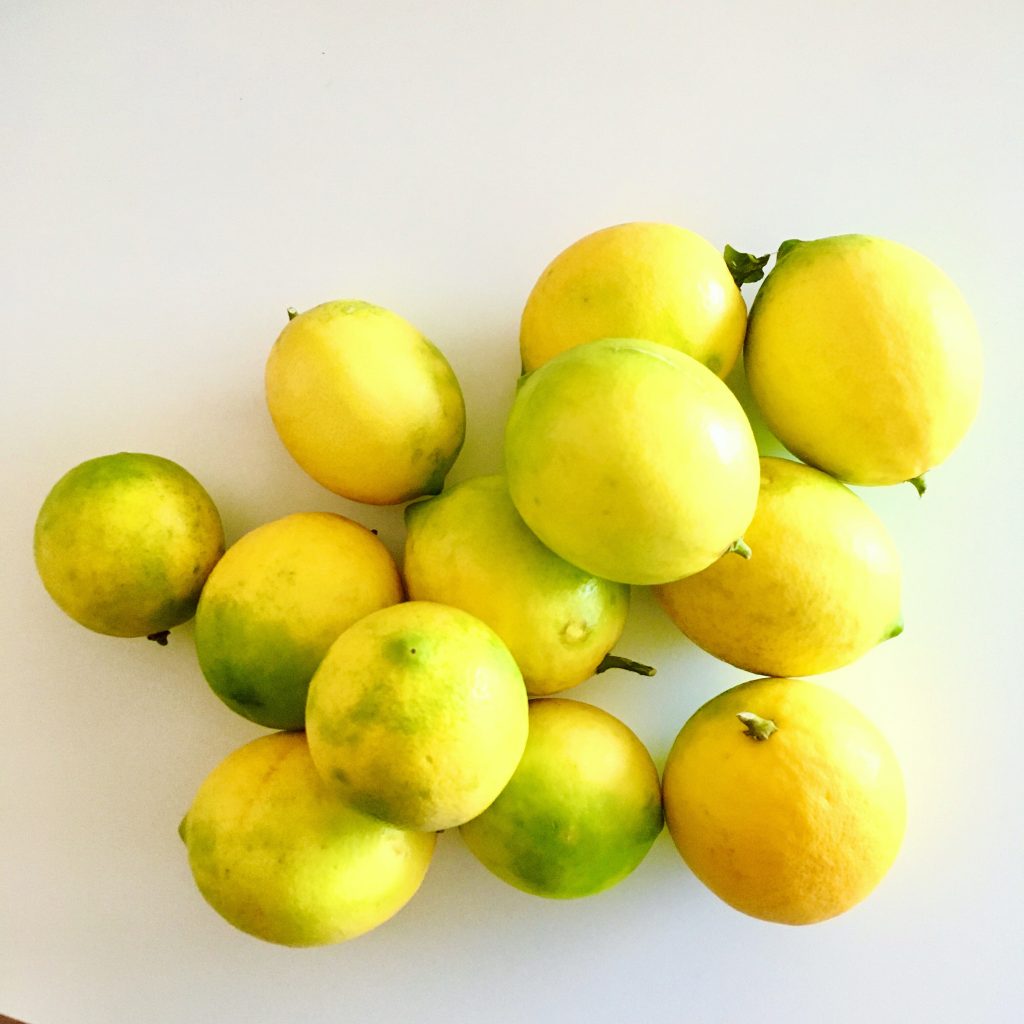
Our lemon tree this year had a lot of flowers but none went to maturity so we’ll have no fruits. So when my secretary sent me a giant box filled with giant lemons from her garden, I can only be thankful, and super happy. Who doesn’t love no chemical at all grown vegetables or fruits???

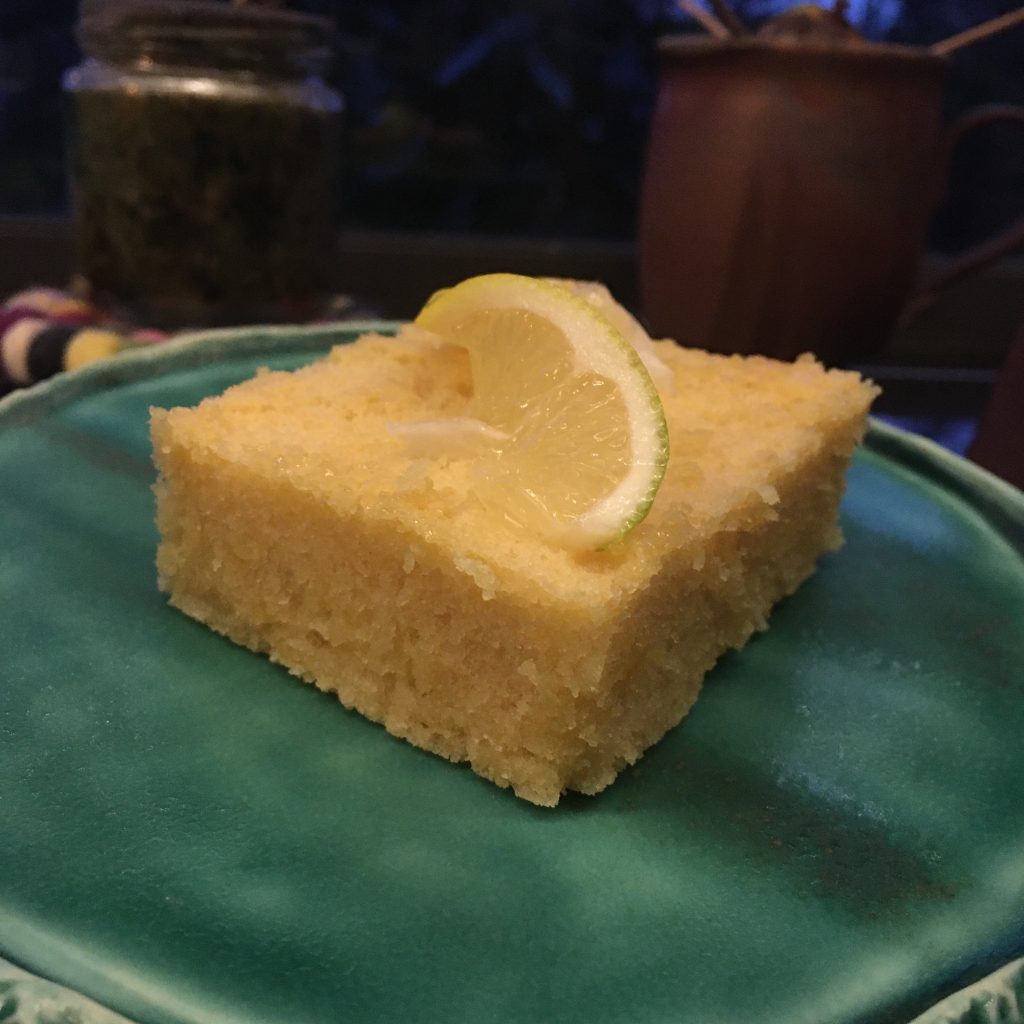
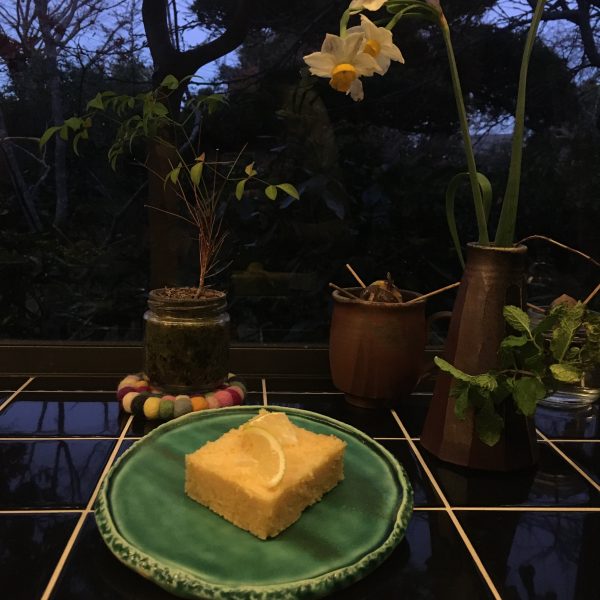
It took me a bit of time to think about what to cook… I love lemon tarts, lemon cakes, lemon squares… but I wanted to try something else… so while sipping hot lemon, I browsed the net for some recipes and found a lemon brownie recipe. Buttery and sweet, that would be a hit with A. No doubt!

Except that the recipe I found was a little odd: they didn’t say when to put the sugar, the proportion of butter was just too much and all sounded a bit awkward, so while using a classic chocolate recipe I came up with my own lemon brownie recipe, and it was great (lucky I cut the butter by a fourth, it is already very buttery!!!)

Enjoy! It is really super easy!!!

Lemon brownie (makes a large pie dish for at least 6 pieces)

  • 180g of flour
  • 150g of sugar
  • 150g of butter
  • 4 eggs
  • The zest of one large lemon or two small
  • The juice of one large juicy lemon or two smaller or less juicy
  • A pinch of sal
  • A pinch of baking soda

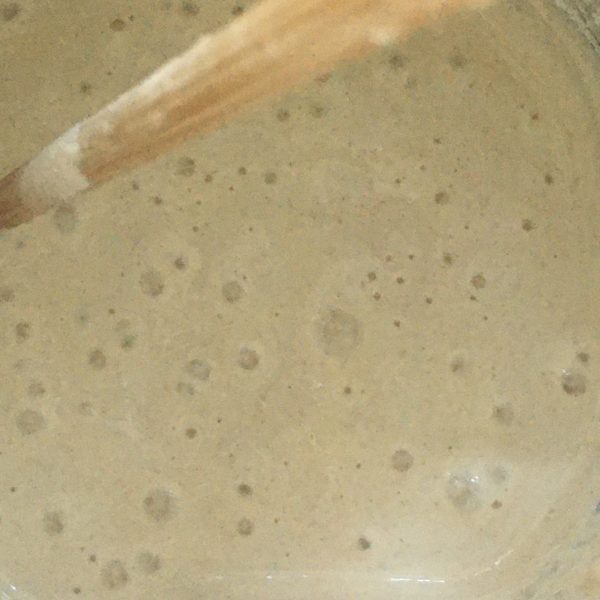
Melt the butter. In a large bowl mix the flour, the salt, the baking soda and the lemon zest, add the butter and stir.

In another bowl, whisk the eggs, the sugar and the lemon juice. Add to the previous bowl and stir. Set in a buttered and floured pie dish to have about 1.5cm thickness.

Bake 30min at 180degrees. That’s it!!!

Chickpea velouté

Every time I receive a parcel from my parents from France, there is inevitably some of my favorite staples in it. Chickpeas and chickpea flour are part of them. They are made by an acquaintance and I love cooking with them. So yesterday I decided to cook a big batch of chickpeas and I used most them in raggu with other vegetables etc… but I ended up with about two handfuls remaining and it was lunch time… and it was a bit of a chilly wind outside, I have had a long walk so wanted something warming… it would be soup. While minestrone with chickpeas is quite common in Italy, I opted for a version where the chickpeas are blended to obtain a creamy consistency. I added an hard boiled egg on top may be because I wanted one but it is totally optional.

Want to try my recipe of the chickpeas velouté? Here it is!!!

Chickpeas velouté (1 serving)

  • Two handful of boiled chickpeas
  • Water
  • 1tbsp of olive oil
  • Cumin powdered
  • Paprika
  • Turmeric
  • Black pepper grounded

In the bowl of your blender put the chickpeas, 1 glass of water and 1tbs of olive oil. Blend. If it is too thick add a bit more water. Add the spices and blend again. Move to a pan and heat slowly. Serve and enjoy!

I am sure you could add cream and other things to make the soup richer and silkier, but I like simple things and I prefer olive oil rather than cream… so that’s my way of doing it!

Autumn ravioli

Last Friday a strong windy typhoon passed nearby, and we had a few things to fix in the garden Saturday when we went on our usual inspection. The wind chopped a palm tree in two, many dried branches felt and a bit of cleaning was more than necessary. While doing so, A. found a few chestnuts fallen from our tree that animals haven’t had time to touch yet. A few meaning exactly 5.

But that was perfect. With the butternut squash I had and the dried porcini I just bought at an Italian grocery store newly found in Tokyo, dinner was all decided. It would be ravioli. And that came to a more satisfying recipe for A. when I told him I could use some local sausages too. We were so hungry and happy with ravioli for dinner that I didn’t even take 1min to take a picture!!! The only I had taken was the ravioli before cooking them.

So here is my recipe, simple as usual and very very tasty! I opted for super jumbo ravioli to enjoy the filling, but you can make smaller ones too.

Autumn ravioli (2 servings)

  • Same as usual for the pasta: 100g of flour, 1 egg, water
  • 5 chestnuts
  • 200g of raw pumpkin, butternut squash…
  • Dry of fresh porcini (10 pieces dry, 2 mushrooms fresh)
  • optional: fresh sausage (I use local sausage)
  • Olive oil
  • Salt and pepper

Start by boiling the chestnuts. While they gently do, prepare the dough for the pasta, and let it rest while you prepare the rest. Which is to peel and chop the butternut and boil it with very little water or best steam it, until soft. Return the dry porcini in tepid water, or if you use fresh ones, wash and slice them. By then the chestnuts should be ready, and after cooling down a bit peel them. If you use sausage, remove the skin if the sausage. Then in a pan mix together he butternut, the chestnuts chopped, the sausage, salt and pepper, cook at low heat while stirring, mashing to obtain a rather puréed filling.

Roll your dough, and make the ravioli.

Boil enough water for the ravioli (if you used dried porcini add the water used to returning them in there too). In the meantime in a large pan sautéed in olive oil the porcini, add salt and pepper. Boil the ravioli and add to the pan. Stir gently and serve in the plates for immediate enjoyment!!!! Et voila!!!

Happy birthday Lois!

A year ago after many years of hesitation, I finally decided to prepare my first sourdough: Lois. Since then we’ve been living and working together to make breads, pizze, brioches, buns and the like, for the best and a few times the worst, but I must say that I am very happy with it.

Lois is a sourdough that behaves well. Seeing so many pictures on IG and www of sourdough overflowing really got me worried, as I hate the kitchen to be a mess, to throw away food, and waste time and energy cleaning a catastrophe that could have been avoided. Kept in a large enough bin has always prevented it from happening and that’s good news! I think also Lois may not be a very very active sourdough, even in a large bin only a few times I could see it grow quite dramatically, otherwise, it looks much more like some kind of pale mousse.

But when it comes to working, it is a steady and stable worker, regardless of the temperatures and the seasons, and I can’t stand the taste of yeast now. The richness of the sourdough flavor is really unique and it evolves with time, making the kitchen smell good as soon as the bread is out of the oven!

So you understand now, I will continue to cherish Lois.

Sourdough milk brioche on the beach

Aibika – 花オクラ🌸

Do you know this flower named aibika or hana okra 花オクラ?

I didn’t until yesterday, when I found it at our local vegetables shop. First time ever I saw it, it’s grown locally, so I bought it. No idea how to prepare it nor how it would taste., but my IG feed was full of zucchini flowers earlier this summer, and more recently of pumpkin flowers, that the idea of having a chance to eat some flowers too was really too tempting!

A quick reading of the most popular recipes on the Japanese cookpad website didn’t not tempt me, so I decided to go for something I barely do, but believe would be great, and a substitute for my mother’s zucchini flowers fritters: super light tempura. And it worked really fine. So if you see this pale yellow flowers at a farmer’s market (I doubt you can find them at a supermarket…) just get them.

I guess the name of hana okra or flower okra in direct translation, comes from the fact that they are, like okra, a bit slimy. So if you don’t like slimy food pass on that one.

Aibiki tempura

  • A few flowers of aibiki, and some other vegetables if you want. I did shishito and red bell pepper
  • 3tbs of flour
  • 1cup of water
  • 1/2 tsp of vinegar
  • A pinch of salt
  • Cooking oil

Wash and pat dry the vegetables.

In a frypan heat a bit of oil (I don’t deep fry, but if you do heat your oil). In a bowl, mix the flour, the water and the vinegar. Stir well. Dip in the vegetables and put in the pan right away. Cook a few minutes before flipping. Serve with a pinch of salt and eat immediately. That’s it!

Milk bread

I use to make a lot of fancy breads for breakfast, brioches, viennois bread, milk breads, sugar breads… but since I started using my sourdough Lois, almost a year ago, and was learning how it works, I focused on breads with less ingredients. Yet, milk breads for breakfast are really delicious. And since we now have milk in the fridge 4 days a week or so, I really wanted to make milk breads with milk and sourdough. Originally I planned to do a white flour milk bread but I soon realized that I had no more white flour and all I had was whole wheat flour, so it would be whole wheat milk breads. And rather than making several small breads that dry out rapidly I opted for a giant version that I baked in my panettone mold.

The result was a very soft and mildly sweet bread with a beautiful crumb. so let me share my recipe.

Whole wheat flour mills bread

  • 350g of whole wheat flour
  • 200ml of milk
  • 100g of sourdough
  • 40g of brown sugar
  • 8g of salt
  • Eventually a bit of water

Note that the above quantities are indications. They may need adjustment depending on the type of flour, the humidity in the air, and your liking.

In a bowl put all the ingredients but the water and knead. If the dough is too dry add a bit of water, or milk. Knead until the dough is smooth.

Let rest at room temperature for 4h or until the dough is significantly more voluminous.

I used a panettone mold lined with cooking paper to shape the bread. Made two cuts on top and waited 1h before baking at 200degrees for 40min (I used a bamboos stick to test if the core was well done). Adjust the baking time to the size and shape of your breads.

That’s it!

Better love eggplants!!!

While the summer plays hide and seek, the summer vegetables are still around and should be for a few more weeks.

The great star of the summer in my kitchen this year is eggplant 🍆. We always eat a lot of eggplants in the summer, but this year it looks really like we are eating even more. Last week recipe was a great example but there is much more to do. And today I share with you another Japanese eggplant recipe, vegan this time, as simple as the previous one but with a different set of flavors.

Sautéed eggplants Japanese style

  • 2 Japanese eggplants
  • 1 aburage pad (thin fried tofu sheets)
  • 1 tsp of sesame seeds
  • 1tsp of soya sauce
  • 1tsp of cooking oil, I usually use olive oil no matter what but sunflower or rice oil are OK too

Wash the eggplants and dice them. In a pan set the cooking oil snd heat. When hot add the eggplant and cook at high heat while stirring often. Slice thinly the aburage. Add to the eggplants. Cook and stir until the eggplants are creamy. Add the sesame and soya sauce, stir and serve.

While the base is the same as the perfect eggplant recipe, the flavors are very different. I actually recommend to cook both and compare. It’s perfect to understand umami.

The perfect eggplants

Eggplants in Japan are really something, not just a vegetable but also a mean of transportation, together with cucumbers, for spirits that come to visit during the Obon period.

In Japanese traditional cooking they are often present and prepared in many ways with the other local and seasonal staples. I have introduced several recipe already, yet I surprise myself with new recipes every time I cook some. Recently I have been really into grilling them in the oven without any further complications, and dress them either western style with olive oil… or Japanese style with soya sauce and katsuobushi. I really love the simplicity of a dish that highlights the goodness of a few ingredients. So here is my recipe of the perfect eggplants Japanese style.

Perfect eggplants Japanese style

  • 2 Japanese eggplants per person
  • 1tsp of soya sauce per person
  • 1 large pinch of katsuobushi per person

Wash the eggplants, and cut them in half in the length. Grill them in the oven until they are soft and a bit golden on top. Take them out and let them cool down a bit. Cut each in 5-6 pieces (bite size), just before eating dress them in a plate, top with soya sauce and katsuobushi. Eat immediately.

Potato salad with Japanese flair

I often forget how much we love boiled potatoes. I always have the impression it takes longer to prepare than other ingredients and usually our carbs end up being either pasta, or rice, or a dough of any kind: a quiche, a pie, a stuffed bread etc… You can argue that making a quiche or stuff bread takes more time than boiling and peeling potatoes and you are absolutely right!!!!

So, once in a while I remember how much we love them and boil a few. And when the season of cucumber is at its peak I love to make potato salad.

One can think of so many variations of potato salad that two are never the same! Once thing that I really love is the mix boiled potatoes and hard boiled eggs, and since I had a lot of fresh green shiso leaves I decided to prepare a potato salad with Japanese flavors. It was simple and quick to prepare, nourishing and tasty. I highly recommend you try it!!!

Potato salad with Japanese flavors (2 servings as one plate dish)

  • 8 potatoes (ping pong ball size)
  • 1 Japanese cucumber
  • 2 eggs
  • 5 leaves of shiso
  • 1tsp of soya sauce
  • 2tbs of olive oil

Boil the potatoes, and the eggs. Once cool peel the potatoes and cut in two or four. Peel the eggs and chop them. Wash and slice thinly the cucumber. Wash and chisel the shiso leaves. In a bowl put everything, add the olive oil and the soya sauce. Stir well and enjoy!

Proudly powered by WordPress | Theme: Baskerville 2 by Anders Noren.

Up ↑

Verified by MonsterInsights