Bread in a pan…

Who would do that honestly???

I never thought I would… until we moved to our new apartment where the kitchen doesn’t have an oven yet and we are still not sure about the renovations we want to do and given the circumstances we prefer to wait a bit… I don’t see myself stopping telework, I’ve always loved it… and always hated train commute. Nor spending the whole week in the country, it would be too tempting to go surfing and work in the garden instead during the day… and I would start working at night…

So, no oven… I’ve tried to bake bigger breads on Sunday but they are so good that they barely last until Wednesday morning in the best of the best scenario… the rest of the week, I make pancakes… but I get board of plain pancakes, and nothing is better than bread (but croissants and pains au chocolat… but honestly they are just air and they feed us enough to not starve 2h later… and lunch is usually more 4 or 5h later…

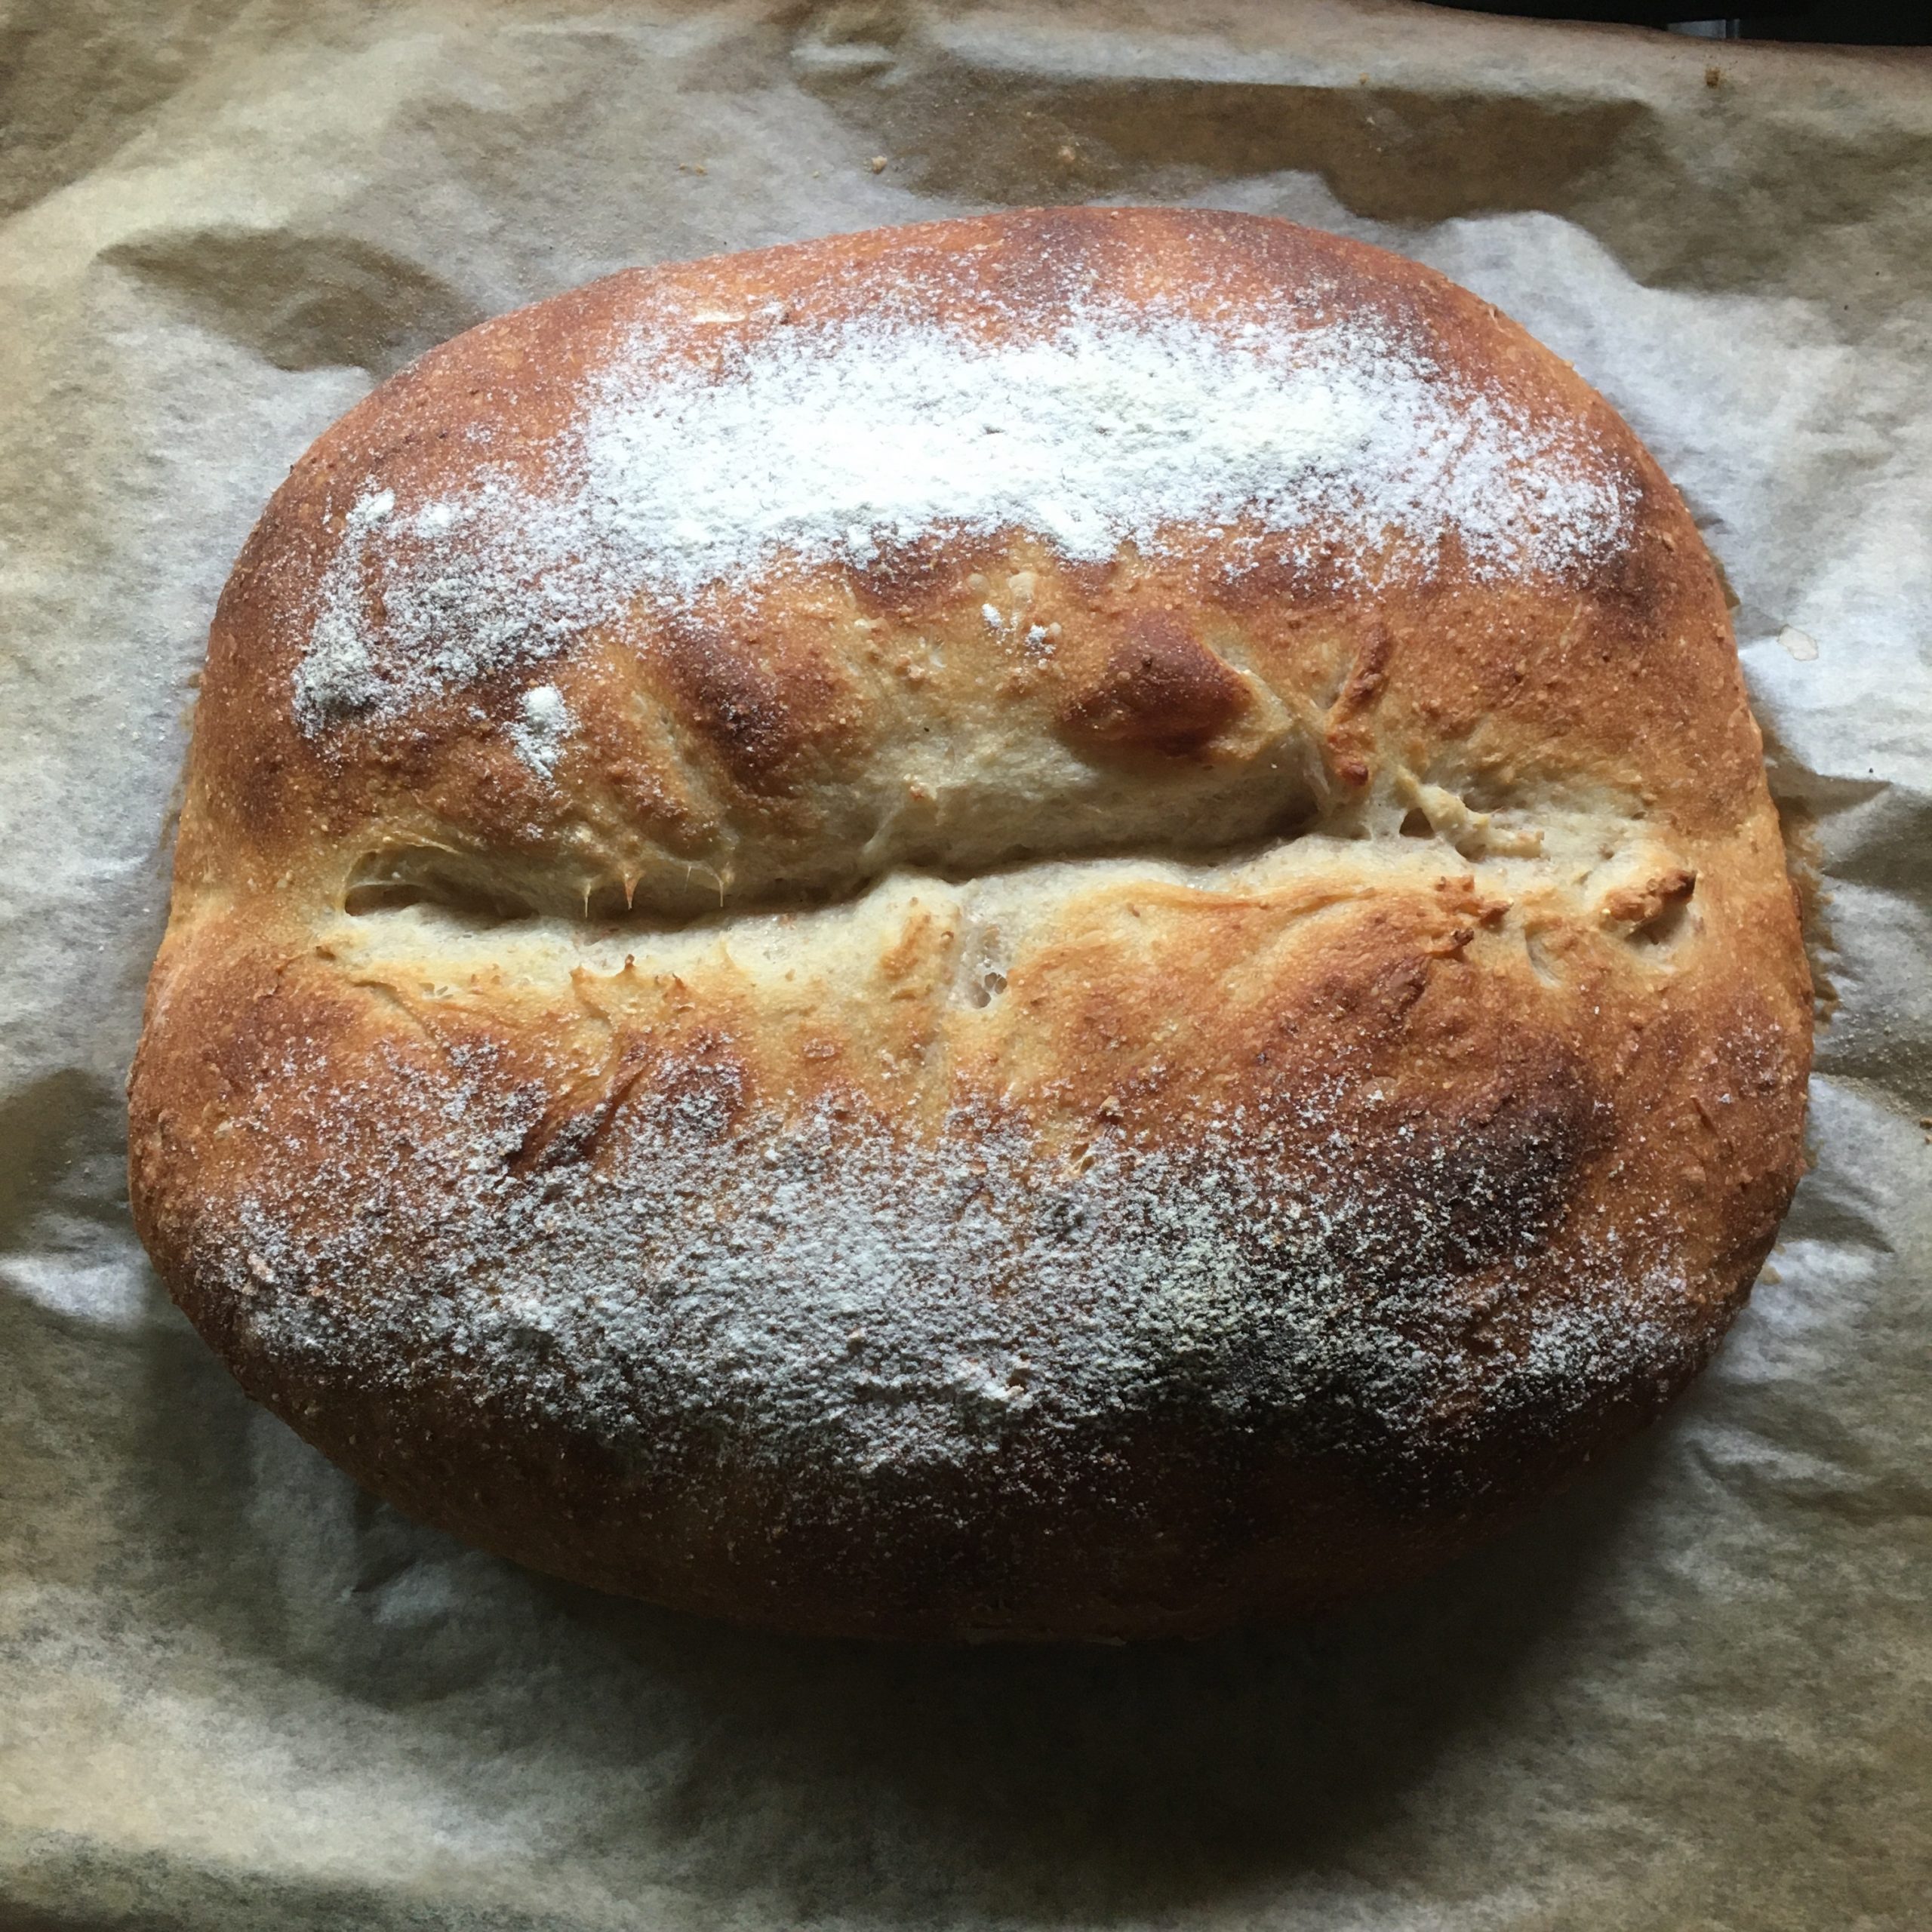
Bread is the only option and I remember seeing recipe of breads in crockpot, in cocotte… so I was tempted to try. In Tokyo I have neither crockpot nor cocotte. I have a pan with a more less fitting cover… more less because my pan once felt and since then it is more an ovaloid than a perfect circle!!!!

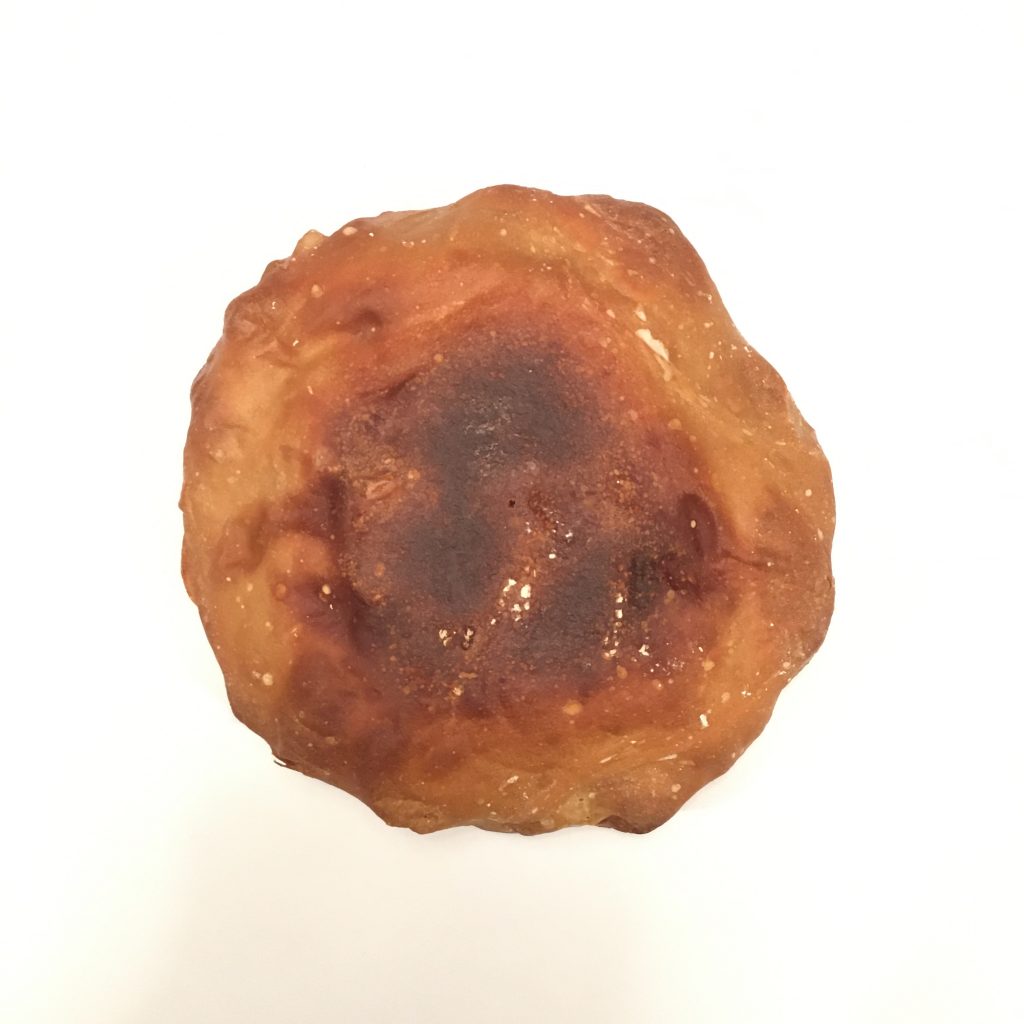
The bread making and kneading is just the same as usual. The rest time also for the first rise. For the second I read that it can be done while the pot is heating, and I tested the first time, but for me it didn’t work, so I just shaped my bread as a ball, laid it on kitchen paper in the pan and waited 1h. Then turn on the gaz rather high and covered and cooked until the bottom was golden. Then I flipped the bread and cooked on the other side. It avoids the thick crusty bottom and the risk of heart of bread not well cooked, and that’s what made my second pan bread perfect.

Cooking bread in a pot may not seems straightforward but it works very well… and I was surprised about it!!!

Sansho – 山椒

This shrub looks like nothing particular in the garden, yet it bears fragrant leaves and fruits. It is sansho -山椒 or Japanese pepper.

I planted the tree the very first spring we started our kitchen garden, and without failure it has produced the fragrant leaves we often eat during early spring with bamboo shoots, and later in June the little tiny fruits that are so recognizable in Japanese cuisine. The shrub grows steadily and the fruits are very fertile meaning you have sansho in the garden and don’t harvest the fruits, they will quickly sprout everywhere! So I devoutly harvest them for our own usage and to give away.

I particularly love one recipe of sansho that comes from shojin cuisine. It just blends the typical Japanese flavors or soya sauce, sake and konbu with sansho. It is very simple to prepare and can keep forever in the fridge. Which means you can harvest your sansho, prepare this recipe and eat sansho all year round until the next harvest. So here is the recipe. I love it with plain white Japanese rice and dry chirimen.

Sansho preserve

  • 1/2 cup of fresh sansho seeds
  • 1/4 cup of soya sauce
  • 1/4 cup of sake
  • 8 pieces of konbu of 1.5×1.5cm

Wash the sansho and remove the stems. Put all the ingredients in a small pan and cook at low heat under cover until the liquid is just enough to keep everything moist. Let cool down. Put in a clean jar and keep refrigerated. Use whenever you want. Isn’t that sinple!

June berry ジューンベリー

When I thought I had tried most berries that exist in Japan, our friends challenged me with a new sort!! The other day Y.-san arrived with a cup full of small dark red berries that looked a lot like dark red currant… so when he said in Japanese “we just harvested june berries, so here are some for you” I took a brain short cut and assumed that june berries in Japanese was the name for red currant. And since my oven was turned on to bake some bread and a quiche, I decided to make a tart with the berries. I prepared a thin crust with olive oil and rye flour, rolled it in a small pie dish, added a spoon of sugar (red currant would be sour…), and wash the berries and while admiring their dark red color, I was telling to myself how dark they are for red currant… well I baked until perfectly done and we ate the tart while still warm. You cannot imagine my surprise when we tasted it. Expecting the tart taste of the currants, slightly blurred by the heat and the sugar, I had in mouth a new flavor… sweet as the sweetest cherry but more floral and berry-like. It was the most delicate surprise!!!

So if you are as stupid as me and didn’t know about june berries, ジューンベリー, here is what a quick search told me about them. Apparently they seem to have been widely popular in the middle age in Europe, but they probably come to a disgrace, as I’ve never seen or heard about amelanchier (the proper name) until a few days ago. Too bad because not only the fruit is delicious, the flowers seem to be very pretty. They also seem to be rather popular in north America, and introduced to Japan for quite some time now. I’ve never seems them on market stalls of any kind, so I’m guessing that those who grow them keep them for themselves. And it is so delicious that I don’t blame them! Now I dream of an amelanchier for our garden! And if you know anything about the june berries I’ll be happy to hear more about them. What to do with them expect pies and jam… and thanks S. And Y.-san!!!

Respectus panis

I’ve making bread at home now for what…??? 6 or 7 years… at first I started easy, not every weekend, just once in a while, now it is just part of my daily weekend routine, and even when I could I was baking bread during weekdays!!! I have tested all kind of recipes, followed the books, then went on my own, using my experience and feeling, and except croissants, that I still feel not confident making, I’ve never failed a brioche or a bread. Two years ago when I discovered breadin5, I understood some of what my experience and intuition were suggesting me: the bread making is not such a rigorous process for which quantities and time are that important. If you think about it billions of humans have been making bread for more than 20 centuries… so it wasn’t about 1g plus or more of yeast, or the exact temperature of water! Breadin5 showed me that we can be more playful with bread making, but last winter, my parents offered me a book about bread making “respectus panis” and what they were saying in this book was exactly what I was waiting for: less yeast, less salt, little kneading, long proving time. Well long at 18degrees so I had to wait until the warm weather was there to test properly, otherwise the house temperature is rather 15degrees or less and long would have mean forever!!! I finally did test the method. And I was not disappointed. With half of the regular amount of yeast and salt the dough takes about 12h to bubble well in the current situation, which will shorten as temperature increases, the bread is a lot tastier and enjoyable and keeps very well. I have tested only with some of my classic white bread and campagne bread and was really surprised by the result! I must say the campagne was a huge hit!!!

So now I can save on yeast, which given that recently it’s been hard to find baking powder and yeast, is definitely a good attitude!!! And I can’t wait to try again this weekend!!

Fava beans

Now is the season and it’s always a feast for me!!! Well… it wasn’t always like that, it took me time to enjoy fava beans but now I love them and I was thinking of doing a fava beans week like I did in the past for many of my favorite ingredients: 5-7 days, 5-7 recipes, but by the time I got to actually seat and write a post I realize I published so many pictures of recipes with fava beans on IG that in the end it wasn’t making sense anymore. So once again the fava bean week has been postponed… I decided to go with a summary of my favorite recipes, may in one or two posts.

One thing that took me some time to understand was how delicious fava beans or sora-mame in Japanese そら豆 are when simply blanched and pealed. I use to eat them whole (don’t get me wrong not whole whole right! Just the beans inside the pod!!!)… but after preparing some Shojin cuisine recipes some years ago, I understood the difference between pealed and not pealed fava beans, and I would never not peal anymore.

One of my favorite fava beans combination is with tomatoes. For some reason Isumi produces beautiful and delicious tomatoes. Very large and ripe ones, I love to cook them slowly with olive oil and reduced into a thick tomato sauce. They are sweet and tasty. Add a new onion to the preparation, soften by the long and slow cooking at low heat, and this is perfection!! If you have made tomato sauce last summer, my preparation is probably close to that, even thicker, so if you still cannot find proper tomatoes just use tomato sauce. I just then add blanched and pealed fava beans and use it for accommodating Japanese rice white and brown, or pasta, long and short or just a slice of made bread.

Tomato and fava beans topping brown rice

One other recipe is to use the fava beans as a base for pasta sauce. Instead of just blanching the fava beans I cook them a little longer so that they become creamy when pealed. Then mash them with olive oil, salt and pepper and add to pasta. Here I added a bit of smoked snapper.

Fava beans pasta sauce with smoked snapper

Finally, one of my favorite way of eating quinoa is to start as a soup, but let the liquid evaporate almost entirely and add plenty of vegetables from the start. I usually do this recipe in winter but spring is also good with all the spring vegetables, here a large tomato for the sweetness, a new carrot, and pealed fava beans and green peas. That’s it!

Have a good day!!!

Yama udo

One of the wild spring green I like to cook is udo or rather yama udo ヤマウドウ. It is a kind of long stick that likes to grow on steep road sides and is very easy to prepare, with a distinctive taste but not strong such that of fukinoto. One preparation that is really easy is with miso in miso ae. Usually I would blanched it to soften it a bit and remove its bitterness or tartness, but I realized while doing a bit of reading, that vinegar water would work as well, which for the lemon-miso ae I wanted to make was more than perfect. Indeed, while I am waiting for my lemon tree to bear fruits (I lost all last year in early strong winds and heavy rains), I found some delicious lemons at the local market. Hence, recently there has been a lot of lemon in my recipe, the lemon cake, lemon pancakes, lemon pasta… The vinegar miso ae is taken to a new level of rich flavors with the addition of the lemon. It works the same way as yuzu miso. That said my recipe today is really super simple, and if you can’t go to pick yama udo yourself or find some, you can try with regular udo. Its taste is much milder but that works very nicely too. And if there is no udo where you live, try with wild asparagus or green asparagus, that will work fine as well.

Yama udo with lemon miso ae (2 servings as side)

  • 1 udo
  • 2tsp of miso (I used my homemade miso)
  • 3tsp of vinegar (I used rice vinegar)
  • 1tsp of sugar
  • a little bit of lemon zest
  • a little of lemon juice (about 1tsp)

Peel the udo and cut in 3cm long pieces. Then slice vertically with about 2-3mm thick, then make sticks. Set in a bowl with water and 2tbs of vinegar for 15min.

In the meantime, in a bowl, mix the miso, 1tbs of vinegar and the rest of the ingredients. Stir well.

Drain well the udo and add to the miso mix. Stir well and serve. That’s it, really simple isn’t it?

I served it with grilled sawara (Japanese Spanish mackerel) and plain white rice.

Green peas

I love spring greens and new vegetables, but among them I love green peas more than the others probably. I love the taste and texture, the color and the versatility, but I also love to shell them, I’ve always had. I remember as a child how many times I helped my mother or my grand mother doing it… it’s the season when days become longer and warmer, the approaching end of the school year…

In Japan green peas are not sold by the kilo, rather in tiny amount, and used as a small green touch in rice or here and there. You don’t eat a plate of green peas… so it has always got me a little frustrated to only have a handful of green peas. Japanese prefer them snap peas, which I love too… but it’s not the same.

So when our British friend came to enjoy tea in our garden and arrives with 3 kilos of green peas he just harvested in his garden, I was as happy as could be!!! First because I wanted to eat green peas so badly, may be because the Maltese pastizzi were too good, and I haven’t found any yet at the local farmers, and because now I could play with peas for real!!!

Despite the classic recipes I love to make with green peas, I wanted to test new things… May be pastizzi themself if I manage to make a good puff pastry… but also I had some cornmeal sitting in my fridge (remember I keep most things in my fridge to avoid pest) and I wanted to cook something with it… a bit of digging in recipes with cornmeal made me lean towards croquettes, and adding peas and spices was the next thing that I found would be nice… or here is what I did plus a few recommendations to make them even better…

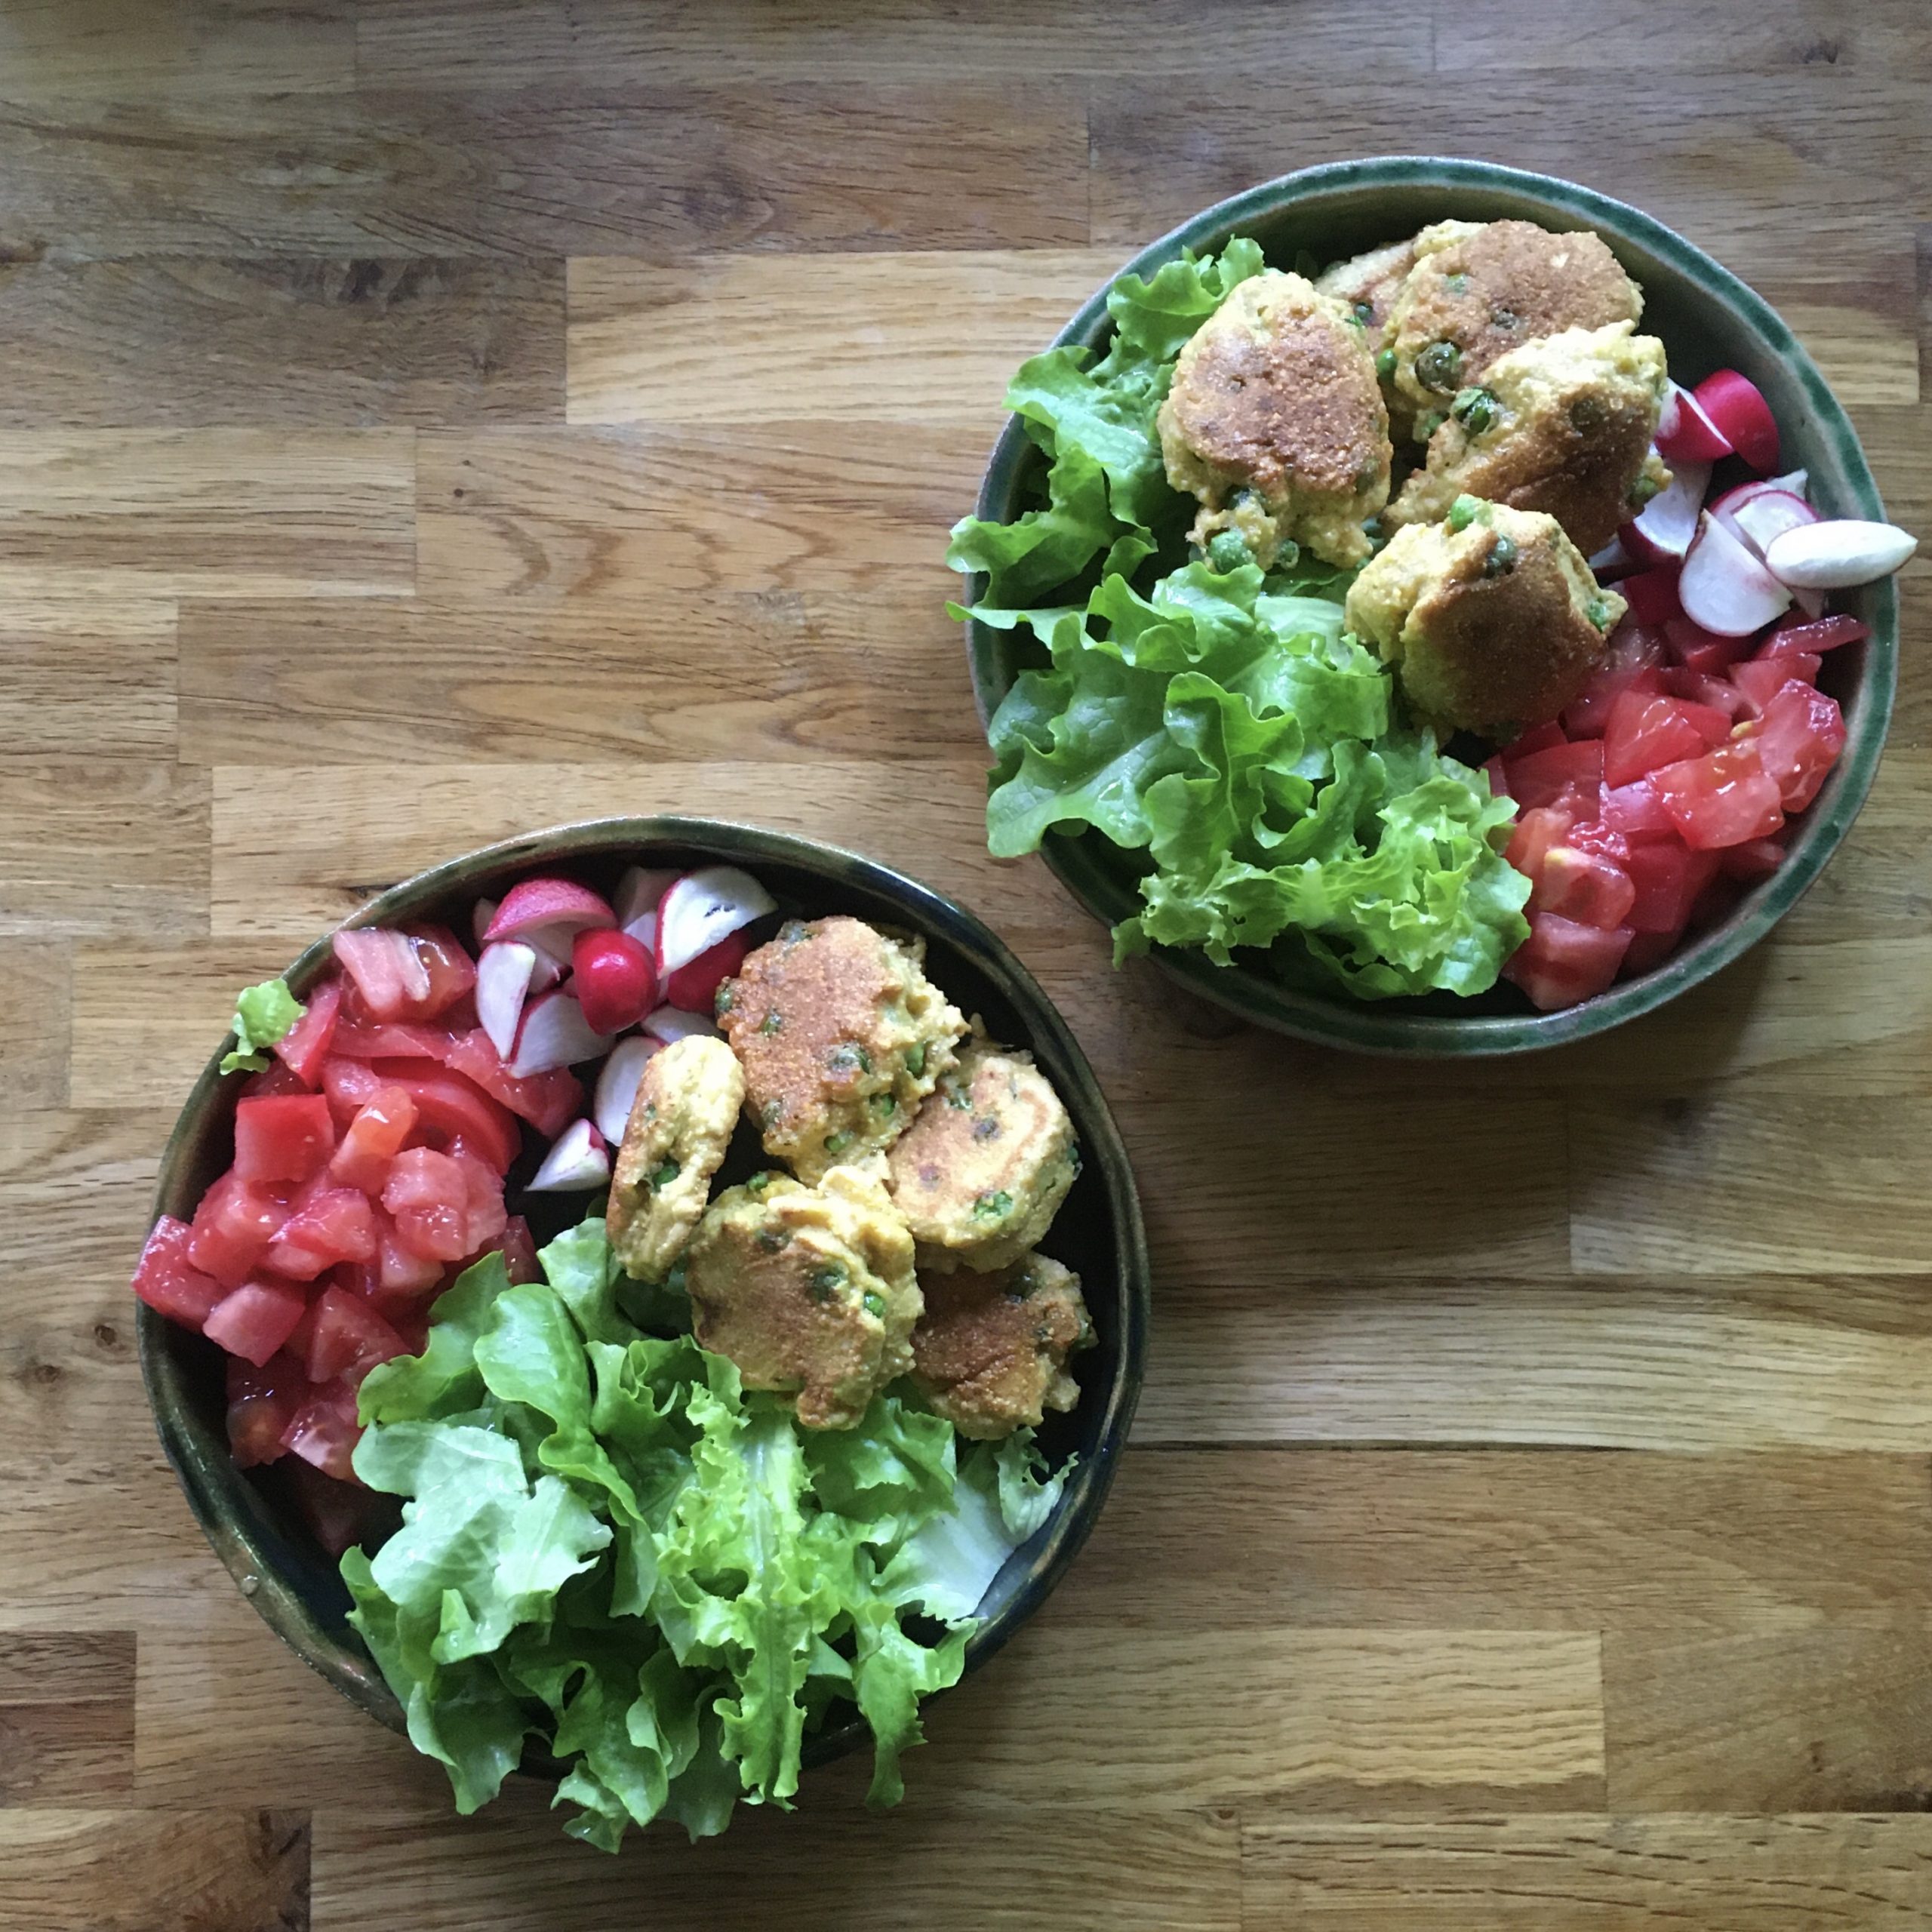
Cornmeal and green peas spicy croquettes
– 100g of green peas, shelled
– 150g of cornmeal
– water
– ground cumin
– a pinch of ground clove
– salt and pepper
– a bit of oil to cook the croquettes

In a bowl add the cornmeal and a bit of water and let rest while you shell the peas. This will soften the cornmeal and avoid the croquettes to be too dry. Then add the peas and add water a bit to obtain a paste rather sticky and hard. Add the spices, stir well and heat the greased pan. With two tea spoons set the dough in small mounts in the pan and cook until golden, then flip and repeat. You can either eat like this or make a tomato sauce or a yogurt sauce to dip them…


Have a good day!

Bamboo shoot again!

We are moving in our new apartment tomorrow, but getting everything ready and working doesn’t mean not cooking, we have to eat 😉 Luckily we are only moving vertically so it’s quite easy to go and meet with the workers in between two online meetings, and anyway we decided not to do a lot of renovations first rather wait to see how we live in that new place. Our main idea was that since we spend most of our week days at work and most of our weekends in the countryside, our Tokyo apartment was oversized, so we wanted a downsizing. Few people want to move to a smaller place but we did. So we found a smaller version without a guest room we decided to move… well that was before Corona and simultaneous telework, so maybe not the most judicious timing… but one has to take opportunities when they come!

What does moving has to do with bamboo shoots??? Nothing… it’s spring, the soft pink of the sakura season is over and made way to the bright pink and fuchsia azaleas, and bamboos are growing growing growing. I even saw some in Kitanomaru park during one of my daily walks. But as I said before, the season is very short, so it’s better to enjoy them without delay.

I presented in the past some bamboo shoot recipes but this week I came with a few more ideas and wanted to share them with you. Both recipe today are mixing Mediterranean and Japanese cuisine, and the key is a fragrant olive oil. The first one is a chickpeas and tomatoes ragu, the second is more of a leftover type of recipe. Indeed, because we’re moving I decided to empty the fridge and the pantry as much as I could. And because we’re moving also and our view won’t be as dramatic as the actual one I shoot a few more times my lunch plate with a view…

Chickpeas and bamboo shoots ragu

– 1/2 bamboo shoot

– 2 cups of boiled chickpeas

– 1 large ripe tomato

– a few capers

– fragrant olive oil

– salt and pepper

Prepare the bamboo shoot as usual by boiling it in rice water fir as long as it needs to be soft (a tooth pick should easily enter.

Boil the chickpeas.

Wash the tomato. In a large pan generously oiled with a good olive oil add the tomato roughly cut. Cook until you obtain a smooth tomato sauce. Add salt and pepper and the capers, the chickpeas, and the sliced bamboo shoots. Stir and add a bit if olive oil, serve and eat warm or cold. That’s it!!!

Leftover bamboo salad

– 1/4 of bamboo shoot boiled

– a handful of boiled chickpeas

– 2 large boiled potatoes

– 1/2 new onion blanched

– a handful of boiled green beans

– fragrant olive oil

– 1tbs of soya sauce

Cut the bamboo, the potatoes, the onion and the green beans, dress in a bowl. Add the chickpeas, the soya sauce, sone olive oil, stir gently and eat!!!

Isn’t that super easy???

Kwarezimal, my way

When we decided to go to Malta last winter I didn’t know what to expect… the history of the island is so much different than this of the neighbouring places such as Sicily and Greece… I imagined that the landscapes and the culture would overwhelm me with beauty and mystery but I didn’t expect that the Maltese food would have such a strong impact on me and on my cooking. More than the food, in general, it’s been breads, pastries and sweets that completely bewitched me. The mix of spices: clove and cinnamon more than any, the citrus fruits, the almonds, pistachios and hazelnuts, the dates, figs and honey… well I am still under the charm and cloves have made their way back to my pantry. When we were in Valetta our friends had in mind to test many of the pastizzi, so we stopped at several places to taste some and ended up rather full, but the kids didn’t seem that full, or the adults eat all the pastizzi and left nothing to them… ??? and so when after hours of walking up and down the city we stopped at caffe Cordina, they ordered some sweets. A. ordered Kwarezimal. At first, I wasn’t much interested in them but after a pause, my appetite was back and when she offered me to try I couldn’t resist. The small pastries attracted me, with the crushed nuts topping and the promise of a taste of honey. And yes, as soon as I had a piece in my mouth, there was something else on my to-do list of things to bake when back home. The one thing special at caffe Cordina is that their Kwarezimal is made from hazelnut powder and all the recipes I found afterwards were made with almond powder. The good point for me, it’s that it is a lot easier to find almond powder than hazelnut powder in Tokyo, the bad point is that the Kwarezimal I made didn’t match my experience at caffe Cordina, but it’s a good reason to try again with hazelnut powder, would I find some!

None the less the almond base treat was truly delicious. I used a combination of recipes I found on the internet to make my Kwarezimal and I was very happy with the results. Having eaten Kwarezimal only once in my life I cannot claim that they were true to the Maltese taste, but at least taste-wise and texture-wise it was delicious. So let me share my recipe here because not only it is delicious but it is super simple to make and vegan: no butter, no egg and no yeast or baking powder… I think it could easily become an energy bar for active days!

Kwarezimal (makes 8 pieces)

– 150g of almond powder (or hazelnut powder)

– 100g of flour

– 60g of brown sugar

– 1tsp of orange blossom flower

– 1tsp of cocoa powder

– 1tsp of cinnamon

– 1tsp of clove

– 1/2tsp of cardamom

– the zest of half an orange or any other citrus fruit

For the topping:

– a handful of crushed pistachio

– some zest of citrus fruit

– 3tsp of honey

Pre-heat the oven to 180 while mixing all the ingredients (but those for the topping) together. Add a bit of water if needed until you obtain a very dense and not too sticky dough. Cut in 8 and make oblong shapes slightly flatten on top (easier for the topping!). Set on cooking paper in the oven for 20minutes. As soon as out of the oven, spread the honey on top of each Kwarezimal, sprinkle the crushed nuts and zest. Let cool down before enjoying (it’s hard to wait, it smells so good!!!!!).

Proudly powered by WordPress | Theme: Baskerville 2 by Anders Noren.

Up ↑

Verified by MonsterInsights